
User's Guide

This document is subject to change without prior notification.
Binsfeld Engineering Inc. | 231-334-4383 www.binsfeld.com 869610-9_A2 Pg. 47
WIRING THE GAGE
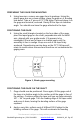
13. Tin each solder pad with a solder dot. (It is helpful to polish the
solder tabs, e.g. with a fiberglass scratch brush or mild abrasive,
before soldering.) Trim and tin the ends of the 4-conductor ribbon
wire. Solder the lead wires to the gage by placing the tinned lead
onto the solder dot and pressing it down with the hot soldering
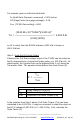
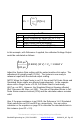
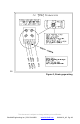
iron. Note: For single-stamp torque gages, a short jumper is
required between solder pads 2 and 4 as shown in the diagram
on the next page
14. Use the rosin solvent to clean excess solder rosin from the gage
after wiring. Brush the gage pads with the solvent and dab with a
clean tissue.
15. Paint the gage area (including the solder pads) with M-Coat A
polyurethane and allow to air dry 15 minutes. This protects the
gage from moisture and dirt. To further protect the gage, apply M-
Coat J protective coating for protection against moisture, fluids
and mechanical damage.