USER GUIDE Speakeasy Combo 2005 Twin Speakeasy Combo 2005 Triple Helpline (for UK only) Monday to Friday from 9:00am to 5:00pm Tel: 0845 345 9677 **Please note that all calls are charged at local rate Or visit our website: www.binatonetelecom.com THE CORDLESS HANDSET IS NOT DESIGNED FOR MAKING EMERGENCY TELEPHONE CALLS WHEN THE POWER FAILS, BUT IF THERE IS A POWER FAILURE, YOU CAN STILL USE THE BASE AND THE CORDED HANDSET TO MAKE AN EMERGENCY CALL.
TECHNICAL DETAILS Standard Digital Enhanced Cordless Telecommunication (DECT) 1.88 to 1.9 GHz (bandwidth = 20 MHz) Frequency range Channel bandwidth 1.
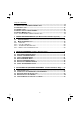
TABLE OF CONTENTS 1 IMPORTANT SAFETY INSTRUCTIONS ................................................................. 4 2 INSTALLING YOUR PHONE ................................................................................. 6 2.1 CONNECTING THE CORDED BASE STATION .............................................................. 6 2.2 INSTALLING THE CORDLESS HANDSET AND CHARGING THE BATTERIES .................... 7 3 GETTING TO KNOW YOUR PHONE .................................................................
Using the corded base: 4.10 MAKE A CALL ....................................................................................................... 17 4.11 MAKE A CALL FROM DIRECT MEMORY KEYS ........................................................ 18 4.12 ANSWER A CALL ................................................................................................... 18 4.13 ENDING A CALL ..................................................................................................... 18 4.
8 PHONE SETTINGS (Cordless Handsets Only)................................................... 25 8.1 DATE AND TIME SETTINGS ..................................................................................... 25 8.1.1 CHANGE THE DATE FORMAT ................................................................................ 25 8.1.2 CHANGE THE TIME FORMAT ................................................................................. 25 8.1.3 SET THE TIME .....................................................
1 IMPORTANT SAFETY INSTRUCTIONS When using your telephone equipment, basic safety precautions should always be followed to reduce the risk of fire, electric shock and injury, including the following: 1) Read and understand all the instructions. 2) Follow all warnings and instructions marked on the product. 3) Unplug this product from the wall outlet before cleaning. Do not use liquid cleaners or aerosol cleaners. Use a damp cloth for cleaning.
Package contents The twin package contains the following items: • 1 Cordless Handset • 1 Base station • 1 Corded Handset • 1 Coiled cord for the corded handset • 1 Charger Pod with connected AC power adapter • 1 AC power adapter for the base station • 1 Telephone line cord • 2 Rechargeable Batteries • 1 User manual NOTE: If you have a Triple or Quad system, you will also have the requisite extra cordless handsets, batteries and charger pods.
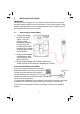
2 INSTALLING YOUR PHONE IMPORTANT The base must be plugged into an electrical outlet at all times to work fully, and the cordless handset will not work without it. Only use the power supply adapters and telephone line cord supplied with the product. Others may not be compatible and may cause a hazard. 2.1 Connecting the Corded Base 1.
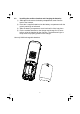
2.2 Installing the cordless handset and charging the batteries 1) Slide open and remove the battery compartment cover from the back of the handset. 2) Place the 2 supplied batteries into the battery compartment with the polarity markings as indicated. 3) Slide the battery compartment cover back until it clicks into place. 4) Put the cordless handset on the charger and charge for 15 hours before using the handset for the first time. The handset will give a beep when it is properly placed on the charger.
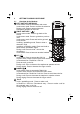
GETTING TO KNOW YOUR PHONE 3 Overview of the Handset 3.
6 OFF During a call: Press to end a call and go back to idle screen In menu / editing mode: Press to go back to previous menu In menu / editing mode: Press and hold to go back to idle screen In idle mode: Press and hold to power off the handset In idle mode (when the handset is powered off): Press and hold to power on the handset 7 ALPHANUMERIC KEYPAD, * (STAR), # (HASH) Press to insert a digit / character / * / # * key in idle mode: Press and hold to enable or disable the keypad lock * key during a call (i
3.2 Display Icons and Symbols The LCD display gives you information on the current status of the telephone. Steady when the handset is in range of the base. Flashes when out of range of the base or not registered to the base. Steady when an intercom is in progress. Flashes when there is an incoming internal call. Indicates a call is in progress. Indicates that handsfree is being used. Indicates that the handset ringer is switched off. Steady when an alarm is set. Flashes when an alarm time is reached.
RIGHT SOFT KEY function. Press C/MUTE to go back to the previous menu level or cancel the current action. RIGHT SOFT KEY function. Press C/MUTE to mute/unmute the microphone during a call, delete characters, or stop an alarm. 3.3 Cordless Handset Menu Structure In idle mode, press
3.4 Corded Base Station 11 12 1 2 3 4 10 5 6 7 9 8 1 STORE In idle mode: Press to enter the Direct Memory storing mode. 2 FIND In idle mode: Press to find/page all registered cordless handsets. Press the button again, or press , or on a cordless handset, to turn off the page signal. Press and hold to enter registration mode. FLASH (Recall) During a call: Press to send a Recall signal (also called Flash).
5 6 7 8 9 VOLUMEa) During a call: Press to decrease the listening volume. b) When ringing Press to decrease the corded base ringer volume. VOLUME+ a) During a call: Press to increase the listening volume. b) When ringing: Press to increase the corded base ringer volume. SPEAKER a) In idle: Press to access the line in speakerphone mode. b) During a call: Press to toggle between the speakerphone and the earpiece mode. c) During ringing: Press to answer a call in speakerphone mode.
3.5 Text and Digit Entry Table The following table shows you where each letter and punctuation character can be found on the cordless handset, by using repeated presses of the alphanumeric keypad. This will be helpful when storing a name in the handset phonebook or renaming your handset. In editing mode, a cursor is displayed to indicate the current text entry position. It is positioned at the right of the last character entered. Writing Tips: 1.
4 USING YOUR PHONE Using a cordless handset: 4.1 Make a Call 4.1.1 Preparatory Dialling Enter the phone number and press or to dial the number. When entering the number, if you make a mistake, press to delete digits. 4.1.2 Direct Dialling Press or to connect to the line and then enter the phone number. (Note: if you enter a wrong digit you cannot correct it with the key.) 4.1.
4.3 End a Call During a call connection, press to end the call. OR Put the handset on the charger to end the call. 4.4. Handset Speakerphone During a call, you can press to alternate between hands-free speakerphone and normal handset use. 4.5 Adjust Earpiece and Handsfree Volume There are 5 levels (VOLUME 1 to VOLUME 5) to choose from for each of the earpiece and handsfree volumes. During a call: Press to select volume 1-5. The current setting is shown.
4.9.1 Redial a Number from the Redial List 1. In idle mode, press to access the redial list. Note: If the redial list shows a name, press the < # > key to view the number of this entry. 2. Press to browse the redial list. 3. Press / to dial to the selected redial number. Note: If there are no numbers in the redial list, the display shows“EMPTY ”. 4.9.2 Store a Redial Number into the Phonebook 1. Follow Steps 1 and 2 in section 4.9.1. 2.
4.11 Making a Call From Direct Memory Keys 1. In idle mode, press , or to dial the number stored in the direct memory keys via speakerphone. Lift up the corded handset to switch the call to the earpiece mode. Note : If the selected direct memory key is empty, an error tone is emitted via speakerphone and the corded base will return to idle mode. 4.12 Answering a Call 1. Pick up the corded handset or press to answer the incoming call. 4.13 Ending a Call 1.
5 Paging and Intercom Use (for multi cordless handset systems) You can locate cordless handsets from the corded base or from other cordless handsets, and you can make intercom calls between cordless handsets, or transfer calls between cordless handsets, or set up a conference call between two cordless handsets and an external caller, provided you have more than one cordless handset registered to your base. Note: You cannot make or receive intercom calls, transfers or conference calls with the corded base.
5.2.2 Call All Handsets 1. In idle mode, press (INT) and all the other registered handset numbers will display, along with a "9". 2. Press <9> to ring to all registered handsets. 5.2.3 Transfer an External Call During an external call: 1. Press
6 PRIVATE PHONEBOOK Your phone can store up to 20 private phonebook entries with names and numbers in each cordless handset. Each phonebook entry can have a maximum of 20 digits for the phone number and 12 characters for the name. You can also select different ringtones for your phonebook entries. (Note: the different ringtones only play when you receive a call if you subscribe to Caller Display and the incoming number matches the stored number.) Phonebook entries are stored alphabetically by name.
6.4 Edit a Phonebook Entry In idle: 1. Press
7 CALLER DISPLAY (NETWORK DEPENDENT) This feature is available if you have subscribed to the Caller Display service with your network service provider. Your phone can store up to 10 received calls in the cordless handset Call List. The number will be shown on the handset display when the phone is ringing.
7.3 Delete an Entry in the Call List 1. Follow Steps 1 and 2 in Section 7.1. 2. Press
8 PHONE SETTINGS Your phone comes with a selection of settings that you can change to personalise your phone the way you like it to work. Using a cordless handset: Date and Time Settings 8.1 You can set the correct time and date for if you want to display the time on the handset display.
8.1.4 Set the Date 1. Press
8.2.2 Set the Alarm Time (if the Alarm is set to be ON) 1. Follow Steps 1 to 4 in Section 8.2.1. 2. Enter the alarm time. 3. Press
8.3.2 Set Alert Tones Three different alert tones are set on by default, but can be turned off, if desired. Key Tone - a single beep is emitted when you press a key. Battery Tone - warning tones are emitted if the battery is low while you are talking on the phone, to alert you that you need to charge the handset batteries. Out Of Range - warning tones are emitted while you are talking on the phone, to alert you to move closer to the base unit, before the call is lost. 1.
8.3.6 Set the Auto Answer If you turn on the Auto Answer, you can answer a call automatically by just lifting the cordless handset off the charger without having to press any key. 1. Press
8.4.3 Change the Recall (Flash) Time You may need to change the recall (flash) time if your phone is connected to a PBX. The recall time options are SHORT (the default value of 100ms), MEDIUM (300ms) or LONG (600ms). 1. Press
9 REGISTRATION IMPORTANT: When you purchase your phone system, all handsets are already registered to your base, so you do not need to register them. Handset registration is only necessary when you buy extra handsets or if a handset has become faulty. You can register additional handsets to have up to five handsets per base unit, with each handset's number (1 to 5) shown on its display. (Note: each handset can only be registered to one base.
10 TROUBLESHOOTING If you have difficulty with your phone, please try the suggestions listed below. Problem Cause No dialling tone when pressing the key a. The connection cord of the base station is not plugged in. b. The adapter cord is not plugged in correctly in the base station. c. The line is busy, as another handset is used. d. Wrong telephone line cord. When connected to a PBX, no and/or wrong connection after dialling. "OUT OF RANGE" is displayed. The call does not work. No display.
11 DECLARATION OF CONFORMITY We the manufacturer / Importer : Binatone Telecom Plc, Declare under our sole responsibility that the following product Type of equipment: Digital corded + cordless telephone Speakeasy Combo 2005 Model Name: Country of Origin: China Agros Brand: complies with the essential protection requirements of R&TTE Directive 1999/5/EC on the approximation of the laws of the Member States relating to Radio Spectrum Matters, the Council Directive 2004/108/EC on the approximation of the laws
12 PRODUCT GUARANTEE This product is guaranteed against manufacturing defects for a period of 1 Year. This does not cover the product where the fault is due to misuse, abuse, use in contravention of the instructions, or where the product has been the subject of unauthorised modifications or alterations, or has been the subject of commercial use. In the event of a problem with the product within the guarantee period please return it to your nearest Argos store.