USER’S GUIDE BLINK1 / MBP2000BU / MSC3 BABY MONITOR USER’S GUIDE The features described in user's guide are subject to modifications without prior notice.
Welcome... to your new Motorola Baby Monitor! Thank you for purchasing the BLINK1/MBP2000BU/MSC3. Now you can see and hear your baby sleeping in another room or you can monitor your older children in their playroom. Please retain your original dated sales receipt for your records. For warranty service of your Motorola product, you will need to provide a copy of your dated sales receipt to confirm warranty status. Registration is not required for warranty coverage.
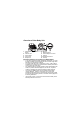
Overview of Your Baby Unit 9 1 2 11 3 4 10 5 7 8 6 1. Photo Sensor (Night Vision Mode) 2. Camera Lens 3. Infared LEDs 4. Power LED 5. Microphone 6. 7. 8. 9. 10. 11. Speaker ON/OFF Switch Power Adapter Connector Antenna Temperature Sensor Pair Key Important guidelines for installing your Baby Monitor • • • • • To use your Video Monitor Baby and Parent Unit together, you must be able to establish a radio link between them, and the range will be affected by environmental conditions.
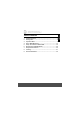
1. Safety Instructions ..................................................................... 6 2. Getting Start ................................................................................ 8 3. Operation Mode .......................................................................... 9 4. Direct Mode Monitoring .......................................................... 12 5. Setup The Camera In Router Mode ........................................ 16 6. More Function Of Baby Monitor ...........
1. Safety Instructions WARNING: STRANGULATION HAZARD - Keep the adapter cord out of baby's reach. NEVER place camera or cords within the cot / crib. Secure the cord some distance away from baby's reach. Never use extension cords with AC Adapters. Only use the AC Adapters provided. CAMERA SET UP & USE: ● Determine a location for the CAMERA that will provide the best view of your baby in his cot / crib. ● Place the CAMERA on a flat surface, such as a dresser, bureau, or shelf.
• Do not touch the plug contacts with sharp or metal objects. Safety Instructions 7 ENGLISH • Never use extension cords with power adapters. Only use the power adapters provided. • Test this monitor and all its functions so that you are familiar with it prior to actual use. • Do not use the baby monitor near water. • Do not install the baby monitor near a heat source. • Only use the chargers and power adapters provided.
2. Getting Started 2.1 Baby Unit Power Supply 1. Connect the small plug of the power adapter to the baby unit and the other end to the electrical outlet. NOTE Only use the enclosed power adapter (5.9V DC / 1000mA). 2. Slide the ON/OFF switch to the ON position. The power LED will light up in green. 3. Slide the ON/OFF switch to the OFF position to turn the Baby Unit off.
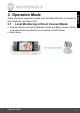
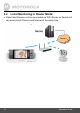
There are three operation modes how the Baby Monitor connected to and viewed by the Parent Unit. 3.1 Local Monitoring in Direct Connect Mode: • Auto and Direct connection between Parent and Baby camera unit for in-house monitoring without the connection to WiFi Router. • Easy Setup. Operation Mode 9 ENLISH 3.
3.2 Local Monitoring in Router Mode: • Parent and Camera unit are connected via WiFi Router so Parent unit can access both Camera and Internet at the same time.
Remote Monitoring in Router Mode: • With the IP and Server Control, the user can view the video picture anywhere from Smartphone (iPhone and Android Phone), Tablet and PC. Operation Mode 11 ENLISH 3.
4. Direct Mode Monitoring 4.1 Turn ON the camera with the slide switch. 4.2 Turn on the MBP2000 Parent unit. In the Home Screen, select the Apps Baby Monitor. The Green LED on the camera front panel will be turned on and start to blink after 45 sec. After 90 sec, it turns into the Direct Mode and waits for the Parent handset unit to connect. Then the Green LED will blink every 2 sec. Duration of blink is 200ms.
Then you will see the Login/Register screen here. 4.4 Then you will view a list of camera which is already set in DIRECT mode and wait for connection. ENLISH 4.3 The camera name consists of “Moto-Cam-xxxxxx” where “xxxxxx” is low 6 nibbles of the MAC address assigned for each camera unit at the factory. The 2nd line “00:0e:a3:07:0a:08” is the MAC address of the Camera. This display of MAC address will be removed in final software.
If you cannot see any Camera in the list, press [Back] key back to Welcome screen and select [Direct Connect] again. Please note the [ReScan] button doesn’t work at the current software. If still not found, please check if the Camera is already in Direct Mode by the Green LED status. If not, reset the Camera to Direct Mode by press-and-hold the RESET button on the bottom cabinet for 10 seconds until you hear the double beep confirmation tone. 4.
For the production unit, each camera will be preset with an unique password and written in the sticker at the bottom cabinet. In the current development software, the camera is not set any password so you could enter anything longer than 4 characters. Then select [Next] to continue. 4.7 Then you should see the Camera video in a few seconds. Direct Mode Monitoring 15 ENLISH 4.
5. Setup the Camera In Router Mode In order to have the Internet access and Remote monitoring function, the user requests to setup the Account and Camera in the Server developed by Binatone. 5.1 In Home Screen, select the Apps Baby Monitor. 5.2 Then you will see the Welcome screen if it is first time setup the Camera.
If you don’t want to Setup the Camera to Router for Local and Remote monitoring, you could select [Direct Connect] to view the Camera video (Please refer to SECTION 1 : DIRECT MODE MONITORING). If you want to continue the setup, select [Start Setup], then the login/register screen is shown. Setup The Camera In Router Mode 17 ENLISH 5.
5.4 For the new user, you need to Select [Create Account]. Otherwise you could login the sever with existing user name from Step 9. If the Parent Handset unit hasn’t yet connected to any WiFi Router, it will prompt the list of available Wireless Network for connection. If it is already connected to any WiFi network, it will jump to Step 5.8. 5.5 18 Enter the Security key of the selected WiFi network to make the connection.
Enter the User Name with the existing email address and password. 5.7 Then you will receive an email with Activation key on the user name email address. Enter the Activation key. ENLISH 5.6 After pressing [Next] button, you will get the login success in Step 10.
5.8 Please enter User Name and Password and then select [Login] 5.
ENLISH 5.10 Select [Add Camera] to add a new Camera to this Account. Then you will see Camera Setup screen to remind you to set the Camera in Direct Mode as described in Step 2. 5.11 Select [Next] to view the list of camera ready to add.
5.12 Seect the camera (e.g. Moto-Cam-070a08 ) in the list. Then you need to enter the password of the Camera. At this moment for this Demo software, you could enter anything longer than 5 characters. In actual production unit, each camera will have different password marked on the label sticked at the bottom cabinet.
ENLISH 5.13 Then you will be prompted to Choose Wireless Network to connect to the Camera. 5.14 Select the WiFi Router SSID name which you want to connect and enter the password. Then press [Next] to continue.
5.15 Then the unit will start to configure the camera to connect to the Binatone Server under your user account through the selected WiFi network. 5.16 After one to two minutes, the Setup is Done as shown. Press [Finish] to view the Camera list available .
Setup The Camera In Router Mode 25 ENLISH 5.17 Then the Logged in screen will show up. Select [Connect to Server] to view the list of camera already configured in your user account.
5.18 Then you should see the Camera shown on the list as following example with the Green Dot and Snapshot picture.
Setup The Camera In Router Mode ENLISH 5.19 Select the Camera picture to display the full picture.
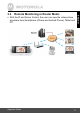
6. More Function Of Baby Monitor After the Camera is connected and Video is shown on Parent units, the user can have more functions.
ENLISH The Camera Settings Menu Scroll to 2nd page More Function Of Baby Monitor 29
Name: Create the name of Camera Camera Volume : Adjust the volume of Camera speaker Camera brightness : Adjust the brightness of Camera video Melody : Select and playback the Lullaby Melod VOX Settings : Select Voice Activation Sensitivity Level - Off, Low, Medium, High Temperature Unit : Switch between degree F and C Remove this Camera : Remove this camera from the current User Account Info : 30 Display the current version of Application Software and Camera Firmware.
ENLISH Access the Camera Remotely outside your home or office If you use the device outside your home and network to login your Account to view your cameras. The camera will indicate in Remote situation with Orange light. In Remote mode, the snapshot picture will not be viewed but you could still press the icon to access the Camera.
Access the Camera from other Devices 1. Android Smartphone and Tablet • For development stage, the Android Apps (apk) can be installed into the Android devices by putting it on SD card for testing purpose. • After product launch, we shall put the App into the Android Market for the user to download. 2. Apple iPhone and iPad • For development stage, the iOS Apps (apk) can only be customized for individual iOS device and installed by iTune for testing purpose. This App is still under development.
ENLISH Enter your user account (Email address) and Password. Then [Login] Then you will see the list of Camera configured already.
Select View to see the Camera video. Currently this Web Portal is still under development so other functions (Pan and Tilt, Temperature reading, 2-way auto communication, etc) will be added later.
• Open Internet Explorer or Google Chome. Type in URL www.moto-cam.com. Then you will get the camera video immediately. In Production version, it will add the Camera Password. More Function Of Baby Monitor 35 ENLISH (2) If you want to monitor the camera video from your PC in Direct Mode: • Connect the WiFi of your PC to the Camera directly. Please ensure the Camera is also set in Direct Mode so you could find its name in the Wireless network list.
ENLISH camera unit cloth.
ENLISH 9
ENLISH BLINK1/MBP2000BU/MSC3 .4GHz WiFi dapter : SWP-22357-00L Input : 100-240V,50/60Hz 0.
BINATONE TELECOM PLC 1 Apsley Way London NW2 7HF,United Kingdom. Tel: +44(0) 20 8955 2700 Fax: +44(0) 20 8344 8877 e-mail: binatoneuk@binatonetelecom.co.uk ________________________________________ . EC Declaration of Conformity We the manufacturer / Importer : Binatone Telecom Plc 1 Apsley Way London NW2 7HF, United Kingdom.
Manufactured, distributed or sold by Binatone Electronics International LTD., official licensee for this product. MOTOROLA and the Stylized M Logo, are trademarks or registered trademarks of Motorola Trademark Holdings, LLC. and are used under license. All other trademarks are the property of their respective owners. © 2011 Motorola Mobility, Inc. All rights reserved. Version 2.