
Owners manual

E4-WM5-Y116A00
EINBAUANLEITUNG/ MOUNTING INSTRUCTION
erstellt am: 21.03.00 E4-WM5-Y116A00_12 Seite 3 von 4 Seiten geändert am: 22.11.12
DO NOT USE AN IMPACT TOOL TO LOOSEN
OR TIGHTEN FASTENERS DUE TO POSSIBLE
DEMAGE TO THE PRODUCT.
SELF- LOCKING NUTS MUST ONLY BE
USED ONCE!
Removal
Place vehicle on a chassis hoist,
lift it and remove wheels.
The lower control arm must be
supported by suitable means!
Remove bottom mount.
Remove top fixing nuts from support bearing.
Do not remove centre nut at this time!
Remove complete strut and
clamp it in an appropriate strut vice.
Using a suitable spring compressor, compress
suspension spring until tension on support bear-
ing is free to move.
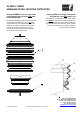
Release central nut and remove original
mounting parts and coil spring. Please refer
to diagram to identify which parts will be re-
placed with BILSTEIN- supplied components.
Release lock ring.
Remove all internal parts and oil from strut.
Surplus of grease on the
outer tube does not diminish
function. Before fitting the insert
should be compressed once to lubri-
cate the inner seal. Take care when
fitting the lock ring. Lubricate the
seal, use a special wrench to tighten
the lock ring.
Installation
Fit BILSTEIN cartridge into original strut housing.
Take care when installing the lock ring (3): lubri-
cate the seal inside the lock ring (use oil from
outside of insert, or synthetic grease).
Avoid tilting sealed lock ring during installation.
Tighten lock ring with special wrench:
torque 130 ± 10 Nm ( 95 ± 7 ft lb )
Fit dust cover.
Do not reuse original bump stop, since
BILSTEIN cartridge has built in bump stop.
Fitment in reverse order as removal.
All rubber- mounted strut/ damper attachments
must not be fully tightened until after the
suspension system is loaded (wheels on the
ground). Other mounting fasteners (for example
brackets) must be securely tightened before load
is placed on the suspension system. Make sure
that the bump stop and dust cover are correctly
and properly fastened.