
Owners manual


E4
E4E4
E4
-
--
-
WM5
WM5WM5
WM5
-
--
-
Y
YY
Y
4
44
4
69
6969
69
A00
A00A00
A00
MOUNTING I
MOUNTING IMOUNTING I
MOUNTING I
N
NN
N
STRUCT
STRUCTSTRUCT
STRUCT
ION
IONION
ION
created: 1/23/15 E4-WM5-Y469A00_0 page 3 of 4 latest revision:
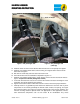
E.
Install the lower end of the shock absorber with the bolt and nut. Temporarily hand tighten.
F.
Install the new supplied lower washer, lower bushing, and support washer onto the shock
stem. Refer to Figure 5.
G.
Pull down on shock body and insert stem into shock mount.
H.
Orient the shock/reservoir assemblies as depicted in Figures 1-4.
I.
Install the new supplied upper bushing, upper washer, and nut onto the shock stem. Refer to
figure 5. Torque nut to 20 N•m (204 kgf•cm, 15ft•lbf)
J.
If a chassis hoist has been used, be sure to lower the vehicle such that its full weight is on the
suspension prior to fully tightening the fasteners.
K.
Tighten lower fasteners to the vehicle manufacturer’s service manual torque specifications.
L.
Carefully check for any possible dynamic interference between the reservoirs and any other
components on the vehicle (specifically the E-brake cable, exhaust, leaf springs, and upper
mount frame buckets), then make any necessary adjustments to the reservoir positions. The
reservoir mounting locations depicted herein are appropriate for this application; however,
some aftermarket components such as tires and/or lift kit combinations may create
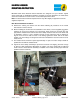
Figure
3
. rear passenger
side
Front of vehicle
Front of vehicle
Figure
4
. rear passenger side
(close-up)