
Owners manual


E4-WM5-Y566A00
MOUNTING INSTRUCTION
created: 03.07.17 E4-WM5-Y566A00_0 page 4 of 10 latest revision:
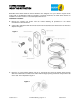
F. Install the 8mm split washer on to the M8 screw.
G. With the tab on the threaded stud facing toward the front of the vehicle, hook the tab into the lower
oval hole. Once the tab is completely inside the frame, the back of the bracket should be able to sit
essentially parallel to the side of the frame rail.
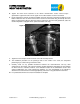
H. Line up the upper round hole in the bracket with the M8x1.25 hole in the frame and slip the 8mm
nylon flat washer behind the bracket, then line it up with the same hole.
I. Install the M8 screw through the upper bracket hole and washer to engage the M8x1.25 threaded
hole in the frame. A non-permanent thread locking compound may be used on the threads in addition
to the split washer for additional durability.
J. Tighten the M8 screw until it just contacts the split washer.
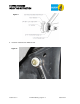
K. Tighten the ¼” nut on the stud and torque to 10 lb•ft (13.6 N•m). The tab on the stud will catch on an
interior feature of the frame which will prevent it from rotating and allow the nut to be tightened.
(Note: In the event that the bracket ever needs to be removed from the vehicle, the nylon retaining
washer will prevent the stud from falling into the frame when the nut is removed.)
L. Torque the 8mm screw to 10 lb•ft (13.6 N•m).
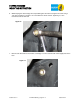
M. Using the provided clamps, slide the open bands through the thin slots on the sides of the bracket
and engage the screw on the clamps.
N. The installed bracket is depicted in Figure 5.
Figure 5