
Owners manual


E4-WM5-Y566A00
MOUNTING INSTRUCTION
created: 03.07.17 E4-WM5-Y566A00_0 page 10 of 10 latest revision:
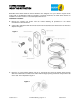
8. With the tab on the threaded stud facing toward the front of the vehicle, hook the tab into the lower
oval hole. Once the tab is completely inside the frame, the back of the bracket should be able to sit
essentially parallel to the side of the frame rail.
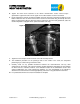
9. Using the shorter ¼”-20 socket cap screw and split washer from the supplemental hardware kit,
secure the bracket by the upper hole. A non-permanent thread locking compound is recommended.
Tighten the screw until it just contacts the split washer.
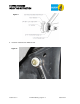
10. Tighten the ¼” nut on the stud and torque to 10 lb•ft (13.6 N•m). The tab on the stud will catch on an
interior feature of the frame which will prevent it from rotating and allow the nut to be tightened.
(Note: In the event that the bracket ever needs to be removed from the vehicle, the nylon retaining
washer will prevent the stud from falling into the frame when the nut is removed.)
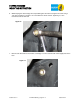
11. Torque the ¼”-20 screw to 10 lb•ft (13.6 N•m).
12. Proceed with step M and all of the subsequent steps in the installation instructions.
Figure 15