
Owners manual

E4-WM5-Y497A00
MOUNTING INSTRUCTION
created: 08.28.15 E4-WM5-Y497A00_0 Page 2 of 5 latest revision:
A. Remove the existing shock and spring unit from the vehicle following all procedures in the
vehicle manufacturer’s service manual.
B. Note the clocking of the lower mount bushing relative to the studs on the upper mount
(important for reassembly).
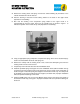
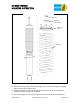
C. Also note the clocking of the suspension spring relative to the upper mount. It is
recommended to mark the upper mount (on the metallic area) as shown in Figure 1 to
indicate the position of the end of the top coil (important for reassembly).
D. Using an appropriate spring compressor, compress the spring until it can be rotated freely by
hand. Then, disassemble the shock and spring unit.
E. Remove the endcap from the existing shock. Then, remove the OEM spring seat from the
existing shock so that it can be reused.
F. Temporarily remove the dust boot from the new Bilstein shock.
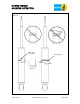
G. Install the provided spring seat support on to the new Bilstein shock (with the smaller end up)
such that the groove inside the spring seat support fits over the circlip on the shock body as
shown in Figure 2. Install the spring seat support in the direction shown only. The circlip must
fit completely in the groove inside spring seat support (see detail view). Improper installation
will cause permanent damage to the shock.
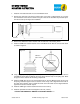
H. Install the OEM spring seat on to the new Bilstein shock and over the spring seat support in
the direction shown only; see Figure 2. Improper installation will cause permanent damage to
the shock.
Figure 1