
Product Manual


WWW.BIGASSFANS.COM © 2015 DELTA T LLC ALL RIGHTS RESERVED.
31
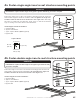
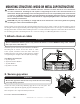
MOUNTING STRUCTURE: WOOD OR METAL SUPERSTRUCTURE
WARNING: The fan should not be installed unless the structure on which the fan is to be mounted is
of sound construction, undamaged, and capable of supporting the loads of the fan and its method of
attachment. Verifying the stability of the mounting structure is the sole responsibility of the customer and/
or end user, and Big Ass Fans hereby expressly disclaims any liability arising therefrom, or arising from
the use of any materials or hardware other than those supplied by Big Ass Fans or otherwise specified in
these installation instructions.
CAUTION: It is your responsibility to comply with all local and national codes and regulations regarding
mounting procedures and installation height!
Yellow Jacket can be hung from the existing building structure using a chain or cable of rated strength to support
the weight of the fan (approximately 105 lbs [47.6 kg]). The following instructions are merely a recommendation for
hanging the Yellow Jacket from the building structure. Consult a structural engineer to determine the best method
for mounting your fan. If mounting the fan to a concrete ceiling, see “Mounting Structure: Concrete.”
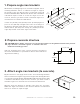
1. Attach chain or cable
ATTENTION
Special consideration must be given to any external air influences such as HVAC discharge units, exhaust
fans, open doors, other fans, etc.
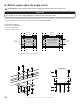
Install the eyenut on the fan yoke with the Yoke Washer
Assembly Kit as shown. Secure the chain or cable
to the eyenut, and then secure the other end to the
building structure. The chain or cable must be capable
of supporting the weight of the fan (105 lbs [47.6 kg]).
Yoke Washer Assembly Kit:
a. (1) 3/4” Eyenut
b. (1) Inverted Yoke Washer
c. (1) 3/4” Washer
d. (1) 3/4-10 x 3” Bolt
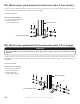
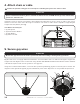
2. Secure guy wires
ATTENTION
At least two guy wires must be used to prevent the fan from rotating
or moving during operation!
Secure the fan’s position by attaching guy wires to the fan yoke. The
diagram on the right shows typical guy wire attachment points.
Note: Guy wires are only included if purchased.
Proceed to “Electrical Installation.”
a
b
c
d