
Product Manual

WWW.BIGASSFANS.COM © 2015 DELTA T LLC ALL RIGHTS RESERVED.
22
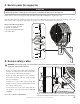
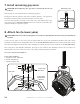
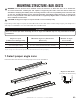
Wire Rope Clip
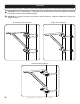
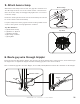
7. Install remaining guy wires
CAUTION: Over-tightening the guy wires could throw the fan o
balance.
Repeat steps 5–6 to install the three remaining guy wires.
Evenly cinch all four guy wires into place using the Gripples
®
. The guy wires
should be taut and evenly spaced around the extension tube.
Once all of the guy wires are taut, secure their loose ends with the wire rope
clips and torque to 4.5 ft·lb (6.1 N·m). Ensure all electrical cords/cables are
unobstructed by the guy wire system.
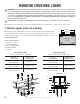
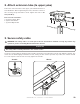
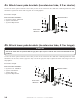
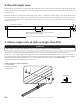
8. Attach fan (to lower yoke)
CAUTION: Ensure the position locking pin is secured prior to attaching the fan to the lower yoke attachment
bracket!
Secure the fan yoke to the lower yoke brackets with the lower yoke attachment bracket and Lower Yoke
Hardware as shown below. Fully tighten the bolts to 40 ft·lb (54.2 N·m). Allow the fan to hang and balance itself,
and then fully tighten the Extension Tube Hardware (securing the lower yoke brackets) to 40 ft·lb (54.2 N·m).
Note: Guy wires and Guy Wire Hardware (if used) are not shown in the illustration below. The procedure for
attaching the fan to the lower yoke is the same with or without guy wires installed.
Proceed to “Electrical Installation.”
Lower Yoke Hardware:
a. (4) 3/8-16 x 1-1/4’’ GR 8 Bolt
b. (8) 3/8’’ Flat Washer
c. (4) 3/8-16 Nylock Nut
a
b
c
b
Lower Yoke
Brackets
Lower Yoke
Attachment
Bracket
Fan Yoke