
Installation guide


Subscribers Profile Overview 154
Adding New Subscribers
New subscribers can be added one-at-a-time or you can create a range of subscriber mailboxes. When a range of
subscriber mailboxes are added, they can be assigned to new subscribers as new subscribers are hired.
When you add a new subscriber, the messaging system automatically uses the default settings specified in the
subscriber template, these settings can be customized for the subscriber on the Subscriber Profile page.
To add a single subscriber
1. In the Navigation Pane, click Subscribers > Subscriber > Profile.
2. Click Add. See “Administration Console Pages,” for information about the Administration Console icons.
The Add subscriber dialog box appears.
3. Select New subscriber.
a. Type the Extension, Last name, First name, and Personal ID.
b. Type Fax ID, available only if the Fax feature is licensed and installed.
c. Click Add to add another subscriber or click Done or Cancel to close the Add subscriber dialog box.
Repeat this step to add additional subscribers.
To add a range of subscriber mailboxes
1. In the Navigation Pane, click Subscribers > Subscribers > Profile.
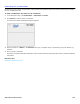
2. Click Add to add a subscriber.
The Add subscriber dialog box appears.
a. Select New range of subscribers.
b. Type the Start and Stop values for the Range of extension # IDs.
c. Optional: Type a Constant Prefix and/or a Constant Suffix fields.
The digit or digits are in added to the default value defined in the personal ID prefix defined on the subscriber
template profile page and the extension number.
d. Click Add to add another subscriber or click Done or Cancel to close the Add subscriber dialog box.
NOTE
BACK UP THE MESSAGING SYSTEM SOFTWARE AND DATA AFTER MAKING SIGNIFICANT CHANGES TO THE MESSAGING SYSTEM. SEE
Backing Up the Messaging System Data.
Related Topics
Subscriber Template Overview
Enrolling Subscribers