Navigating the Administration Console The UNIVERGE® UM8000 Administration Console is used to handle most messaging system administration tasks and is accessed using a monitor and keyboard attached to the console or a desktop computer that is connected to the same network as the messaging system server.
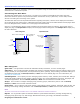
Administration Console Overview Administrator tasks for the messaging system are accomplished using the Administration Console user interface. It is accessed from a networked computer. Introducing the Main Menu The Main Menu appears when you first log on. The main menu consists of a Navigation Pane and a page with information about the product. The product information includes the version, system time, current mode, and the amount of recording time remaining on the system.
Network. Use to add and view locations within the messaging system network. To view additional sites, click Search or the Previous and Next icons. NOTE THE NETWORK PAGES ARE AVAILABLE ONLY IF A MULTIPLE SITE LICENSE IS PURCHASED. System. Use to set general information about the messaging system, including site contact information, message storage and playback settings, system prompts, schedules, port settings, and phone system integration. Port Status.
Administration Console Pages The Administration Console pages are divided into three areas: • The Navigation Pane, located on the left side of the page, contains links to other Administration Console pages. • The page where messaging system data is typed, selected, and displayed. • The title bar contains the name of the record or user and command icons.
Using System Administration Help System Administration Help introduces you to the Administration Console and explains how to configure and maintain the messaging system. On the Administration Console, click the icon to see help topics. System Administration Help is available on the Support disc. NOTE POP-UPS JAVASCRIPT MUST BE ENABLED ON YOUR WEB BROWSER TO ACCESS FEATURES OF THE ADMINISTRATION CONSOLE AND REFER TO THE WEB BROWSER DOCUMENTATION FOR INFORMATION ABOUT ENABLING POP-UPS AND JAVASCRIPT.
Using the Help System To open the online help file, click the Help icon on any Administration Console page, or open wwhelp.htm on the local hard drive. To use the help system 1. 2. Click to show the Help Navigation Pane. In the Help Navigation Pane, select Contents, Index, or Search. • Contents. Displays the table of contents. • Index. Displays the index. Click a letter, Numerics, or Symbols then select on a keyword to open the topic. • Search. Click Displays the Search tab.
Convention Page Field Descriptions Description A list of page field descriptions is available, see “Page Field Descriptions.“ Related Documentation The following documents and online resources are available: Installation Guide. Provides instructions for installing and configuring the messaging system. Available in PDF format only. User Guide. Provides subscriber instructions for accessing the messaging system and managing messages. Available in PDF format only. Mailbox Manager Help.
Logging On and Logging Off for System Managers The messaging system requires system managers to have valid credentials to log on to the Administration Console. The procedures in this help system assume that you have already logged on using system manager credentials. If you plan to remotely access the Administration Console using the Internet, the messaging system server must be connected to a network with a secure connection to the Internet.
Registering the Messaging System The messaging system software must be registered to receive technical support assistance and notifications about upcoming releases. When the messaging system is not registered, system functionality is not affected. However, a registration reminder continues to appear periodically when you log on. Use the following procedure to register the messaging system and validate the registration.
Server Control Some procedures require the messaging system to be shut down and restarted before the changes become active. When shutting down the messaging system busy ports are shut down after the current call is disconnected. The messaging system software does not answer or place calls when it is shut down. The messaging system software can be shut down and restarted using the Administration Console or Maintenance Menu on any networked computer.
Using the Administration Console to Restart the Messaging System To restart software using the Administration Console 1. Start a Web browser. In the browser address bar type: http:///admin where is the name or IP Address of the messaging system server. 2. Click Server Control. 3. Click Start to restart the messaging system. The messaging system may take more than 30 seconds to restart. The Status icon changes from red to green.
Using the Desktop Icon to Stop the Messaging System To stop the messaging system software at the server 1. On the Linux desktop, right-click the Status icon. 2. Select Stop. 3. Click Yes to confirm that you want to stop the messaging system. The system shuts down each port as it becomes available, and then shuts down the software. The Status icon changes from green to red after the messaging system software is shut down. The messaging system may take more than 60 seconds to completely shut down.
Using the Desktop Icon to Restart the Messaging System To restart the messaging system software at the server 1. On the Linux desktop, right-click the Status icon. 2. Select Start. 3. Click Yes to confirm that you want to stop the messaging system. The Status icon changes from red to yellow while the software is restarting. The messaging system may take more than 60 seconds to start CAUTION! CLICKING THE Start ICON MULTIPLE TIMES MIGHT CAUSE THE SYSTEM TO LOCK UP OR DAMAGE DATA.
Stopping and Starting the Linux Operating System The Linux operating system can only be shut down at the messaging system server using a command. To shut down the Linux operating system 1. Log on to a client computer and use SSH to connect to the messaging system server or log on to a local console. 2. Log on as Admin. 3. On the command line type poweroff then press ENTER. To restart the Linux operating system 1.
System Overview The messaging system simplifies the messaging process by storing communications in a universal mailbox. UM8000 provides the flexibility to manage voice, fax, and e-mail messages from any location. These topics introduce basic system concepts, explains the role of the system manager, describes how to log on to and log off the system, and how to navigate the Administration Console.
System Manager Responsibilities System managers are responsible for the day-to-day management of the messaging system. They add and train new subscribers, operators, and other system managers, as well as answer questions about the system. Periodically, system managers might need to update greetings to reflect holidays or other circumstances. A system manager can change mailboxes and greetings using a phone or the Administration Console. Any enrolled subscriber can be a system manager.
Basic Concepts This topic describes basic UNIVERGE® UM8000 messaging concepts. System Users There are three types of system users: • Subscribers. A subscriber is an enrolled user. When subscribers call the messaging system, they identify themselves to the messaging system using a unique system ID. Subscribers manually enter their personal ID or the phone might be programmed to automatically provide the ID.
happens next. For example, the system might route the call to the operator, take a message, or route the call to another box. Transfer-Greeting-Action Flow A call reaches a box » » » Transfer Greeting Action The system tries to transfer to an extension… …the system plays the transaction box greeting… …and if no touchtone keys are pressed, the system performs an action, such as routing the caller to the public interview box.
Assigning System IDs A system ID is a unique identification number that is used to identify a subscriber, guest, transaction box, voice detect box, or interview box. System IDs are numbers that callers dial to access subscriber extensions and mailboxes. System IDs are used to link boxes for advanced call routing and audio text. NOTE DUPLICATE SYSTEM IDS ARE NOT PERMITTED IN THE MESSAGING SYSTEM. Before assigning system IDs: • Estimate what kind and how many system IDs are needed.
Understanding System and Personal IDs The messaging system listens for system IDs and personal IDs on a digit-by-digit basis. When a caller enters a system or personal ID, the system examines the first digit to see if it is a valid ID. If the first digit is not a valid ID, the system listens to the second digit and checks to see if the combination of the two digits is a valid ID. This process is repeated for every digit until a match is found or there are no more digits to check.
Internal IDs An internal ID is a special ID that cannot be entered using a phone keypad. To create an internal or hidden ID, use a $ (dollar sign) as the first character of the ID. The $ (dollar sign) cannot be entered using a phone keypad. Internal IDs are used to route callers to voice detect boxes, transaction boxes, or interview boxes and preventing callers from directly entering the voice detect box, transaction box, or interview box.
Recording Voice Fields or Interview Prompts Use the Administration Console Media Control Tool to record voice fields and prompts. Voice fields contain names, greetings, or introductions. The length of a voice field recording appears on the buttons, in minutes:seconds as shown below. Prompts describe what action to take as callers use the system. The system connects prompts with recorded names and greetings to create the system conversation. Voice field recording time 3-minutes and 6 seconds.
To record or rerecord a voice name or greeting on the Administration Console 1. In the Administration Console click Subscribers > Subscribers > Profile or Subscribers > Subscribers > Greeting or another page that has the voice field for the name, greeting, or prompt. 2. Click the voice field. The media control tool appears. Playback/Record device selection Play Stop playback/record Start/Pause recording Save the recording 3. Click , then select the Recording device. 4. To record, click . • Phone.
Using a Phone to Change System Information System managers can change most system information using the Administration Console. However, system managers can also use a phone and the system manager conversation to change mailboxes, greetings, schedules, and operator settings. Use a phone and system manager log with the system manager personal ID and security code to hear the system manager conversation.
Configuring System Security It is recommended that you complete the following procedures immediately after logging on to the messaging system the first time. These procedures protect the messaging system from unauthorized access. WARNING! FAILURE TO COMPLETE THESE PROCEDURES MIGHT RESULT IN UNAUTHORIZED ACCESS AND A POTENTIAL LOSS OF DATA. • Change the personal ID for the default system manager. Personal IDs are assigned following a rule, such as prefixing an extension number with a single digit, 9.
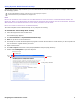
To configure a default passwords 1. In the Navigation Pane, click Subscribers > Account Policy. The Security Settings page appears. 2. To require subscribers to set a security code, clear the Permit blank password check box. 3. To require a minimum number of characters in a security code, select Minimum number of characters in password, then type the number in the text box. 4. In the Default password for each new subscriber field, type a different code. The password must be 3-9 digits in length. 5.
Following Recommended Security Practices In addition to performing the procedures described in Configuring System Security, follow these security recommendations on an ongoing basis. WARNING! FAILURE TO FOLLOW THESE RECOMMENDATIONS CAN RESULT IN UNAUTHORIZED ACCESS TO THE SYSTEM AND A POTENTIAL CORRUPTION OR LOSS OF DATA. • Limit the number of system managers. System managers can change the system in many important ways.
System Configuration The System > Configuration pages contain fields that store basic information about the site and messaging system. This information includes contact information, message storage and playback settings, system prompts, schedules, port settings, and phone system integration configuration.
Changing General Configuration Settings The fields on the System > Configuration > General page control the number of days the system stores data for call reports, the ID to access numeric groups or remote sites, the maximum number of times an unknown caller can enter an invalid ID, the maximum number of security code/password attempts, allows Mailbox Manager access, and configures Web encryption for the Administration Console, Mailbox Manager, and mobile client.
Saving and Storing Data for Reports The messaging system creates daily data files containing information about system activity and call traffic, this data is used to create reports. To configure the storage time for report source data 1. In the Navigation Pane, click System > Configuration > General. For detailed field information, see the System > Configuration > General System table. 2. In the Call report aging… days field, type the number of days to store report data.
Configuring Numeric Group and Remote Site IDs Configure a remote access ID to use numbered groups or let subscribers send messages to remote locations. When using a phone to leave a message, subscribers enter the ID to identify the correct numeric group or remote location. When subscribers leave a message for another location, this number must be entered before specifying the remote subscriber name or extension number. To configure an ID for numeric groups and remote sites 1.
Limiting Misdials from Unidentified Callers An unidentified caller is a subscriber, guest, or other person who accesses the messaging system without entering a valid personal ID. The unidentified caller has no system privileges and hears a different system conversation than a caller who enters a valid personal ID.
Enabling Access to Mailbox Manager Subscribers use the Mailbox Manager to read or listen to their messages and change their personal settings using a computer connected to the network. If your organization is using Mailbox Manager, you must enable access to the Mailbox Manager systemwide then set the default subscriber template or individual subscriber access options. To enable access to Mailbox Manager systemwide 1. In the Navigation Pane, click System > Configuration > General.
Configuring Encryption for Mailbox Manager Users Subscribers can use the Mailbox Manager to change their personal settings using a computer that is connected to the network. To configure encryption 1. In the Navigation Pane, click System > Configuration > General. For detailed field information, see the System > Configuration > General System table. 2. 3. Under Web encryption for users, select one: • Require SSL. Use SSL encryption only for log on, password change requests, and enrollment.
System Settings Overview Use the System > System Settings page to configure settings for directory assistance, conversation maps, and startup options and error notification.
Understanding Directory Assistance When a caller does not know a subscriber extension, they can use the alphabetic or numeric directory assistance to select an individual. Operator assistance is not required to use the alphabetic or numeric directory assistance. Alphabetic Directory Assistance Alphabetic directory assistance is the default setting for the messaging system. A caller uses the phone keypad to locate a subscriber by entering the first few letters (usually 3) of the subscriber’s name.
Configuring the Alphabetic Directory Alphabetic directory assistance enables a caller to find a subscriber using the phone keypad to spell the subscriber’s name. The system plays the name of the closest matching subscriber. If the system finds more than one match, it plays each possibility until the caller selects one. Subscribers can be listed in the system directory by selecting Include in alphabetic directory assistance on the subscriber access options page.
Selecting a Conversation Map The messaging system includes optional phone interface emulations in addition to the default conversations described on the Quick Reference Card. These emulations resemble the messaging menu choices that subscribers might be familiar with from their previous messaging system experience. To select a conversation map 1. In the Navigation Pane, click System > Configuration > System Settings. For detailed field information, see the System > Configuration > System Settings table.
Configuring Startup Options and Error Notices When messaging system errors occur a message can be sent to a designated subscriber. Configure at least one subscriber, usually a system manager, to receive error messages. To configure the system startup options and to send error messages 1. In the Navigation Pane, click System > Configuration > System Settings. For detailed field information, see the System > Configuration > System Settings table. 2. Type the startup options in the Startup field. C.
Viewing the Installed System Languages During installation a default messaging system language is selected. Use the following procedure to review the languages and text-to-speech (TTS) languages that are installed. The languages page is also used to change the default language, install and remove languages and TTS languages. NOTE THE NUMBER OF LANGUAGES ACTIVATED ON THE MESSAGING SYSTEM IS LICENSED, THEREFORE YOU CANNOT ACTIVATE MORE LANGUAGES THAN YOUR LICENSE ALLOWS.
Adding or Removing Language Packs Languages in the messaging system can be added and removed. You must have the appropriate licensing to install new languages. NOTE THE MESSAGING SYSTEM MUST BE LICENSED FOR THE NUMBER OF LANGUAGES INSTALLED. WHEN ADDING LANGUAGES KEEP IN MIND THAT EACH LANGUAGE PACK REQUIRES ADDITIONAL DISK SPACE. To add a language pack 1. In the Navigation Pane, click System > Configuration > Languages.
Controlling How Long Public Messages are Stored The System > Configuration > Public Messages page controls how long public messages are stored after they have been heard. Only subscribers who have public message access can listen to public messages. After an authorized subscriber listens to a public message, it is marked as old and is not sent to any other subscriber. If a subscriber deletes a public message, it is deleted from the mailboxes of all subscribers with public message access.
Changing Recording Settings The messaging system has several settings that control how the messaging system records messages. Message Recording and Call Screening Limits The messaging system server hard disk must have enough storage space to accommodate daily storage needs. Set a maximum recording length, in seconds, for greetings and call screening to conserve disk space. These settings are applied to all subscribers and guests.
Related Topics System Schedules System Configuration 44
Entering Contact and Site Information Use the System > Configuration > Contacts page to record contact information for your organization. This information should include the name of the messaging system administrator, customer contact, and telephone numbers. To complete the Contacts fields 1. In the Navigation Pane, click System > Configuration > Contacts. For detailed information about the fields on this page, see the System > Configuration > Contacts table. 2.
Completing the Calls Answered Fields Use the Calls Answered page to configure how calls are answered. To complete the Calls Answered information fields 1. In the Navigation Pane, click System > Configuration > Calls Answered. 2. Type the number of trunks (external lines on the phone system) and stations (number of phones). 3. Type the average number of calls handled per day. 4. Select which day calls are answered: 5. 6. 7. • All trunks. Answers all incoming calls. • Some trunks.
Configuring Access Numbers Configure trunk information, internal modem extension, and voice port station numbers. The information on this page specifies how users access the messaging system from internal and external phones. To complete the access numbers information fields 1. In the Navigation Pane, click System > Configuration > Access Numbers. For detailed field information, see the System > Configuration > Access Numbers table. 2. Type the Trunk pilot #.
Changing Message Sorting Use this page to configure the sort and playback order of messages. To configure message playback order 1. In the Navigation Pane, click System > Configuration > Message Sorting. For detailed field information, see the System > Configuration > Message Sorting table. 2. In the Select Message Order table, specify the order that the message types appear in the messaging system. Select the type of message, then click the up or down arrows the list. 3.
Hospitality Settings The Hospitality Settings page configures the hospitality settings for the messaging system. Use this page to specify PMS confirmation information, wake-up call handling and check-in messages.
Configuring Basic Hospitality Settings Use the System > Configuration > Hospitality Settings page to provide customized messaging system services for hotel guests: wake-up calls, the hotel guest directory, and guest information services. To change the hospitality configuration settings 1. In the Navigation Pane, click System > Configuration > Hospitality Settings. See System > Configuration > Hospitality Settings for field descriptions. 2.
Configuring the Hotel Guest Directory The hotel guest directory enables callers to transfer directly to a guest's room without the assistance of an operator. The messaging system never provides callers with the guest’s room numbers. Guests can select if they are included in the guest directory. To be included in the hotel guest directory, guests access the messaging system, select the guest directory setting, and follow the system prompts to record their name.
Overlapping Room Extension Numbers When the phone system uses overlapping room numbers of different lengths such as 110 and 1102, the messaging system must be able to distinguish between the numbers to correctly transfer a call or send a message lamp on or off code. ID entry delays are used to help differentiate overlapping room numbers. The ID entry delay prevents the messaging system from transferring a call or sending a lamp code until the complete extension number has received.
Configuring Wake -up Calls The messaging system can be configured to enable guests to configure and manage their wake-up calls. Use the system reports available to help you to monitor and manage the wake-up call service. System Capacity The system can make approximately three wake-up calls per minute per dial-capable port on the messaging system. Wake-up calls are sent out only on ports set to Answer/Dial out, Dial out only, Answer/Message, or Message only.
Configuring E -mail Settings The e-mail integration enables subscribers to use text-to-speech technology to use a phone to listen to e-mail messages. Subscribers can include e-mail message totals in the new message count, automatically forward all voice messages to the e-mail inbox, and forward all incoming faxes to the e-mail inbox. E-mail integration provides users with 24-hour access to e-mail from any touchtone phone.
Completing the E -mail Message Template The e-mail message template defines the format for e-mail notification messages, message to copy, message to forward, and faxes sent from the messaging system. To define the e -mail notification message 1. In the Navigation Pane, click System > Configuration > E-mail Message Template. For detailed field information, see the System > Configuration > E-mail message template table. 2. Select a Language to use for the notification e-mail. 3.
Importing Messaging System Data Use the System > Import & Export > Import page to import messaging system data. Imported data can include subscribers, transaction boxes, or groups from another database or messaging system. The import utility creates subscriber accounts using the imported data. CSV File Requirements The first row in a CSV file must contain column headers. The import utility translates the information in each column into subscriber attributes matching the column header.
Exporting Messaging System Data System Schedules System Configuration 57
Exporting Messaging System Data Use the System > Import & Export > Export page to export messaging system data about Subscribers, Transaction boxes, Open groups, Private groups, or Local access groups to a comma-separated value (CSV) file. The CSV file can be archived as a secondary backup of the system, or imported into a database or another messaging system. To export the messaging system data 1. In the Navigation Pane, click System > Import & Export > Export. 2.
Displaying and Updating Licensed Features Use the System > Licensing page to display messaging system licensing or to update licensed features. Displaying the Current Licensing Information Use the following procedure to display the current license settings for the messaging system. To determine installed system settings • In the Navigation Pane, click System > Licensing. The number of licenses for licensed features appear under License Counts.
Redirecting or Remapping Extension Numbers Use the Extension Remapping page to redirect or remap calling and called numbers on a systemwide basis. Calling numbers are numbers that originate the call. Called numbers are numbers that receive the call. NOTE WHEN A LIVE RECORD conversation IS INITIATED FROM A REDIRECTED EXTENSION, THE SYSTEM SENDS THE RECORDED CONVERSATION TO THE MAILBOX OF THE CALLED EXTENSION, INSTEAD OF SENDING THE RECORDED CONVERSATION TO THE REDIRECTED EXTENSION.
To edit an existing extension remapping rule 1. In the Navigation Pane, click System > Extension Remapping. 2. To deactivate the rule without deleting it, clear the Active check box. 3. Click Delete to delete the rule. 4. Change the other fields as needed. 5. To change the priority of a remapping rule, click Move. Then select: 6. • Top of the list. To give the rule priority over all other remapping rules. • Specify. Type a number to assign it to a specific priority in the list. Click Move.
Mapping or Routing Trunks Incoming calls on specific extensions can be routed directly to transaction boxes, language select boxes, or subscribers. For example, if two or more companies share a phone system, the messaging system can differentiate incoming calls for the companies and route the calls. Program trunks to route directly to a specified system ID. If an invalid system ID is defined for a trunk, the system plays “I’m sorry, I did not hear your selection” to callers on that trunk.
Viewing Port Status Use the Port Status page to monitor port status as the messaging system answers and routes calls, dials phone numbers to deliver messages, or turns on message waiting indicators. Each row represents a single port. When a port is idle the field displays the status programmed for the port. When the port is handling a call, the port status appears. Depending on how many ports are installed, several tabs appear on the page, each displaying some of the ports.
Configuring the Extended Automated Attendant The extended automated attendant enables callers to dial extensions when there are no database entities (subscriber mailboxes or transaction boxes) linked to the extension. This significantly reduces the potential database size and increases system responsiveness by decreasing the system resource utilization and system administration. When the extended automated attendant is activated, it acts as an additional database for non-subscriber extensions.
System Schedules Most organizations are not open 24-hours every day. There might be situations where departments have different work hours within the same organization. You can configure up to three different schedules and each schedule has three different modes of operation: • Day Mode. Consists of the days and hours the organization is open for business or when standard phone service is available. Day mode hours are any hours specified, these hours do not have to be normal daylight hours. • Night Mode.
Defining Schedules Define a maximum of three schedules numbered 1 through 3. A company with departments that work different hours can create one schedule for general business hours (schedule #1), one for extended customer service hours (schedule #2), and one for the order department (schedule #3). A special schedule, #4, is always in the same mode. Use schedule #4 for ports or boxes that should be in the same mode regardless of the time of day.
Creating and Modifying Schedules Use the schedule page to define and configure schedules. Configure multiple schedules if your organization has departments on different schedules. When multiple schedules are defined configure each port and transaction box to follow the defined schedules. NOTE IF YOU DO NOT ASSIGN A SCHEDULE TO A PORT, THE PORT USES SCHEDULE #1. IF YOU DO NOT ASSIGN A SCHEDULE TO A TRANSACTION BOX, THE TRANSACTION BOX USES THE SCHEDULE OF THE PORT THAT ANSWERS THE CALL.
Configuring Holidays Define up to 18 holidays in a calendar year. Calls are handled in night mode on days that are defined as holidays. List the dates of the holidays in the Holidays Schedule and associate the schedule with a numbered greeting. Greetings for each holiday are recorded on the Greetings page. Ports assigned to a schedule with Ignore holidays set to No treat incomings calls as if the system is in night mode on holidays. One or more schedules can be set to ignore holidays.
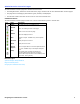
Voice Prompts Use System > Voice Prompts page to listen to or rerecord the messaging system voice prompts. The voice prompts are spoken by the messaging system during a call. Prompts tell callers what action to take as they use the system. The system connects prompts with recorded greetings and voice names to create the system conversation. Use the Administration Console to play or rerecord prompts.
4. Prompt Set Description vc ViewCall program Click Next or Previous to move through the list of prompts. Type the number of prompts to display on the page. 5. Click the prompt button to play the prompt. 6. Close the Media Player window. To rerecord a voice prompt using a computer 1. In the Navigation Pane, click System > Voice Prompts. For detailed field information, see the System > Voice Prompts table. 2. Select the language for the voice prompt from the Language list. 3.
Opening Box Overview Opening boxes manage how the messaging system routes incoming calls: greeting callers, presenting caller selections. and the actions taken in response to the caller selections. A default opening box, with a default opening greeting, is included with the messaging system. The default greeting can be changed. An opening box stores up to three greetings: a day greeting, a night greeting, and an alternate greeting. Only a system manager can record these greetings or switch between them.
Opening Box Configuration Steps The messaging system provides a default configuration for the opening box. While this configuration enables the messaging system to function immediately it can be changed to meet the needs of your organization. Use the following steps to configure an opening box. 1. Plan the messaging system opening action. Decide how callers are greeted and routed. Decide how many opening boxes are needed. 2. Create required opening boxes. See Creating Opening Boxes. 3.
Creating Opening Boxes The messaging system supports multiple opening boxes. Multiple opening boxes are useful if a messaging system is configured to handle multiple incoming phone lines. Opening boxes manage incoming call routing. To create opening boxes 1. In the Navigation Pane, click Call Management > Opening Boxes > Profile. For detailed field information, see the Call Management > Opening Boxes > Profile table. 2. Click Add.
Editing Opening Box Profiles The opening box profile specifies the opening box name, system ID, and Restart IDs. To edit the opening box profile 1. In the Navigation Pane, click Call Management > Opening Boxes > Profile. For detailed field information, see the Call Management > Opening Boxes > Profile table. 2. In the Name field, type a name for the box. 3. In the System ID field, type a new system ID for the box.
Recording Greetings and Configuring Actions After Greetings The opening greeting is the first thing a caller hears when calling a messaging system. This greeting can be changed by recording a new greeting. The greeting buttons on the Greetings page display the duration in minutes and seconds for each greeting. A greeting has not been recorded if 00:00 appears on the button.
Routing Callers with One -Key Dialing One-key dialing enables callers to reach a particular location within the messaging system or select a preferred language by pressing a single touchtone key. One-key dialing is used to route callers from the opening greeting box to transaction boxes, voice detect boxes, language select boxes, or interview boxes. To avoid one-key dialing conflicts with an extension ID, specify a system pause to wait for the caller to press additional keys.
Routing Callers to a Language Select Box Enables callers to select a preferred language for the system conversation. Configure a One-Key dialing option to route callers from the opening greeting box to the language select box. NOTE ONLY SYSTEM ADMINISTRATORS CAN PROGRAM ONE-KEY DIALING, HOWEVER, THEY MUST NOTIFY SUBSCRIBERS TO CHANGE THEIR GREETINGS WHEN ONE-KEY DIALING RULES ARE SELECTED DURING A SUBSCRIBER GREETING. To select a language select box 1.
Opening Box Overview Recording Greetings and Configuring Actions After Greetings Opening Box Overview 78
Configuring Directory Assistance Settings Dialing settings in the opening greeting box can be configured to enable callers to select alphabetic (automatic) or numeric directory assistance. The following procedure assumes that you have already configured numeric directory assistance and that you are not using the one-key dialing settings in the opening greeting box.
System Operator Overview The system operator box is a transaction box that specifies how the system handles calls to the operator. The system operator box defines the extension, call transfer settings, and greetings for the operator and actions taken if the operator is not available. When the operator is not available, the default setting is to transfer the call to a public interview box to gather caller information.
Steps for Configuring the System Operator Box Use the following steps to specify how the messaging system handles calls for to the operator. 1. Configure the operator ID, voice name and language. See Configuring the System Operator Profile for details. 2. Configure call transfer. See Configuring System Operator Box Call Transfer for details. 3. Configure greetings and actions after greetings. See Configuring System Operator Box Greetings for details. 4. Configure message taking settings.
Configuring the System Operator Profile The operator system ID is the number that callers use to connect to the system operator. Callers can press this extension while listening to the opening greeting or at any time the system is listening for an ID. The default system ID for the system operator is 0 (zero), but this can be changed. The operator system ID does not have to match the operator extension. To change system operator box settings 1.
Deleting System Operator Box Messages Bulk deletion of system operator box messages is no longer available. Only subscribers that have access to public message groups can delete public messages associated with the System Operator box. The messaging system is configured to delete system operator box messages automatically on the System > Configuration > Public Messages page. Use the following procedure to delete all messages in the system operator box. To delete the messages in system operator box 1.
Configuring System Operator Box Call Transfer After a caller is connected to the system operator box, the system operator box takes control of the call and applies the transfer-greeting-action rules configured for the box. Call transfer settings determine how the phone and messaging system interact during a call transfer. To configure call transfer 1. In the Navigation Pane, click Call Management > System Operator Box > Call Transfer.
Configuring System Operator Box Greetings Use the System Operator Greetings page to record operator greetings. When a transfer to the operator extension is not successful the system plays the active greeting and then takes the specified action. By default, the system is configured to route the caller to the public interview box. The Active Greetings section has recording buttons; the length of each recording appears on the button. A greeting has not been recorded if 00:00 appears on the button.
Recording Voice Fields or Interview Prompts Opening Box Overview Configuring How Messages are Taken for a Transaction Box Steps for Configuring the System Operator Box Record Transaction Box or Voice Detect Box Greetings Using a Phone Public Interview Box Overview System Operator Overview 86
Configuring How Messages are Taken for the System Operator Box Use the System Operator Messages page to control how the system takes messages for the system operator box: set the maximum length of a message, if callers can leave urgent messages, and set the action the system takes after taking a message for the box. After the operator has heard a message, the messages can be manually deleted or left for the system to automatically delete the messages.
Assigning a System Operator Box to a Port Multiple operators can be created by configuring a transaction box for each port receiving incoming calls. When callers press 0 (zero) during a messaging system conversation they are routed to a second operator. Multiple operators are used to support systems with two or more languages, systems shared by two or more businesses, or other special applications. Designate Port 1 to receive all calls that come to the phone number advertised as a Spanish language line.
Transaction Box Overview Use transaction boxes to configure special call handling, create menus, or play prerecorded announcements. Configure call transfer to a phone number or extension for each transaction box. If the extension is busy or unanswered, the system plays a greeting for the box, then takes the action specified. Unlike the subscriber directory page, a transaction box can handle callers two different ways: one for day mode and one for night mode.
Transaction Box Configuration Steps Several processes are required to properly create and configure the transaction boxes. 1. Add the transaction box. See Adding a Transaction Box. 2. Configure the general transaction box settings. See Configuring a Transaction Box Name, Language, or Schedule. 3. Change call transfer. See Editing the Transaction Box Name, Language, or Schedule. 4. Record greetings for the transaction boxes. See Configuring Transaction Box Greetings and Action After Greetings. 5.
Adding a Transaction Box Decide how many transaction boxes are needed and how callers are routed to them. Before creating a new transaction box, decide who will own the box. The owner receives messages for the box when the box is configured to take messages. When an owner is deleted, the box is automatically deleted. NOTE BACK UP THE MESSAGING SYSTEM SOFTWARE AND DATA BEFORE MAKING SIGNIFICANT CHANGES TO THE CONFIGURATION SUCH AS ADDING A LARGE NUMBER OF TRANSACTION BOXES.
Deleting a Transaction Box Delete all references to a transaction box system ID when deleting a transaction box. Any messages currently stored in the transaction box are automatically deleted. You cannot delete system defined transaction boxes. To delete a transaction box 1. In the Navigation Pane, click Call Management > Transaction Boxes > Profile. 2. Select the box to delete. Click Search to find and select the transaction box to delete. 3. Click Delete to delete the transaction box. 4.
Configuring a Transaction Box Name, Language, or Schedule After adding a transaction box you need to record the name, assign a language, and select a schedule. To change general transaction box settings 1. In the Navigation Pane, click Call Management > Transaction Boxes > Profile. For detailed field information, see the Call Management > Transaction Boxes - Profile table. 2. Click Voice name to record a name. 3. Select a default language for the transaction box from the Language list. 4.
Editing the Transaction Box Name, Language, or Schedule After adding a transaction box you need to record the name, assign a language, and select a schedule. To edit the transaction box settings 1. In the Navigation Pane, click Call Management > Transaction Boxes > Profile. For detailed field information, see the Call Management > Transaction Boxes - Profile table. 2. 3. Click Search to find and select a transaction box. a.
Configuring Transaction Box Call Transfers Call transfer settings determine how the phone system and the messaging system interact during a call transfer. Specify the extension where calls are transferred, select the transfer type, and configure the call transfer settings. If call transfer is turned on and Await Answer is the transfer type, the messaging system tries to transfer a call to the phone or extension listed.
8. Record an Introduction. The messaging system plays this recording before it transfers a call to the transaction box. 9. Click Save.
Configuring Transaction Box Greetings and Action After Greetings Transaction box greetings are recorded and stored on the transaction box Greetings page. If call transfer is turned off or if the extension is busy or unanswered, the system plays the active greeting. The system then takes the after-greeting action defined. When a caller does not press any touchtone keys during the greeting, the messaging system takes the after-greeting action defined on the Greetings page.
Record Transaction Box or Voice Detect Box Greetings Using a Phone Only transaction box owners can use a phone conversation to change greetings if the transaction box system ID does not contain a $ (dollar sign) or other symbol not found on the touchtone phone keypad. When a system ID contains a $ or other symbol not found on the touchtone phone keypad, greetings can only be changed using the Administration Console. To record transaction box greetings using a phone 1.
Configuring How Messages are Taken for a Transaction Box Configure how messages are taken for transaction boxes on the Messages page. This includes setting the maximum length of a message, if callers can leave urgent messages, and the action the system takes after taking a message. Specify the action the system takes after recording the message. If the system is set to take a message, specify whether callers can edit their messages or mark messages urgent.
Configuring Transaction Box One -key Dialing Use the One-key dialing page to define one-key dialing to offer callers a menu of choices. One-key dialing enables callers to use a single touchtone key (from 0 to 9) to represent any transaction box. Set any system IDs where callers can be routed when they press a single touchtone key. Callers can bypass one-key dialing. Set the system to pause a certain number of seconds for additional touchtones before routing the call according to the one-key dialing menu.
Interview Boxes Overview Interview boxes provide information or collect information from callers. An interview box can contain up to 20 questions or announcements. Each interview box has an owner, a name, and a system ID. When the interview box owner is removed from the system, the interview box is automatically deleted. When collecting information from callers, configure the interview box to record caller responses. A beep after the question prompts callers to respond.
Interview Box Configuration Steps 1. Plan the interview. See Planning an Interview. 2. Create the interview box. See Adding an Interview Box. 3. Record the interview questions. See Recording Interview Box Questions. 4. Configure how messages are taken. See Configuring How Messages are Taken for an Interview Box. 5. Test the interview. Call the system and confirm that the system handles the call correctly.
Planning an Interview Think about the information that is to be collected from the caller. Write the questions before creating an interview box. Determine the maximum length, in seconds, of the response for each question. Decide how callers are routed to the interview box: • Callers can be routed using a transaction box after-greeting action. • One-key dialing from a transaction box to the interview box. • Dialing the system ID for the interview box during the opening greeting.
Adding an Interview Box Use the following procedure to add a new interview box. To add an interview box 1. In the Navigation Pane, click Call Management > Interview Boxes > Profile. For detailed field information, see the Call Management > Transaction Boxes - Profile table. 2. Click Add. See “Administration Console Pages,” for information about the Administration Console icons. The Add Interview Boxes dialog box appears. a. Type a name for the interview box. b. Type a system ID for the interview box.
Recording Interview Box Questions Record the questions and set the maximum time callers have to respond to each question after creating an interview box. Use a phone or the Administration Console to record the interview box questions. To record interview box questions 1. In the Navigation Pane, click Call Management > Interview Boxes > Questions. 2. Select an Interview box. Click the Previous icon or click Search to find and select an interview box.
Configuring How Messages are Taken for an Interview Box Configure how the messaging system stores interview box messages. Caller replies to the interview questions are saved in a single message and each reply is separated by a beep. To configure how messages are taken for an interview box 1. In the Navigation Pane, click Call Management > Interview Boxes > Messages. 2. Select an Interview box. Click the Previous icon or click Search to find and select an interview box.
Public Interview Box Overview The public interview box is a special interview box used to handle operator calls that are not answered. The public interview box asks a caller for his or her name, phone number, and a brief message. Using the public interview box is not restricted operator calls that are not answered. Public interview boxes can be used to collect information for a company survey, collect caller information for a department, and so on.
Language Box Overview Use the Language Boxes Profile page to create a language box. Language boxes enable callers to select a language for the system conversation. Use language boxes only when the messaging system has more than one language installed. Use a voice detect box to automatically assign a language to callers. Planning Language Boxes Each language box is assigned a unique system ID. The system manager owns the language boxes and only a system manager can add or change language boxes.
Language Box Configuration Steps 1. Add a language box. See Adding and Configuring Language Boxes. 2. Record instructions telling callers to select a language. See Configuring Language Box Key Mapping. 3. Configure the restart ID for each language. See Editing Opening Box Profiles. 4. Configure the opening greeting. See Call Management > Opening Box - Greetings.
Adding and Configuring Language Boxes When multiple languages are installed on a messaging system, use language boxes to enable callers to select a language for the system conversation. A language can be assigned to a dedicated port if you expect to receive a substantial number of calls in a particular language. To add and configure a language box 1. In the Navigation Pane, click Call Management > Language Boxes > Profile.
Configuring Language Box Key Mapping Use the Key Map page to record instructions describing how to select a language and set the action the system takes for each language selection. Create up to 10 different recordings (numbered 0 through 9), one for each number on the phone keypad. Each recording should be in the same language specified in the Language list for the key. To configure key mapping 1. In the Navigation Pane, click Call Management > Language Boxes > Key Map.
Voice Detect Boxes Overview Voice detect boxes are used when the phone system or service area includes callers that do not have touchtone access and the messaging system is not configured to detect dial pulses. Voice detect offers menus and directories to callers then listens for spoken sounds and silence, not touchtones. A voice detect box is a type of transaction box that listens for verbal caller responses instead of touchtones.
Voice Detect Box Configuration Steps 1. Plan the voice detect application. Decide how many voice detect boxes you need and how callers are routed to them. 2. Add the voice detect boxes. See “Adding a Voice Detect Box.” 3. Configure the voice detect box. See “Configuring Call Transfer for a Voice Detect Box.” 4. Configure call transfer settings. See “Configuring Call Transfer for a Voice Detect Box.” 5. Configure greetings and actions.
Adding a Voice Detect Box The default voice detect box, $VOICE, is installed with the messaging system. Additional voice detect boxes can be added to the messaging system, use the following procedure to add voice detect boxes to the messaging system. To add a voice detect box 1. In the Navigation Pane, click Call Management > Voice Detect Boxes > Profile. For detailed field information, see the Call Management > Voice Detect Boxes - Profile table. 2. Click Add.
Related Topics Voice Detect Box Configuration Steps Configuring Call Transfer for a Voice Detect Box Configuring Voice Detect Box Greetings and Action After Greetings Configuring How Voice Detect Box Messages are Taken Configuring a Destination ID for Speech or Silence Configuring Voice Detect Call Holding Configuring Voice Detection Voice Detect Boxes Overview 115
Configuring Call Transfer for a Voice Detect Box The voice detect box call transfer settings determine how the phone and the messaging systems interact during a call transfer. When call transfer is turned on and the transfer type is Await Answer, the messaging system tries to transfer the call to the phone or extension listed. If the extension is busy or unanswered, the system plays a greeting for the box and follows the configured after-greeting action. To change call transfer for a voice detect box 1.
Configuring How Voice Detect Box Messages are Taken Configuring a Destination ID for Speech or Silence Configuring Voice Detect Call Holding Configuring Voice Detection Voice Detect Boxes Overview 117
Configuring Voice Detect Box Greetings and Action After Greetings Voice detect box greetings are located on the Greetings page. If call transfer is turned off or if the extension is busy or unanswered, the system plays the active greeting. The system then takes the after-greeting action specified on the Greetings page. The Active Greeting section configures which greeting is played: day, night or alternate greeting.
Configuring How Voice Detect Box Messages are Taken Control how the system takes messages for the voice detect box, configure the maximum length of a message, and specify if callers can leave urgent messages, and configure the action after taking a message. To configure how messages are taken for a voice detect box 1. In the Navigation Pane, click Call Management > Voice Detect Boxes > Messages. For detailed field information, see the Call Management > Voice Detect Boxes - Messages table. 2.
Configuring a Destination ID for Speech or Silence When configuring a voice detect box specify the system IDs where callers are routed if they speak or remain silent. To limit phantom calls to the operator, do not set the system to route callers to the operator if they remain silent. Route silent callers to another box with the action after greeting set to Hang up or Say bye. To configure the system ID where callers are routed from a voice detect box 1.
Configuring Voice Detect Call Holding Callers say “Yes” or remain silent to place themselves on hold when call holding and call transfer are configured with voice detect. The voice detect call holding feature is configured on any Transfer page that has the Use VOX holding check box. To enable call holding the following must be enabled: • Call transfer type must be set to Await Answer or Wait for ringback set. • Allow call holding must be enabled.
Changing the Public Fax Box System ID The public fax box provides fax detect, routing, and notification for incoming faxes eliminating the need for a dedicated phone line for a fax machine. The public fax settings apply to both manual and automatic fax calls. • Manual Faxes. Callers dial a fax number using the phone keypad on a fax machine and listen to the progress of their calls on a speaker or handset.
Configuring the Public Fax Box Call Transfer Settings The call transfer settings determine how the phone system and the messaging system interact during a call transfer. To configure the public fax call transfer 1. In the Navigation Pane, click Call Management > Public Fax Box > Call Transfer. For detailed field information, see the Call Management > Public Fax Box - Call Transfer table. 2. To enable call transfer to an extension connected to the fax machine select Transfer to.
Configuring the Public Fax Box Actions Use the fax action page to configure what the messaging system should do if the fax extension does not answer or is busy. To configure the public fax action if the fax extension does not answer or is busy 1. In the Navigation Pane, click Call Management > Public Fax Box > Action. 2. Select the action the messaging system is to take if the fax extension does not answer or is busy. 3. 4. • Route to operator. Route the caller to the system operator box.
Creating and Maintaining Fax Boxes The messaging system maintains fax boxes for receiving faxes routed to a particular system ID in addition to subscriber fax boxes. Use these fax boxes for special needs, such as collecting faxed résumés from job applicants or incoming orders from customers. These fax boxes are assigned to an owner. The configuration procedures for fax boxes are similar to those for subscriber fax boxes. Adding a Fax Box Use the following procedure to create a new fax box.
Configuring Fax Box Settings Fax box owners use this page to configure voice annotation, record an introduction, specify the action the messaging system takes if a fax port is not available, specify what action the messaging system takes after taking a message or holding, and record the fax box greeting. To configure fax settings 1. In the Navigation Pane, click Call Management > Fax Boxes > Voice Annotation and Fax Action.
Configuring One -Key Dialing for a Fax Box Use the Fax Boxes One-key dialing page to configure one-key dialing rules for the fax box. One-key dialing enables callers to use a single touchtone key (from 0 to 9) to select a system ID or any transaction box. NOTE ONLY SYSTEM ADMINISTRATORS CAN PROGRAM ONE-KEY DIALING, HOWEVER, THEY MUST NOTIFY SUBSCRIBERS TO CHANGE THEIR GREETINGS WHEN ONE-KEY DIALING RULES ARE SELECTED DURING A SUBSCRIBER GREETING. To configure one -key dialing for a fax box 1.
Subscriber Template Overview Use the subscriber template to configure default settings for all new subscribers after the messaging system is installed and before starting to add new subscribers. When new subscribers are added to the system, their settings are automatically set to the template values. Using the subscriber template to configure default settings can save time and ensure consistency of data in the messaging system.
Configuring the Default Subscriber Template Subscriber template pages is used to configure default values that are applied when new subscribers are added to the messaging system. The subscriber template is divided into ten pages: 1. Profile. Configure the default subscriber personal ID and language settings. See Configuring the Default Personal ID and Language. 2. Access Options. Contains settings to specify how the subscriber interacts with the messaging system.
Understanding Default Profile Settings — Overview Default subscriber profile settings are configured on the subscriber template page. These settings are used when new subscribers are added to the messaging system database. The following information is a summary of the information on the template, subsequent topics provide detailed procedures for configuring the default profile.
Configuring the Default Personal ID and Language The default subscriber profile template includes the default settings for personal IDs and default language selection. To create the default subscriber ID 1. In the Navigation Pane, click Subscribers > Subscriber Template > Profile. For detailed field information, see the Subscribers > Subscribers > Profile table. 2. Type a 1- or 2- digit prefix followed by X in the Personal ID field. The X is replaced with the subscriber’s extension number. 3.
Selecting Default Subscriber Access Options Access options control subscriber access to system features. The access options selected determine how the subscriber interacts with the messaging system. The default settings can be changed for individual subscribers on the subscriber access options page. To enable or disable a setting for the majority of subscribers, enable or disable the option on the subscriber template page. To change subscriber access options 1.
Require first-time enrollment Requires subscribers to enroll themselves the next time they call the system or use Mailbox Manager. The system does not deliver messages to subscribers until they have enrolled. Allow to change phone notification settings and call screening options The subscriber can change notification settings. Allow to change hold settings. The subscriber can change call holding using a phone. NOTE FOR SECURITY REASONS, THIS ACCESS OPTION IS TURNED OFF BY DEFAULT.
Address messages by extension Send messages using the extension number instead of the first three letters of the last name. Allow to edit subscriber-to-subscriber messages Subscribers can add to, listen to, or rerecord messages to another subscriber. Allow to redirect messages Subscribers can redirect messages. Allow access to public message groups Subscribers can create public message groups and send messages to public message groups.
Related Topics Configuring the Default Subscriber Template Understanding Default Profile Settings — Overview Subscriber Template Overview Subscriber Template Overview 135
Default Transfer, Call Holding, and Call Screening Configure the default call transfer settings for all new subscribers. The messaging system handles the calls following the transfer-greeting-action structure configured in the subscriber call transfer template. A customized transfer structure for individual subscribers is configured on the subscriber call transfer page. In most cases, the system tries to transfer a call to the extension.
Configuring Default Call Transfer Settings All transfer types put calls on hold and then dials the requested extension. The most common call transfer type is release. The await answer transfer type is required to configuring call screening and call holding settings. Call screening causes the system to screen calls before transferring the call to the subscriber; the messaging system plays the configured screening information before the subscriber accepts the call.
10. Click Subscriber Template > Greetings, select Take a message. If Take a message is not selected, record a different call holding prompt. Take a message offers callers, who are placed on hold, the choice to continue holding, leave a message, or try another extension. 11. Click Save.
Configuring Default Greetings The Subscriber Template Greetings page specifies how the messaging system handles calls when an extension is busy. To activate the busy greeting and configure after greeting actions 1. In the Navigation Pane, click Subscribers > Subscriber Template > Greetings. For detailed field information, see the Subscribers > Subscriber Template > Greetings table. 2. Select Enable busy greeting to play a busy greeting when the subscriber’s extension is busy.
Configuring Default One -Key Dialing Use the Subscriber Template One-key Dialing page to enable callers to press one key on a touchtone keypad to make a selection. One-key dialing quickly routes callers to directory assistance, a subscriber extension, transaction boxes, voice detect boxes, language boxes, or interview boxes.
Configuring Default Messaging Use the Subscriber Template > Messages page to define rules for unidentified caller messaging. This includes enabling unidentified callers to edit messages they recorded, specifying the maximum length of the message, if the caller can mark the message as urgent, what the messaging system does after taking the message, message retention, maximum message storage, setting the maximum messages a subscriber can save, and the message playback order for new and old messages.
12. Click Save.
Configuring Default Message Notification and Delivery Use the Subscriber Template Notification page to configure message notification. The messaging system uses a message waiting indicator light on the phone to tell subscribers when messages are waiting. Other message notifications include a distinctive dial tone, such as a stutter tone, or a message display. The method available depends on the phone system. To activate message delivery and notification 1.
A delivery attempt is fails when the delivery number is busy, unanswered, answered by a person who does not enter a personal ID or answered by an answering machine. g. In the Maximum retries field, type the number of unsuccessful delivery attempts before the messaging system stops trying to deliver the notification to the selected device. To configure no limit, type 99. h. Click Save. Repeat this step for each device type used for message notification.
Configuring Default Fax Delivery Notification The messaging system notifies subscribers of new faxes and delivers a fax message to a specific fax machine at a scheduled time. Specify default fax notification settings on the Subscriber Template > Notification page. To configure additional notification settings 1. In the Navigation Pane, click Subscribers > Subscriber Template > Notification. For detailed field information, see the Subscribers > Subscriber Template > Notification table. 2.
Configuring Default Live Record Settings Live record, available with certain DTMF phone system integrations and ViewMail® or ViewMail for Microsoft Messaging, enables subscribers to record phone conversations. A subscriber can keep this recording for later reference or redirect it to another subscriber or group of subscribers. Local laws might require a periodic beep while a conversation is being recorded. The messaging system provides this beep.
Enabling Live Monitor The live monitor feature must be licensed. It enables subscribers to listen to a message as it is being recorded in their mailbox. The phone system and the subscriber’s extension must be configured properly to monitor messages as they are being recorded. Refer to “Configuring live monitor” and “Configuring the phone system integration” chapters in the Installation Guide for instructions.
Configuring Default Fax Settings Use the Subscriber Template Fax page to configure the FAX system ID, fax routing, after message or holding routing, voice annotation, and one-key dialing rules. NOTE ActiveFax IS AN OPTIONAL FEATURE THAT REQUIRES LICENSING AND INSTALLATION. When many or all subscribers want personal fax boxes, configure a default convention for assigning fax IDs.
Configuring Default Subscriber E -mail Settings The messaging system must be licensed for e-mail integration and the integration configuration steps must be completed during installation before subscribers can use the e-mail features. Subscribers receive new e-mail message notifications through the messaging system or the e-mail integration package. Subscribers can listen to e-mail messages from any touchtone phone.
Configuring Default Account Policies Use the Subscribers > Account Policy page to configure default account policies for subscribers. Specify a default password (security code) for each new subscriber, specify the minimum length of the security code, and for minimal security allow blank passwords. When a default security code is created the messaging system requires subscribers to create a new code during the enrollment conversation.
Enrolling Subscribers There are two ways to enroll subscribers: • Enroll each subscriber at the console typing their names in the appropriate fields of the Subscriber Directory. • Allow subscribers to self-enroll. To allow self-enrollment, you must add subscriber mailboxes with Require first-time enrollment set. This setting directs subscribers to call the messaging system and enroll. After general enrollment is completed: • Delete any unused subscriber voice mailboxes.
Subscribers Profile Overview The Subscribers pages have the same fields as the subscriber template pages but they also provide several additional settings that apply only to individual subscribers. Use the subscribers profile page to configure custom preferences for each subscriber. This includes their recorded names, personal IDs, language choice, message counts, and more. Subscriber information spans several pages in the Administration Console.
Customizing Subscriber Profile Information This page contains specific subscriber information: extension number, name, personal ID, recorded name, language preference, security code, number of new messages, and total number of messages. For detailed information about the subscriber template default settings, see Configuring the Default Subscriber Template. To customize a subscriber profile 1. In the Navigation Pane, click Subscribers > Subscribers > Profile.
Adding New Subscribers New subscribers can be added one-at-a-time or you can create a range of subscriber mailboxes. When a range of subscriber mailboxes are added, they can be assigned to new subscribers as new subscribers are hired. When you add a new subscriber, the messaging system automatically uses the default settings specified in the subscriber template, these settings can be customized for the subscriber on the Subscriber Profile page. To add a single subscriber 1.
Searching for a Subscriber Use this has a large number of subscribers, finding a particular subscriber profile can be time consuming. The search function simplifies this task. To find a subscriber by name or an extension 1. In the Navigation Pane, click Subscribers > Subscribers > Profile. 2. Click Search to find and select a subscriber. The Search and Select Subscriber dialog box appears. 3.
Deleting Subscriber Information The following subscriber information can be deleted from the messaging system database: • Subscribers • Subscriber’s messages When a subscriber is removed from the system, the messaging system automatically deletes all messages, private message groups, guests, transaction boxes, and interview boxes owned by the subscriber. Subscriber’s e-mail messages are not deleted from the e-mail system when a subscriber is removed from the messaging system. To delete a subscriber 1.
Resetting Subscriber Password The subscriber’s password cannot be retrieved or deleted. However, system managers can reset the subscriber password to the system default when a subscriber forgets their password. To reset subscriber security codes 1. In the Navigation Pane, click Subscribers > Subscribers > Profile. 2. Click Search to find and select a subscriber. 3. On the subscriber Profile page, select Reset password to System Default password. 4. Click Save. 5.
Assigning System Manager Status Any enrolled subscriber can be a system manager. However, only existing system managers can assign system manager status to other subscribers. There must be at least one system manager for the messaging system. If there is only one system manager in the system, that subscriber cannot be demoted from system manager. To assign system manager status 1. In the Navigation Pane, click Subscribers > Subscribers > Profile. 2.
Changing Subscriber Access Settings The Access Options page controls how subscribers access system features. The subscriber template defines general access options for all new subscribers. Use the Subscribers > Access Options page to customize individual subscriber access. To change subscriber access options 1. In the Navigation Pane, click Subscribers > Subscribers > Access Options. 2. Click Search to find and select a subscriber. 3. Select or clear the access settings.
Enabling Live Monitor for a Subscriber Subscribers use the live monitor feature to listen to a message as it is being recorded in their mailbox. To monitor messages using a phone, the phone system and the subscriber’s extension must be properly configured. See “Configuring live monitor” in the “Configuring the phone system integration” chapter of the Installation Guide for instructions. To enable live monitor for a subscriber 1. In the Navigation Pane, click Subscribers > Subscribers > Access Options. 2.
Transfer, Call Holding, and Call Screening Configuration Steps Customize call transfer settings for individual subscribers on the subscriber call transfer page. All new subscribers inherit the call transfer settings configured on the subscriber template call transfer page. The messaging system follows the transfer-greeting-action defined for the subscriber mailbox.
Configuring Subscriber Call Transfer Settings Use the Subscriber > Call Transfer page to enable subscriber call transfer and select call transfer types. All call transfer types put a call on hold then dial the extension. The most common transfer type is release. The await answer transfer type is required to configure call screening and call holding. When call screening is enabled the messaging system screens calls transferred to a subscriber.
11. Click Save. 12. On the Subscriber > Greeting page, select Take a message. If Take a message is not selected, record a different call holding prompt. Take a message offers callers on hold to continue holding, leave a message, or call another extension. 13. Click Save.
Configuring Subscriber Greetings Use the Subscriber Greetings page to listen to and record subscriber greetings. Each subscriber has a standard greeting, busy greeting, and alternate greeting. Use this page to select an active greeting (standard or alternate), activate or deactivate the busy greeting, or customize the transfer-greeting-action sequence.
Configuring Subscriber One -Key Dialing One-key dialing enables callers to press one key to go to a particular location within the messaging system. For example, callers can be quickly routed to directory assistance, subscribers’ extensions, transaction boxes, voice detect boxes, language boxes, or interview boxes. When a caller presses a key that is set for one-key dialing, the messaging system immediately acts on that key press.
SET THE SYSTEM TO WAIT A CERTAIN NUMBER OF SECONDS FOR ADDITIONAL TOUCHTONES BEFORE ROUTING THE CALL ACCORDING TO THE ONE-KEY DIALING MENU. GREETING. SET THE IDS AND BYPASS ONE-KEY One-key delay FIELD. PAUSE ENABLES CALLERS TO ENTER FULL SYSTEM HOW LONG THE SYSTEM WAITS BETWEEN TOUCHTONES USING THE DIALING DURING A 5. Click Save. 6. Record a new greeting to provide paging instructions for callers. For example, “Hello, this is Pat. I am away from my desk at the moment, to page me, press 1 now.
Configuring Subscriber Message Handling Use the Subscribers > Messages page to configure how subscriber messages are handled. This includes unidentified caller messages, message retention, message storage limits, and message handling. Storing Messages When a new message arrives it is stored until the subscriber listens to it. Once a subscriber has listened to a message, the message is marked as old and is saved for a specified number of days that is configured on the Subscriber Template > Messages page.
• All messages. Count voice, transaction box messages, interview box messages, and fax boxes. 10. Select Maximum number of messages and type the number in the text box. • If a message storage limit has been set, select Warn subscribers when message storage reaches to warn subscribers before the limit is reached, and type the number of megabytes in the text box. • Include transaction box messages in quantity calculations.
Configuring Subscriber Message Notification and Delivery Use the Subscribers > Notification page to configure subscriber message notification. The messaging system notifies subscribers that new messages are available using: message waiting indicator and message delivery. Message notification can be sent to the subscriber extension or other external phones that the system automatically dials. Up to five devices per subscriber can be configured for message notification.
• Use this setting to assign priorities to each message delivery phone number. For example, if you type 0 (zero) for Work Phone and 60 for Home Phone, for the first 60 minutes the messaging system tries to deliver new messages only to the Work Phone. After 60 minutes, it tries to deliver new messages to both phones. f. Select the number of rings that the system waits for an answer when attempting to deliver the message in the Wait … rings before failing the attempt field. g.
Configuring Fax Delivery Notification The messaging system notifies subscribers of new faxes and delivers a fax message to a specific fax machine at a scheduled time. Specify default fax notification settings on the Subscriber Template > Notification page. To configure additional notification settings 1. In the Navigation Pane, click Subscribers > Subscriber Template > Notification. For detailed field information, see the Subscribers > Subscriber Template > Notification table. 2.
Configuring Subscriber Live Record Settings Live record enables subscribers to record phone conversations and is available with certain DTMF phone system integrations and ViewMail. A subscriber saves the recording for later reference or redirect it to another subscriber or group of subscribers. Using Live Record without ViewMail If DTMF live record is used without ViewMail, the phone system administrator programs the phone system to enable live record on the phones.
Configuring Subscriber Fax Use the Subscribers > Fax page to configure subscriber’s default fax mail settings to accommodate individual preferences. Configure fax delivery to a specific fax machine, record a fax introduction and/or fax greeting, permit voice annotation, and configure one-key dialing rules for each subscriber. NOTE WHEN YOU CONFIGURE SUBSCRIBER ONE-KEY DIALING RULES, MAKE SURE THAT YOU HAVE THE SUBSCRIBER RERECORD THEIR GREETING TO EXPLAIN THE ONE-KEY DIALING RULES TO THE CALLER.
c. Select Allow edits to voice annotation to allow callers to edit the recorded annotation. d. Select Notify subscriber even if there is no voice annotation to send a subscriber notification for the fax message. This field works with Ask for voice annotation. 8. Configure one-key dialing rules for the fax box. Maximum of 10 keys can be configured. 9. Click Fax Greeting to explain the one-key dialing rules. NOTE SUBSCRIBERS CANNOT RECORD THE FAX GREETING FOR THEIR FAX MAILBOX. 10. Click Save.
Configuring System Handling When Fax Ports are Not Available To configure system handling when a fax port is not available 1. In the Navigation Pane, click Subscribers > Subscribers > Fax. 2. Click Search to find and select a subscriber. 3. Select an action in the No Fax Available section: 4. 5. • Take a message. When selected, select the appropriate action in the After Message or Holding section. • Route to operator. Routes the caller to the system operator box. • Route to.
Configuring Subscriber E -mail Settings Use the Subscriber > E-mail page to configure subscriber e-mail notification and e-mail server information. The e-mail integration enables subscribers to use text-to-speech technology and a phone to listen their e-mail messages. The new message count can include e-mail messages, all voice messages and incoming faxes can be automatically forwarded to their e-mail inbox.
Subscriber Guests Use the Subscribers > Guest page to create subscriber guest profiles. When subscriber guests are created the host subscriber provides a personalized messaging system experience for clients, contacts, friends, or family. These callers are enrolled on the system as guests of the subscriber and are greeted by name and have direct access to exchange messages with their host. Guests are limited to leaving messages for their host.
Managing Subscriber Guests Guests are assigned to a host subscriber. Guest messages can be deleted without removing the guest from the messaging system. However, when a guest is removed all messages owned by the guest are automatically deleted. To add a guest 1. In the Navigation Pane, click Subscribers > Guests > Profile. 2. Click Add. See “Administration Console Pages,” for information about the Administration Console icons. The Add Guest dialog box appears. a.
Configuring Guest Message Notification Guest notifications must be configured by the system manager. System managers use this page to configure guest notifications. To configure a guest message notification 1. In the Navigation Pane, click Subscribers > Guests > Notification. For detailed field information, see the Subscribers > Subscribers > Guests > Notification table. 2. Click Search to find and select a guest. 3. Select a notification device and use the following steps to configure the device.
Training New Subscribers Subscriber training is an important to help subscribers understand and use the messaging system. Training subscribers is more effective when training focuses on the essential features. Break up the training into the basics so that subscribers become familiar and comfortable logging on to the system and accessing their messages. More advanced training can be provided as subscribers become familiar with the system or develop special needs.
2. Test subscriber 1 checks messages: a. Call the system as the test subscriber 1 and log on. When the system answers, enter the test subscriber’s Personal ID. b. Listen to the system conversation, the messaging system announces the number of new messages. c. Play the sample message recorded before training and ask for a reply. d. Record a short reply. When the system plays the message recorded in step 1, and prompts for a reply, record a short response to the message. 3.
The Day After Training Record a group message for all subscribers that participated in the training. Ask the subscribers if there are any problems or questions. Request a reply to your message. If you receive a reply indicating that a subscriber is confused or frustrated with the messaging system, visit that person to help them resolve their issues.
Backing up and Restoring Messaging System Data The messaging system backs up the messaging system data on a daily basis at a preconfigured time. The default time of the daily back up is 2:00 AM in the local time zone. Manual back ups can be done when you need to back up data before an upgrade or migration.
Backing Up the Messaging System Data The messaging system database is backed up on a regular basis. Backups include all subscriber information, system prompts, recorded names, and can include messages. Backup files are saved with a .zip file extension. Use the restore utility to restore data from backups or migrate data from different versions of the messaging system to the current version. The back up and restore utilities are run using the Administration Console. Backup Types • Manual.
Scheduling Daily Backups Daily backups occur every day at the selected time by default. System managers can change the time of the scheduled backup. The file name is automatically generated using the system date and time. For example, vmbackup-2009090620002.zip. To schedule a daily backup 1. In the Navigation Pane, click System > Backup & Restore > Backup. 2. On the Backup page select Enable daily backup at… 3. Select the hours, minutes, and AM or PM from the time lists. 4.
Restoring Data from Backup Files Use the restore utility to restore a backup file. Backup files might consist of data from the current version or data from an earlier version of an OS/2 or DOS messaging system. Restoring data from OS/2 or DOS versions might not transfer data from the previous messaging system.
Transferring Backup Files There might be a time when you need to store the messaging system backup files on another computer. The following procedure provides instructions for transferring files between the messaging system and another computer. There are other methods of transferring files between computers, these include using PuTTY, or WinSCP. Refer to the manufacturer’s documentation for these utilities.
Updating the Messaging System Software Updates for the messaging system software are made available as files that can be downloaded and installed. Notifications are sent when an update is available to be downloaded. Download the update file from a specified source saving it to a GUI (Graphical User Interface) based operating system such as Windows XP or Linux with a GUI. WARNING! THE MESSAGING SYSTEM SOFTWARE MUST BE REGISTERED OR YOU WILL NOT BE ABLE TO DOWNLOAD THE UPDATES.
Configuring Log Settings The messaging system provides a variety of log files that monitor system activity and error conditions related to data and internal processes. If an error occurs, it is recorded in an error log file. Use the System > Logs page to configure the number of days that the messaging system stores the log files. The messaging system deletes old files at midnight on the day that they expire. To configure error log settings 1.
Message Groups Overview Message groups provide a way to deliver a message to several subscribers at the same time. When a message is sent to a message group, it is automatically sent to all subscribers that are members of the group. Depending upon the Distribution method selected, a message might be heard by only one member (Dispatch) or by all members (Broadcast). System managers create and maintain message groups using the Administration Console.
To send a message to the All Subscribers group 1. Log on to the messaging system as a subscriber. 2. When prompted enter All on the phone keypad.
Creating and Configuring a Message Group Configure message groups on the Groups > Message Groups page. Subscribers with access to the Mailbox Manager can create and manage their own message groups on the Group tab. Subscribers should refer to the User Guide or Mailbox Manager Help for procedures to create and manage message groups. To create a message group 1. In the Navigation Pane, click Groups > Message Groups. The Message Groups profile page appears.
Deleting a Message Group or Group Messages The following Message Group information can be deleted: • A group • A group’s messages • A group’s members. See Removing Message Group Members. To delete a message group 1. In the Navigation Pane, click Groups > Message groups. 2. Click Search to find and select a message group. 3. Click Delete Group, Save Messages to delete the message group and save the group messages. 4. Click OK to confirm the deletion or click Cancel.
Removing Message Group Members To remove members from a message group 1. In the Navigation Pane, click Groups > Message groups. 2. Click Search to find and select a message group. 3. Click Members. The Search or Add Members dialog box appears. 4. Click Remove next to the member name to remove the member. Repeat this step to remove another member from the group. 5. When you have finished removing members, click Done to close the Add or Search Members dialog box.
Changing the Open or Local Message Group Owner Only Open and Local message groups can be assigned new owners. Use the following procedure to change the owner of an open or local message group. When a new owner must be assigned to a private group, delete the existing group then create a new group and select the new owner. To assign a new owner for an open or local message groups 1. In the Navigation Pane, click Groups > Message groups. 2. Click Search to find and select a message group. 3.
Renaming Message Groups When a touchtone phone is used to create a message group, a subscriber presses three keys to create the spelled name or number for the group then records the full name of the group. Use the Administration Console to access the message group, the messaging system displays the three keys in the group Name field. Use the following procedure to assign a complete name for the message group. To rename message groups 1. In the Navigation Pane, click Groups > Message groups. 2.
Changing the Message Group Message Distribution Method When a message group is created the broadcast distribution method is assigned by default. Use the Administration Console to change the distribution method. • Broadcast. All members hear the message. • Dispatch. message. Only the first member to pick up messages hears the message. All other members do not receive the To change the message group distribution type 1. In the Navigation Pane, click Groups > Message Groups. 2.
Configuring Outside Caller Group Messaging Messages from external callers can be routed to groups from a personal mailbox, interview box, or transaction box. For example, a call to Technical Support can be routed to the entire Technical Support group. Using dispatch messaging, the message is delivered to the group, when the first member of the group checks voice mail no one else in the group hears the message. Outside caller group messages are routed to open groups.
Configuring Cascading Message Notification A hierarchy of message notifications can be configured combining outside caller group messaging and dispatch distribution. For example, for technical support, create a group and configure the first message notification to be sent to the pager of a frontline technical support representative. After a 15 minute delay send the next notification is to the pager of the department manager.
Configuring Transaction Box Greetings and Action After Greetings Message Groups Overview 200
Numeric Directory Assistance Overview Numeric directory assistance enables callers to press numbers instead of letters to look up a subscriber when their phone keypads do not have letters. Configuring numeric directory assistance requires three steps: 1. Divide subscribers into groups based on a common characteristic such as department or location. Create the directory groups. 2. Add subscribers to the directory groups. 3. Create a menu of one-key numeric dialing choices for callers.
Configuring Numeric Directory Assistance Steps 1. Create directory groups and submenus. See Creating Directory Groups. 2. Add members to the directory groups. See Adding Subscribers to a Directory Group. 3. Add a directory menu. See Creating Directory Menus and Submenus. 4. Assign the directory groups and submenus to the directory menu. See To assign directory groups and submenus to a directory menu. 5. Rerecord the opening greeting. numeric directory assistance.
Creating Directory Groups Directory groups and Directory menus are used to configure numeric directory assistance. Callers use directory assistance by pressing numbers to hear a list of subscribers and their extensions. Group subscribers using a common characteristic, such as subscribers in the same department or location, then create a menu of choices that assigns a single touchtone key to each directory grouping, then add the directory groups to the directory menu to create one-key dialing menus.
Creating Directory Menus and Submenus Directory menus are used to create one-key dialing rules for numeric directory assistance linking directory groups into menus and submenus. To add a directory menu or submenu 1. In the Navigation Pane, click Groups > Directory Menus. For detailed field information, see the Groups > Directory Menus table. 2. Click Add. See “Administration Console Pages,” for information about the Administration Console icons. The Add Directory Menu dialog box appears. a.
Deleting Directory Groups or Directory Menus When a directory group or directory submenu is deleted from the messaging system, the system automatically removes the group from directory menus that list the directory group. NOTE DELETING A DIRECTORY GROUP MIGHT CREATE A GAP IN A DIRECTORY MENU. ASSISTANCE CONFIGURED THREE DIRECTORY GROUPS. FOR CUSTOMER SERVICE, KEY. PRESS 3.” AFTER THE FOR EXAMPLE, AN ORGANIZATION HAS NUMERIC DIRECTORY SECOND DIRECTORY GROUP IS DELETED.
Phone System Overview This topic provides an overview about configuring the phone system switch. The switch and integration options enable the phone system to integrate with the messaging system and the use of additional messaging system features. The integration between the phone system and the messaging system is configured during the installation process using the Installation Guide, the phone system integration guide (if applicable to the system), and the phone system manufacturer’s documentation.
Selecting a Phone System The messaging system includes a comprehensive library of phone system settings that contain predefined parameters for integrating the messaging system with your phone system.most phone systems commercially available. A “Default” phone system setting is available, providing generic settings suitable for basic integration with almost any phone system. Use the following procedure to select a phone system when first configuring the messaging system. To select your phone system 1.
Configuring Integration Options Integration settings are used to implement messaging system features. The Integration options field on the Switch Information page enables you to type multiple values for multiple selections. Each value is separated by a space. For detailed information about the integration options available for use, see the Switch > Information table and your phone system documentation.
Configuring Identified Subscriber Messaging The messaging system uses identified subscriber messaging (ISM) to enable internal callers to leave messages for subscribers when their calls are forwarded to the messaging system from another extension. The messaging system plays the recorded name of the calling subscriber before the message. To configure identified subscriber messaging 1. In the Navigation Pane, click System > Switch > Switch Information.
Configuring Phone System Soft Keys The Integration Options field is used to configure phone systems to handle DTU phones and soft keys. Use the following procedure to configure the soft key time out settings. To configure phone softkeys 1. In the Navigation Pane, click System > Switch > Switch Information. See the Switch > Information table and your phone system documentation for detailed information about Integration options. 2.
Activating General Tone Detection When the general tone detection feature is activated, the messaging system can listen for busy, reorder, or dial tones at all times. The messaging system checks for a dial tone before it dials out to deliver messages or to light message waiting lamps. Activate general tone detection to prevent dialout call collisions and to prevent phantom calls when the phone system does not have an immediate disconnect feature.
Configuring Switch Extensions A port, also known as a swtich extension, is a single incoming phone line answered by the messaging system. The system might include two types of ports: the voice port and possibly a fax port. Configure each extension to answer incoming calls, deliver messages, or set message waiting indication. Specify the number of rings before a port answers a call and the port schedule. On multilingual systems, specify the language used by each port.
Configuring Dialing Codes Use the Dialing Codes page to set the outdial access number and the call transfer sequences for the messaging system. Using an Outdial Access Number Subscribers must dial an outdial access number (for example: 9) to place an external call. To enable the messaging system to deliver messages to an outside phone number or to activate pagers, an outdial access number must be defined.
Special Dialing Characters The special characters described can be included in phone numbers dialed by the messaging system. NOTE THE SYSTEMWIDE PHONE SYSTEM SETTINGS ARE CONFIGURED ON THE SYSTEM > SWITCH > DIALOUT Character Description X The messaging system inserts the subscriber extension. PAGE. Use this code only when the subscriber extension ID is the same as the phone extension the messaging system is dialing. , Comma.
Related Topics Configuring Dialout Codes and Special Dialing Characters Phone System Overview Phone System Overview 215
Configuring Touchtone Settings The values on this page determine the touchtone sensitivity levels. When any of these fields must be changed, refer to the descriptions in the System > Switch > Touchtones table, call Technical Support or a qualified phone system technician for assistance. WARNING! DO NOT CHANGE VALUES ON THE SYSTEM > SWITCH > TOUCHTONES PAGE ONLY WITH GUIDANCE FROM TECHNICAL SUPPORT OR A QUALIFIED PHONE SYSTEM TECHNICIAN.
Configuring Incoming Call Settings WARNING! DO NOT CHANGE VALUES ON THIS PAGE WITHOUT GUIDANCE FROM TECHNICAL SUPPORT OR A QUALIFIED PHONE SYSTEM TECHNICIAN. When any of these fields must be changed, refer to the descriptions in the System > Switch > Incoming Calls table, call Technical Support or a qualified phone system technician for assistance.
Configuring Dialout Codes and Special Dialing Characters Use the System > Switch > Dialout page to configure dialout settings for integrating the messaging and phone systems. CAUTION! THE DEFAULT VALUES FOR THESE FIELDS SHOULD NOT BE CHANGED. BEFORE MAKING ANY CHANGES, Dialout TABLE AND CONSULT WITH TECHNICAL SUPPORT OR A QUALIFIED PHONE TECHNICIAN. REFER TO THE System > Switch > For definitions of the special dialing characters, see Special Dialing Characters.
Controlling Message Waiting Indication Use the System > Switch > MWI page to configure message waiting indication (MWI). The phone system must have message waiting indicators on the extensions and allow the indicators to be turned on and off from a standard nondigital phone. Use the To immediately reset message waiting indicators to immediately reset message waiting indicators. To confirm or change message waiting indicator settings 1. In the Navigation Pane, click System > Switch > MWI.
Configuring Voice Detection Voice detection controls the length of time the messaging system waits for a caller to speak when leaving a message, responding to voice detect boxes, or responding to boxes with voice detect call holding. When a caller does not speak within the specified time in voice detect boxes, the messaging system routes the caller to the system ID specified if the caller remains silent. This is configured on the Call Management > Voice Detect Boxes > Voice page.
Configuring the Call Holding Message Cycle Use the System > Switch > Call Holding page to configure how many callers can be placed on hold, how often the system attempts to transfer callers on hold, and how long callers can wait on hold. The Call Holding Cycle Specify the length of time that the messaging system places the first caller on hold before asking if the caller wants to keep holding, leave a message, or try another extension.
Limiting the Number of Ports On Hold When call holding is active for boxes or subscribers, it is recommended that you restrict the number of ports that can be on hold for any single extension and the total number of ports that can be on hold in the entire messaging system. For best system performance set the maximum number of calls allowed to hold at one time for an extension to half, or less, of the total number of ports in the messaging system.
Cut -Through Paging for Pagers Overview The messaging system can be configured to enable callers to send their phone number to a subscriber’s pager when the subscriber phone is unanswered. This is called cut-through paging. There are three types of cut-through paging for a subscriber extension: • Attended Paging. A caller presses a touchtone key and enters a phone number to send a phone number to a pager. The system reports if the page is successful before closing the call.
4. Select Attended, Unattended, or Release for the Cut-through Page Type section. • Attended Paging. A caller presses a touchtone key and enters a phone number to send a phone number to a pager. The system reports if the page is successful before closing the call. If the call to the pager does not connect, the caller has the opportunity to leave a voice message. Attended paging can be configured to use one or two ports. • Unattended Paging. A caller presses a touchtone key and enters a phone number.
Configuring a Barge-in Code for Live Record Subscribers use the live record feature to record phone conversations if the phone system supports live record. The conversations are stored as voice messages in the subscriber voice mailbox. Program a barge-in code to enable the messaging system to tap into a call and record the call. Local laws might require a periodic beep while a conversation is being recorded, the beep interval is configurable.
Enabling Call Park and Page When a phone system supports the park and page feature, an incoming call can be parked and paged on another extension without ringing the extension phone, calling the parked extension picks up the call. The messaging system can automatically park incoming calls on specified extensions. When the phone system supports paging, the messaging system notifies subscribers that a call is parked on a particular extension.
CAUTION! CALL PROGRESS WITH PARKING AND PAGING IS NOT SUPPORTED ON THE SV8100 PHONE SYSTEM. SELECTING THESE FEATURES WITH THE SV8100 PHONE SYSTEM MIGHT NOT LET CALLERS COMPLETE THE CALL. REFER TO THE SV8100 DOCUMENTATION FOR DETAILED INFORMATION ABOUT INTERNAL AND EXTERNAL PAGING. 14. Type the number of seconds the messaging system waits for a subscriber to pick up a parked call in the Pickup delay field. When the wait time is exceeded, the messaging system uses the subscriber after-greeting action.
System Reports The messaging system provides several different categories of reports: usage, directory, fax, errors, network, and hospitality. View reports using a text editor, or import report data into a spreadsheet or word processing file. The following is a list of available reports: Category Usage reports Title Format System usage report graph or table Usage report by system ID graph or table See “Creating Messaging System Usage Reports.” Busy Ports Busy port report.
See Saving and Storing Data for Reports Configuring Log Settings Creating Messaging System Usage Reports Creating Busy Port Usage Reports Creating Network Message Reports Creating Network Subscriber Reports Creating Network Groups Reports Creating Network Call Reports Creating Fax Reports Creating Directory Reports Call Report Log Reports Using the Error Log Report Creating Hospitality Reports Creating Hotel Guest Report System Reports 229
Creating Messaging System Usage Reports Usage reports show patterns of system activity. A usage report might contain data about the entire messaging system, individual subscribers, transaction boxes, extension IDs, ports, or directories. Usage reports are formatted as bar graphs or tables. To create a usage report for a system ID 1. In the Navigation Pane, click Reports > Usage > Usage Reports. 2. Select the report From and To dates. NOTE IF 3.
Creating Busy Port Usage Reports The busy ports usage report shows the amount of time the ports were busy and shows the average percentage of time the ports were busy during a specific time period. Create the report for all ports on the system or for a selected group of ports. If all or nearly all of the ports are busy during peak hours, calls can go unanswered unless a caller lets the ring continue until a port becomes free. You might need additional ports to efficiently handle all of your incoming calls.
Creating Directory Reports Directory reports provide information to enable analysis of system data. These reports include subscribers and guests, extensions, message groups, and directory assistance. The reports provide information about when a subscriber last used the messaging system, the boxes and groups a subscriber owns, how many directory groups and menus the system uses, and which groups a subscriber belongs to. • Subscribers Report.
Creating Directory Subscribers Reports The subscriber directory report lists all subscribers with the number of new messages, and total new and old/archived messages, the last time the subscriber checked for messages, and the access options configured for the subscriber. The report is sorted by the subscriber’s last name. To create a subscribers directory report 1. In the Navigation Pane, click Reports > Directory > Subscribers. 2. Select an output device: 3. • Display.
Directory Report Access Option Codes The following table describes the access codes used in reports to describe the access options assigned to a subscriber or guest: Access Code Access Option Description A Subscriber cannot change configuration settings using a phone. B Subscriber does not receive a return receipt for a message unless explicitly requested. C Subscriber is not notified of new public messages. D Excludes subscriber from automatic (alphabetic) directory assistance.
Access Code Access Option Description 0 Subscriber can change message notification settings.
Creating Directory Extension Reports An extension report lists all subscriber information sorted by last name. This report includes information about call transfer type, call transfer settings, options, and call holding configurations. To create a directory extension report 1. In the Navigation Pane, click Reports > Directory > Extension. 2. Select an output device: 3. • Display. Displays the report in a pop-up window. • File. Saves the report to a file. The default file name is default.
Creating Directory Reports System Reports 237
Creating Directory Group Reports There are four types of directory group reports: • List Messages. Group list report providing the group name, type, dispatch mode, and owner name. • Members. Reports selected group name members, the type of group, dispatch mode, and owner name. • Groups Person. Reports all groups where the subscriber is a member. • Directory. Reports all groups sorted by group name, includes group type and the directory ID for each group.
Creating a Directory Groups List Messages Report To create a directory groups list messages report 1. In the Navigation Pane, click Reports > Directory > Groups > List Messages. 2. Select one of the following group types: 3. 4. • Owner. Select the subscriber and list groups owned by the selected subscriber. • All message groups. • All open groups. List all open groups. • All local access groups. Available only with networked messaging systems with remote sites. List all message groups.
Creating a Directory Groups Members Report To create a directory groups members report 1. In the Navigation Pane, click Reports > Directory > Groups > Members. 2. Select the group name from the Group name list. 3. Select an output device: 4. • Display. Displays the report in a pop-up window. • File. Saves the report to a file. The default file name is default.txt, type a report file name to use an alternative file name. Click Run to generate the report.
Creating a Directory Groups Person Report Creates a report showing a subscribers group membership. To create a directory groups person report 1. In the Navigation Pane, click Reports > Directory > Groups > Groups Person. 2. Select the subscriber from the Person name list. 3. Select an output device: 4. • Display. Displays the report in a pop-up window. • File. Saves the report to a file. The default file name is default.txt, type a report file name to use an alternative file name.
Creating a Directory Groups Directory Report Use the following procedure to create a directory report of group directory IDs. To create a directory groups directory report 1. In the Navigation Pane, click Reports > Directory > Groups > Directory. 2. Select an output device: 3. • Display. Displays the report in a pop-up window. • File. Saves the report to a file. The default file name is default.txt, type a report file name to use an alternative file name. Click Run to generate the report.
Creating Directory System Managers Report This report creates a list of all system managers. To create a Directory System Managers Report 1. In the Navigation Pane, click Reports > Directory > System Managers. 2. Select an output device: 3. • Display. Displays the report in a pop-up window. • File. Saves the report to a file. The default file name is default.txt, type a report file name to use an alternative file name. Click Run to generate the report.
Creating Fax Reports Fax reports provide information about fax activity and documents. To create a fax activity report The fax activity report provides a list of all faxes for the specified time period with the following information: document number, description, and file name. 1. In the Navigation Pane, click Reports > Fax > Activity. 2. Select the report date range: From and To dates.
Creating a Fax Document Report Use the following procedure to create a report of faxes that includes a description and the fax file name. To create a fax document report 1. In the Navigation Pane, click Reports > Fax > Document. 2. Select an output device: 3. • Display. Displays the report in a pop-up window. • File. Saves the report to a file. The default file name is default.txt, type a report file name to use an alternative file name. Click Run to generate the report.
Call Report Log Reports Call log reports show call activity for the messaging system or for individual subscribers. The call log report includes information about every call the messaging system answers, dials, or transfers. The call log report has information that useful when troubleshooting messaging system problems.
Item Format/Value Description Owner Guest Int Box Tran Box Msgbox Public Xfer op Xfer ID Restart Shutdown ViewMail Call from a subscriber Call from a guest Call for an interview box Call for a transaction box Call for a message box Public call Transfer to operator Operator ID transfer System restarted System stopped Call to access ViewMail FAILURE System dial out to turn on message waiting indication or for message delivery System failure (Fail codes appear in next three fields) Status of C
Using the Error Log Report The error log provides error codes, the port number, and the date and time of the message response. If a problem cannot be resolved using the error log report, contact Technical Support. Error codes generated by the messaging system include: Error code Description The module where the error appears. Where: Mxxx-yy Exx-yy xxx = the module number and yy = the error location in that module. The type of error. Where: xx = the error number and yy = the location.
Call Report Log Reports System Reports 249
Creating Network Message Reports Multisite messaging reports provide information about subscribers and message groups at remote sites. To create a multisite messaging report 1. In the Navigation Pane, click Reports > Network > Messages. 2. Select the report date range: From and To dates. NOTE WHEN THE START DATE IS THE SAME OR LATER THAN THE END DATE THE SYSTEM ASSUMES YOU MEAN THE MONTH AND DATE OF THE PREVIOUS YEAR. 3. 4. Select an output device: • Display.
Creating Network Subscriber Reports Multisite messaging reports provide information about subscribers, mailbox IDs, and remote location. To create a multisite messaging report 1. In the Navigation Pane, click Reports > Network > Subscribers. 2. Select All Sites or a specific site from the Remote Site list. 3. Select an output device: 4. • Display. Displays the report in a pop-up window. • File. Saves the report to a file. The default file name is default.
Creating Network Groups Reports Multisite messaging reports provide information about message groups at remote sites. To create a multisite messaging report 1. In the Navigation Pane, click Reports > Network > Groups. 2. Select All Sites or a specific site from the Remote Site list. 3. Select an output device: 4. • Display. Displays the report in a pop-up window. • File. Saves the report to a file. The default file name is default.txt, type a report file name to use an alternative file name.
Creating Network Call Reports Multisite messaging reports provide network call reports. To create a multisite messaging report 1. In the Navigation Pane, click Reports > Network > Call Reports. 2. Select the report date range: From and To dates. NOTE WHEN THE START DATE IS THE SAME OR LATER THAN THE END DATE THE SYSTEM ASSUMES YOU MEAN THE MONTH AND DATE OF THE PREVIOUS YEAR. 3. Select All Sites or a specific site from the Remote Site list. 4. Select an output device: 5. • Display.
Creating Hospitality Reports Hospitality reports for wake-up call service provides information that ensures that guests are receiving the requested services. Create wake-up call reports at least once a week. During peak demand it might be helpful to generate the reports more frequently. Four hospitality reports help manage the wake-up call service: Report Name Description Hotel Guests Reports a list of guests. See “Creating Hotel Guest Report.” .
Creating Hotel Guest Report The system provides a report that lists all hotel guests. The report is sorted by guest name, or by room number. This report is useful if staff want an on-demand guest list or if you need to research a messaging system problem for a guest. To create the hotel guest report 1. In the Navigation Pane, click Reports > Hospitality > Hotel Guests. 2. Select an output device: 3. • Display. Displays the report in a pop-up window. • File. Saves the report to a file.
Pending Calls Report This report lists all pending wake-up calls in the system queue. Use this report to monitor wake-up call usage and schedule an alternative wake-up call service if the system is unavailable. Always generate this report before the system is shut down for maintenance. To create a wake -up call report 1. In the Navigation Pane, click Reports > Hospitality. 2. Select Pending Calls. 3. Select an output device: 4. • Display. Displays the report in a pop-up window. • File.
Creating the Wake -up Call Log Report This report lists all attempted wake-up calls. Use the report to troubleshoot when a wake-up call was made. Wake-up call usage patterns can be established and monitored when they are tracked over time. To create a wake -up call report 1. In the Navigation Pane, click Reports > Hospitality > Wake-up call log. 2. Select the report date range: From and To dates.
Wake -up Call Failures This report lists failed wake-up calls log statuses: • Overload. Wake-up calls that were made more than 10 minutes after the requested time. • Max retry. Wake-up calls that remained unanswered after the maximum number of retries. This condition generates an urgent message to the designated subscriber pager. • Expired. Wake-up calls that expired before they were made. A wake-up call request expires when it cannot be made within 20 minutes of the scheduled time.
Hospitality Site Configuration The Hospitality Settings page is used to configure the default settings for the hospitality feature, the Property Management System (PMS), the default wake-up call, and the default check-in message.
Auto Transfers The hotel guest directory conversation asks external callers to enter the first few letters of the guest’s last name. The messaging system default is to require external callers to confirm all selections of guest names, however, it can be configured to enable direct transfers without confirmation if the system finds only one matching guest name in the directory. To make auto transfer available to external callers 1.
Spelled Guest Names The messaging system requires the spelling of the guest’s last name to include a guest in the guest directory. If the integrated property management system (PMS) is installed, it can automatically send guest names to the messaging system. When the PMS supports spelled guest names, specify if guests can change the spelling of their name in the guest directory.
Changing the Wake-up Greeting The messaging system comes with a standard wake-up greeting that is played in the default system language. This wake-up greeting can be customized. Use the Administration Console to change the wake-up greeting on the System > Configuration > Hospitality Settings page or record the wake-up greeting by calling the messaging system and responding to the system prompts. The minimum length for a custom wake-up greeting is two seconds.
Handling Unanswered Wake -up Calls The messaging system provides an added feature when repeated wake up call attempts are unanswered by a guest. The messaging system can alert hotel staff that a guest might need assistance. To provide staff notifications of unanswered wake -up call attempts 1. Dedicate a pager to unanswered wake-up call notifications. 2. Create and configure a subscriber message box for wake-up call notifications. 3. Configure the message box to notify the dedicated pager number.
Using Hotel Guest IDs The messaging system automatically creates a mailbox and personal ID for each guest room extension. The personal ID is assigned to the room extension and uses the personal ID to identify the voice mailbox. Using room numbers as the guest extension numbers simplifies using the guest messaging service for both hotel staff and guests. Each Hotel Guest page displays a guest room extension and its mailbox that corresponds to hotel room number.
Configuring Hotel Guest Template The Hotel guests Guest Template page is used to configure default settings for hotel guest profiles. The Default Guide ID prefix is configured on this page. These default settings can be customized for individual guests on the guest profile page. For instructions on changing settings for an individual hotel guest, see Changing Hotel Guest Settings. To configure default hotel guest personal settings 1. In the Navigation Pane, click Hotel Guests > Guest Template.
Configuring and Recording Check -in Messages A check-in message is a greeting that hotel guests hear the first time they access the messaging system. This message greets guests and provides useful information about the hotel and services. Guests hear the check-in message once. Use the Administration Console or a phone to record and configure a check-in message. NOTE THE First-time enrollment FIELD ON THE GUEST SETTINGS DISABLED, THE GUEST DOES NOT HEAR THE MESSAGE.
Configuring the Multilingual Guest Conversation Feature Hotel guests and the people who call them hear the messaging system conversation in the language selected by the guest. The first time a guest logs on to the messaging system, the system conversation asks the guest to select a language. The language the guest selects remains in effect until the guest changes it or checks out. Installing additional languages does not alter the guest language selection. To install additional languages 1.
Enabling Hotel Guest Passwords The password setting enables guests to set a password for the voice mailbox. The password does not appear on the Administration Console and the hotel staff cannot access the password. If a hotel guest forgets the password, hotel staff can delete the password the guest can then create a new password. The messaging system provides an auto-log on feature that bypasses the need for guests to enter an ID and a password when checking messages.
Configuring Auto -Log On for Hotel Guests When auto-log on is enabled, hotel guests do not need to enter a personal ID or password when they access their voice mailbox from their rooms. NOTE THE AUTO-LOG ON FEATURE IS AVAILABLE ONLY TO SUBSCRIBERS WHO ARE HOTEL GUESTS. THIS FEATURE IS DISABLED BY DEFAULT. To enable auto -log on 1. In the Navigation Pane, click System > Switch > Switch Information. 2. Add hlog=1 to the Integration options field. 3. Click Save. To disable auto -log on 1.
Using an Informational Service The information service routes hotel guests to a transaction box after they have checked their messages. The informational messages are used to communicate information about hotel events and services or local businesses. The messages are played following the transaction box schedule. Guests can skip the informational messages by hanging up. To configure informational messages for hotel guests 1. Create a transaction box. See To add a single transaction box. a.
Adding and Deleting Hotel Guest Rooms and Messages Use the Hotel Guests page to add and remove guest room numbers if you do not have a PMS integration installed. The PMS integration automatically adds room numbers to the messaging system. If the PMS integration is not available then guest rooms must be added manually, this involves two steps: add hotel guest rooms to the messaging system then add the guest names.
Manually Adding Hotel Guest Names Use the following procedure to add hotel guests to the messaging system. To manually add guest names 1. In the Navigation Pane, click Hotel Guests > Guests > Profile. 2. Click Search to find and select the guest room (extension). The extension appears in the Last name field within parentheses. 3. Type the guest name in the Last name and First and middle name fields. 4. Click Save.
Deleting Hotel Guests When a hotel guest is removed from the messaging system, the guest’s messages are automatically deleted. To delete a hotel guest 1. In the Navigation Pane, click Hotel Guests > Guests > Profile. 2. Click Search to find and select the guest. 3. Click Delete to delete the guest from the messaging system. 4. Click OK to confirm the deletion.
Deleting Hotel Guest Messages Use the following procedure to delete only the guest messages from the system without deleting the guest. To delete a hotel guest’s messages 1. In the Navigation Pane, click Hotel Guests > Guests > Profile. 2. Click Search to find and select the guest. 3. Click Delete Messages. 4. Click OK to confirm the deletion.
Hotel Information Services The hotel information services uses linked transaction boxes to provide announcements and other information to hotel guests. Every menu or announcement in the information service is contained in a transaction box. Use the transaction box greeting to record the menu or announcement and then configure links between the boxes.
Configuring Guest Help for Information Services Provide Help in the information service to give guests guidance about the service and how to use it. Help is a special set of submenus that callers reach from many places in the service. Configure each Help component in its own transaction box. Keep the following in mind when configuring help: 1. Make help accessible from the main menu. A caller who is unfamiliar with the information service needs guidance right away. 2. Make the access method consistent.
Direct Call Transfers A basic information service contains menus configured to route callers to submenus and announcements. Guests can be transferred when a selection is made. There are two types of call transfers: • Internal Call Routing. Guests are transferred to a hotel extension. • Direct-Dial Settings. If the phone system supports the direct-dial feature, guests are transferred to an external number.
Incorporating Advertisers into an Information Service A 24-hour information service for local businesses can be incorporated into the hotel information service. This provides information for guests and can generate income for the hotel. Service categories enable businesses to determine their level of visibility in the information service. Create service categories to structure an advertisement fee schedule for businesses near the hotel.
Configuring Remote Recording for Advertisers Use the remote recording feature to enable a business to maintain its own advertisements on your hotel information service. To enable a business to have remote control of its advertisements 1. Enroll the business or an individual from the business, as a regular subscriber on the messaging system and give them ownership of the transaction box containing their announcement. See “Adding New Subscribers.” 2. Create a new transaction box for the business.
Updating the Information Service Building guest interest in the information service relies on keeping the information service up-to-date. Current and accurate information is valuable to guests while outdated information is not. Make sure that the staff member or business responsible for maintaining the information services updates it when the information becomes outdated. Encourage advertisers to keep their announcements current.
Hospitality Site Management After a Hospitality site has been configured, daily management consists of configuring individual guest mailboxes, resetting guest boxes, retrieving messages after a guest has checked out, and customizing guest mailboxes. The Hotel Guests > Guests pages contain information for each room and guest. The required field values on the pages are automatically populated by the messaging system.
Configuring the Guest Template Use the Hotel Guests > Guest Template page to configure a template for hotel guests. The guest template enables you to automatically assign default settings for all guests added to the messaging system.
Configuring Hotel Guest Recorded Name, Language, and Message Storage The PMS integration package automatically configures hotel guest room numbers, names, and mailboxes for each guest. Without the PMS integration package, guests, guest room numbers, and names must be manually added to the system. When manually adding guest names, use the “last name, first name” format. This format enables sorting guest names by last name on reports and in the guest directory. Be consistent.
Resetting a Hotel Guest Message Box When a guest is checked out, the PMS integration automatically resets the mailbox so it is immediately available for the next guest checked-in to the room. When the PMS is not able to provide the checkout information to the messaging system, hotel staff members must manually check out a guest and reset the mailbox for the room. Housekeeping staff can also reset a room mailbox after preparing the room for the next guest.
Accessing Messages After a Hotel Guest Checks Out After checking out a guest, unheard messages are transferred to a guest message storage box. The messages are held for the specified period of time defined on the Guest Profile page. Guests use the post checkout ID code configured on the System > Configuration > Hospitality Settings page to access the unheard messages. Hotel staff should check the Property Management System to verify that the guest has received all of their voice messages.
Checking Hotel Guest Messages The message waiting indicators on room phones tell guests they have new messages. Guests call the messaging system to hear their messages. If the phone system supports easy message access, guests can press a button on the room phone to hear their messages. Refer to the phone system documentation to determine whether easy message access is available and how to enable the feature.
Restoring a Hotel Guest Mailbox When a guest checks out and then decides to check back into the same room, or if the guest is accidentally checked out, hotel staff can undo the checkout. When the PMS integration is installed, and the hotel staff restores the room on the same day that the checkout was recorded, PMS restores unheard messages and guest settings. Without the PMS integration hotel staff must manually restore the guest mailbox and personal settings.
Deleting a Hotel Guest’s Password Guest passwords are not displayed on the Administration Console. If a hotel guest forgets the password, delete the password so that the guest can create a new one. To delete a hotel guest’s password 1. In the Navigation Pane, click Hotel > Guests > Profile. The Phone password disabled message appears beneath the Delete Messages button when no security code is set. 2. Click Search to find and select the guest’s profile. 3.
Changing Hotel Guest Settings Use the Hotel Guests > Guests > Guests Options page to review and change settings for individual guests. First Time Enrollment Select Require first-time enrollment to require guests to complete the first-time enrollment activities the first time they access the messaging system. The Hospitality Hotel Guests report shows which guests have enrolled and which guests have not completed the enrollment process.
Related Topics Hospitality Site Configuration Configuring the Guest Template Configuring Hotel Guest Recorded Name, Language, and Message Storage Resetting a Hotel Guest Message Box Accessing Messages After a Hotel Guest Checks Out Checking Hotel Guest Messages Restoring a Hotel Guest Mailbox Hospitality Site Management 290
Changing Call Transfer Settings for Hotel Guests Use this page to configure the hotel guest call transfer settings. If call transfer is disabled, calls are transferred to the room voice mailbox. To change call transfer settings for a hotel guest 1. In the Navigation Pane, click Hotel Guests > Guests > Call Transfer. For detailed field information, see the Hotel > Guests > Guest Call Transfer table. 2. Click Search to find and select a guest. 3. To transfer calls to the guest: a.
Guest Greetings Use this page to record the hotel guest personal greeting and to set the after greeting actions. To change the standard greeting for a guest 1. In the Navigation Pane, click Hotel Guests > Guests > Greetings. 2. Click Search to find and select a guest. For detailed field information, see the Hotel Guests > Guests > Greetings table. 3. Click Standard greeting to record or re-record a new guest greeting. 4. Click Save.
Guest Messages Notification New hotel guests are assigned the same default subscriber message notification and delivery settings. Use this page to customize message notification for a guest. To change messages notification for hotel guests 1. In the Navigation Pane, click Hotel Guests > Guests > Notification. 2. Click Search to find and select a guest profile. For detailed field information, see the Hotel Guests > Guests > Guest Notification table. 3.
Guest Messages Notifications and Delivery Use this page to configure the message notification and delivery schedules To change a guest’s message notification settings 1. In the Navigation Pane, click Hotel Guests > Guests > Messages. 2. Click Search to find and select a guest profile. For detailed field information, see the Hotel Guests > Guests > Guest Messages table. 3.
Converting a Hotel Guest to a Subscriber Convert hotel guests to a subscriber to provide the guest access to additional messaging features. Before checking out the guest, convert them back to a hotel guest. When you convert a hotel guest to a subscriber, the guest has settings and privileges not usually available to hotel guests and the guest is not listed in the hotel directory. To convert a hotel guest to a subscriber 1. In the Navigation Pane, click Hotel Guests > Guests. 2.
Fax Mail Configuration Steps Fax Mail Overview The ViewFax program enables subscribers to send and receive faxes using a computer. Configure special purpose fax boxes to receive faxes routed to a system ID. 1. Configure fax ports and station numbers. Set an appropriate fax port status to maximize system performance. Configure the fax station numbers to ensure that incoming faxes are transferred to the correct fax port. See Configuring Fax Ports and Fax Station Numbers for details. 2.
Configuring Fax Ports and Fax Station Numbers Configure each fax port, setting how the port is used to answer or dial calls. Use a combination of fax port settings to meet the needs of the organization. For example, dedicate a fax port to sending faxes, receiving faxes, or both. How the fax ports are configured depends on how often the ports are used to deliver fax mail and how often the ports must support incoming fax traffic.
Configuring Delivery Retry Settings The fax mail settings control fax header information and fax retry settings. Configure the number of pages allowed in a fax transmittal, how many delivery attempts are made per delivery set, how many delivery sets to attempt, and the delay between delivery attempt sets. To change systemwide fax mail settings 1. In the Navigation Pane, click System > Fax setup. For detailed field information, see the System > Fax Setup table. 2.
Understanding Fax Delivery Retry Settings When the system calls a fax machine that is busy or unavailable, the system tries to deliver the fax again as soon as another fax port is available. When the specified number of delivery failures occurs, the system waits the number of minutes specified to start another set of delivery attempts.
Subscriber Fax Delivery Overview Subscribers can have fax boxes that store fax messages just as their voice mailboxes store voice messages. The system automatically creates fax boxes for all subscribers added to the messaging system when a Fax ID is configured on the subscriber template. Existing subscriber profiles must be updated to include the Fax ID.
UNIVERGE® UM8000 Message Networking UNIVERGE UM8000 message networking enables subscribers to send, receive, reply to, and forward voice messages to subscribers on other messaging systems and can include remote subscribers on distribution lists. The local and remote sites must be synchronized before attempting to send messages between the sites. UNIVERGE UM8000 provides a range of features and capabilities to support networking with remote messaging systems.
Message Networking Configuration Each remote site must be enrolled in your system and the administrator at each remote site must enroll your site as a remote site on their local system. Gather the information for each site and determine which sites need to communicate with each other before configuring a messaging network. Then configure the sites as follows: 1. Determine which protocol to use for communicating with each site. See About Networking Protocols. 2. Add each remote site to the network.
About Networking Protocols UNIVERGE® UM8000 supports two networking protocols: PlusNet and Auto Messaging Interchange Specification (AMIS). Not all message networking features are available with each protocol. • AMIS. The Auto Messaging Interchange Specification protocol is a telephony-based protocol in which messages are exchanged using the public telephone network. AMIS uses DTMF for communication and control. • PlusNet.
Adding a New Remote Site The remote system must be defined on the local UNIVERGE® UM8000 system to enable communications between the systems. The location definition includes all of the information required for UNIVERGE UM8000 to establish communication and exchange messages with the remote system. This is the phone number required to reach the remote system in AMIS or PlusNet. Create the local definition by adding the remote site. To add a new remote site 1.
Configuring General Parameters for a Remote Site Configure the general networking parameters for the site. Configuring Message Delivery for a Remote Site The Message Delivery fields specify the times that calls to remote systems can be initiated. The system only initiates calls during the specified hours. By limiting the schedule to times that long-distance toll charges are lowest you minimize the cost of message networking calls. The message delivery schedule must be specified for each remote site.
Understanding Directories UNIVERGE® UM8000 Message Networking 306
Configuring the Remote Site Template Use this page to configure the default parameters for the remote sites. The template applies the default settings to new remote sites when they are added to the messaging system. If you change the default settings and have existing remote sites, the remote site settings must be manually updated.
Configuring the Local Site Use this page to configure the local site before subscribers can exchange messages with subscribers in remote sites. To configure the local site 1. In the Navigation Pane, click Network > Local Site Setup. For detailed field information, see the Network > Local Site Setup table. 2. 3. If the Network site type is Open. The systems exchange messages using a public phone network. Configure the Open site type, otherwise skip this step: a.
Understanding Directories The remote and local sites must exchange subscriber and group information before PlusNet subscribers can send and receive messages. WARNING! EXPORTED DIRECTORY INFORMATION CAN ONLY BE USED BY ANOTHER PLUSNET SITE. THE AMIS PROTOCOL DOES NOT SUPPORT EXCHANGE OF DIRECTORY INFORMATION. The remote directory must be periodically synchronized to ensure that the local site has the most current list of remote subscriber names.
Exporting Directories Before subscriber and group information can be imported by a remote site, the local site directory information must be exported. The exported information can be transferred to the remote site using discs, tapes, a modem, or the Internet. NOTES EXPORTED DIRECTORY INFORMATION IS USED WITH PLUSNET SITES. THE AMIS PROTOCOL DOES NOT SUPPORT DIRECTORY INFORMATION EXCHANGE. MESSAGE DELIVERY TO ALL REMOTE SITES IS DISABLED DURING THE EXPORT PROCEDURE.
Importing Directories The exported directory file must be transferred to the messaging system server hard disk of each participating PlusNet remote site. The directory information must be imported from the hard disk to the messaging system database. NOTE ONLY PLUSNET SITES CAN IMPORT DIRECTORY INFORMATION FROM OTHER PLUSNET SITES. THE AMIS PROTOCOL DOES NOT SUPPORT DIRECTORY INFORMATION EXCHANGE. To import a remote site directory 1.
Updating and Synchronizing Directories PlusNet sites must exchange subscriber and group information before PlusNet subscribers can send and receive messages from other PlusNet sites. The first directory update between sites might require hours to transmit over phone lines. During the first directory update, the directory information that sites exchange includes: • Subscribers’ spelled names, voice names, and extensions. • Message groups’ spelled names or numbers, voice names, and group types.
Determining Call Data for a Remote Site Determine call data for a remote site, such as the date and time of the last local incoming and outgoing calls, as well as any failed attempts to exchange messages with the site. Obtain more detailed information about call data in remote sites using reports. To determine call data for a remote site 1. In the Navigation Pane, click Network> Remote sites. 2. Click Search to find and select a remote site. 3.
Troubleshooting Topics in this section identify problems related to the messaging system installation, maintenance, and customization. If you experience a problem that you cannot solve using the information and the resources cited, or you experience a problem that is not discussed, contact your technician or Technical Support.
Upgrade Issues Symptom or Problem See Problems are reported after a messaging system upgrade Delivery of subscriber messages is delayed or subscriber message notification delays occur “Delayed messages” on page 341 and “Delays in message notification” on page 342 Messaging system server hard disk is full “Disk full error messages” on page 343 System does not identify touchtones correctly “Touchtone sensitivity” on page 345 Call transfer problems “Call transfer initiation problems” on page 346 Prob
Delayed Messages You might receive a complaint about new messages being delayed or arriving late in a voice mailbox. Although it might sometimes appear that the messaging system is delaying the delivery of a new message, the system never holds a new message for delivery at a later time unless a caller selects the Future message delivery setting. Perceptions of delayed or late messages are real and should be taken seriously.
Message Notification Delays Delays in message notification might cause complaints of message delays. The messages are arriving properly, but the subscriber message notification might be delayed. When the system is operating normally, subscribers receive notification of new messages immediately after the message is recorded. The following situations might cause message notification delays: • The caller selects Future message delivery.
Disk Full Error Messages Use the following procedure to reclaim disk space on the messaging system server if you receive disk full warning messages. To reclaim disk space on the messaging system server 1. Check the contents of the public interview box. Confirm that at least one subscriber has Allow access to public messages selected on their Access Options page. 2. Confirm that the subscribers who have access to public messages are routinely reviewing and taking action on the messages in the box. 3.
Touchtone Phone Sensitivity The messaging system detects real touchtones dialed by a caller while screening out “false” touchtones that occur in natural human speech. The system distinguishes between them on the basis of length. Dialed touchtones are usually longer than the similar tones in speech, so the system ignores tones under a specified length. The messaging system stores three different minimum lengths for touchtones, each is specified in milliseconds.
Call Transfer Initiation Problems One or both of the following situations might indicate a problem with transfer initiation settings: • The caller hears touchtones and is not transferred after hearing the prompt, “Please wait while I try that extension.” • The caller is disconnected after hearing the prompt, “Please wait while I try that extension.” Check hookswitch flash timing Some phone systems require a longer hookflash than other systems.
Phantom Calls A phantom call occurs when a phone rings, the phone is answered, but there is no caller on the line. Phantom calls from the messaging system might be caused when: • a caller using the messaging system dials an extension, then hangs up before the transfer is completed. • a subscriber checking messages initiates a return call, then hangs up before the call completed. • the system attempts to lamp a subscriber’s message waiting indicator with an incorrect code.
Networking and Visual Messaging The corrective actions described in this topic might require the network administrator’s assistance. Visual Messaging and Busy Ports When Visual Messaging programs are installed, certain performance problems might occur, including message notification delays and an increase in the percentage of busy signals. Installing Visual Messaging programs, particularly ViewMail, means subscribers are using Visual Messaging to connect to phone ports.
Text -to -Speech Text -to -speech does not read e -mail messages in the correct language. If multiple text-to-speech languages are installed on the messaging system, the system examines the text and encoding of an e-mail message to determine the language it is written in. The software identifies the language by comparing fragments of text (N-grams) to standard profiles of known languages, then calculating a probability that the message matches one of the profiles.
Hospitality Dialing Reset message box ID, Post checkout ID, ID for guest directory, Wake-up greeting ID, or Check-in message ID transfers the call to a subscriber or transaction box. When the hospitality package is added to an existing messaging system, one of more of the default hospitality IDs might be assigned to a subscriber or transaction box instead of the appropriate hospitality system ID. The hospitality IDs must be updated. See “Configuring Basic Hospitality Settings.
Glossary access codes Codes used in reports that represent the system access options configured for the subscriber or guest. These are single characters that represent the various access options. access options Options that control the system features available to the subscriber. These options are selected on the Subscriber Access Options page. action What the system does when processing a call. For example, an action might be taking a message, routing the call to the operator, or saying good-bye.
automated attendant A group of features that sets up the messaging system to act as a receptionist to answer and route incoming calls. Callers hear a recording and are routed after touchtone input. automatic directory assistance Callers connect to a subscriber’s extension ID by spelling the first few letters of the name on a touchtone keypad. Subscribers can spell the first few letters of the first name or last name, depending on the system configuration.
call screening A call transfer setting that enables the messaging system to record caller information. This information is played for the subscribers before the call is connected. call transfer The transfer of a call from the messaging system to the phone system, which takes control of connecting the call to an extension. Call transfer can be turned on and off. See await answer; call routing; release; and wait for ringback.
dial tone detection Enables the messaging system to listen for a dial tone when initiating a dial out or transfer to determine a line is available. Availability of dial tone during some scenarios is determined by the capabilities of the phone system. Dial tone detection is accomplished through a feature called general tone detection. directory assistance A directory of subscriber extension IDs available to callers with lettered keypads.
extension The actual phone number of a phone in the system. extension ID The number a caller uses to reach a subscriber’s voice mailbox. The extension ID is not always the same as the physical phone extension number. For example, if two subscribers share the same extension, they have different extension IDs for their separate voice mailboxes. external caller A caller outside of the organization. A subscriber who calls the system and does not enter a personal ID is treated as an external caller.
group report Shows all message groups, the members of a particular group, the owners of private groups, and the groups that a particular subscriber or guest belongs to. guest A person who is hosted by a subscriber. A guest is given a guest mailbox and allowed to trade two-way messages only with the subscriber host. A guest can be a member of the subscriber’s private message groups, but cannot be a member of open message groups.
local site Part of the multisite network messaging package. The onsite messaging system in a multisite network is called the local site. It defines all other offices linked to it in the system as remote sites. See network messaging and remote site. mailbox The location where the messaging system stores messages. For example, the messaging system keeps messages for a subscriber in the subscriber’s mailbox.
new message A message that has not yet been heard by the recipient. See archived message and old message. night greeting Greeting that is played during the night mode schedule. night mode The messaging system operation mode outside of normal business hours. All days and hours not assigned to day mode are assigned to night mode. See holiday schedule and schedule. nonsubscriber A caller not enrolled in the messaging system as a system manager, subscriber, or guest.
over-the-phone enrollment Configure the system to play a special enrollment conversation for new subscribers that lets them enroll themselves in the messaging system the first time they call the system. See console enrollment and enrollment conversation. owner A subscriber or system manager who has control over a transaction box, interview box, voice detect box, or message group. If the owner is deleted all boxes and private message groups are also deleted.
public interview box An interview box that handles callers who have not reached an operator or have not chosen a system ID. Other callers can be routed to this box. Messages in this box are public messages. See interview box and public messages. public messages Messages collected in the public interview box or the system operator box. Public messages are distributed only to subscribers with public message access.
SSH Secure Shell is an Internet protocol providing secure encrypted remote communications over an unsecured channel. SSL Secure Sockets Layer, a common protocol for creating a secure connection between a client and a server. standard greeting A recording that callers hear when they reach a subscriber’s voice mailbox before being offered a chance to leave a message. station Phone use in a site. subscriber Anyone who is enrolled in the messaging system.
touchtones The sounds made pressing keys on touchtone phones. See DTMF. transaction box A type of box used to configure call routing, create menus, or provide audiotext announcements. transfer A physical connection of a call from a called party to another called part. Otherwise, this sounds more like a call. transfer-greeting-action The three-part sequence for handling every call routed to a voice mailbox, transaction box, or other type of box.
voice detection A function that enables the messaging system to listen for spoken sounds, instead of listening only for touchtones or pulse tones. voice detect box A type of transaction box that uses voice detection to enable callers to make choices or respond to prompts by speaking. For example, saying yes or no. Callers can still press touchtone keys, so a greeting might say “to hold press 3 or say yes.
Page Field Descriptions The following is a list of the Administration Console pages and descriptions of each of the fields on the pages.
Subscriber Template > Subscriber Template > Access Options Subscriber Template > Subscriber Template > Call Transfer Subscribers > Subscriber Template > E-mail Subscribers > Subscriber Template > Fax Subscribers > Subscriber Template > Greetings Subscribers > Subscriber Template > Live Record Subscribers > Subscriber Template > Messages Subscribers > Subscriber Template > Notification Subscribers > Subscriber Template > One-key Dialing Subscribers > Subscriber Template > Profile Subscribers > Subscribers >
Subscribers > Subscribers > Profile Field Description Last Name The subscriber’s last name. When automatic directory assistance is enabled callers spell the first three letters of the subscriber name to find the extension number. First and middle name Display the subscriber’s first and middle names. Personal ID Displays the subscriber’s personal ID, usually the prefix 9 followed by the extension number. The prefix is set on the Subscribers Template Profile page.
Subscribers > Subscribers > Access Options Field Description Conversation Options Allow access to setup options Enable subscribers to change configuration settings using a phone: personal greetings, message groups, call transfer, message delivery, recorded name, spelled name, security code, and directory listing. Personal greetings can be changed only if Hear conversation in traditional order is not enabled. Announce message lengths Enable the system to state the length of the messages.
Field Allow to change phone notification settings and call screening options Description The subscriber can change notification and screening settings. Allow to change holding settings. The subscriber can use a phone to change call holding settings. NOTE THIS SETTING IS TURNED OFF BY DEFAULT FOR SECURITY REASONS. THIS SETTING MUST E ENABLED TO ALLOW SUBSCRIBERS TO CONFIGURE CALL TRANSFER AND MESSAGE NOTIFICATION. Allow personal greetings Subscriber can change personal greetings.
Field Allow to send messages to remote site1 Description Enables the subscriber to send messages to subscribers and message groups at remote sites. This setting is used only on messaging systems with the network messaging feature. This feature allows two or more messaging systems to exchange messages with one another. Allow to send urgent Enables the subscriber to send urgent messages outside the messages to remote site1 message delivery schedule to subscribers and message groups at remote sites.
Field Description Forward voice mail to e-mail system Allows the subscriber to automatically forward voice message to the subscriber’s e-mail inbox. Available only with the e-mail integration feature. Message is deleted from system if not specifically set to keep new or old. Cannot be used Receive e-mail notification on new fax/voice mail. Keep messages new on messaging system.
Subscribers > Subscribers > Call Transfer Field Enable call transfer Description Turns call transfer on or off. • Check for dialtone before transferring. The messaging system listens for a dialtone before attempting to transfer the call. • Transfer to subscriber’s extension. Select this setting to transfer calls to the extension specified on the subscriber profile page if transfer is enabled. • Transfer to. Accepts an alternate extension to transfer calls to if call transfer is enabled.
Field Description Gather phone number Asks callers to provide a phone number before routing the call. Gather account number Asks callers to provide their account number before routing the call. Announce transfer Plays a beep before connecting the caller. With most phone systems, this setting lets the subscribers know exactly when the call is connected or that the call is from an external caller. Confirm before transfer Before the system transfers a call, the subscriber can decide to take the call.
Subscribers > Subscribers > Greetings Field Description Active Greeting Standard greeting Enables the standard greeting for the subscriber. When the standard greeting is selected, the following are available: When subscriber’s extension is busy • Enable busy greeting. If the subscriber does not have a standard greeting recorded and the Enable busy greeting field is not selected, callers hear “ is not available right now.
Subscribers > Subscribers > One -key Dialing Field One-key dialing (Fields 1 through 0) Description Each number represents a touchtone key on a phone. Up to ten one-key dialing rules can be configured. Each key is routes the caller to the specified system ID. The messaging system listens for one-key dialing entries during the greeting and during the good-bye prompt. One-key delay… seconds Page Field Descriptions Type the number of seconds the messaging system waits before acting on the key press.
Subscribers > Subscribers > Messages Field Description Unidentified Caller Messaging Allow callers to change messages they just recorded Callers can change the messages they just recorded. Maximum message length to record from an unidentified caller… seconds. The maximum length of a message, in seconds, from an outside caller. Message Auto Copy to Copies incoming voice messages to the specified voice inbox. The original message is not deleted. Click Search and select a subscriber. Delete on copy.
Field Applies to: Description Select one of the following: • Voice messages only. Select to include only voice messages in the message limit count. • All messages. Select to include both fax messages and voice messages in the limit count. Maximum number of messages The maximum number of received messages permitted in the subscriber inbox. When this number is reached, the system stops recording new messages for the caller until messages have been deleted.
Subscribers > Subscribers > Notification Field Description Message Indication Enable Message Waiting Indication (MWI) Select to activate message waiting indication. At subscriber's extension Subscriber's extension is used for message waiting indication. At extension: Type the extension where the subscriber receives message waiting indication. Current MWI state Indicates whether message waiting indication is on or off. Message Notification Select a device.
Field Wait… minutes before the first delivery attempt Description The number of minutes between the arrival of a new message and the first attempt to deliver it. Use this setting to assign priorities to each message delivery phone number. For example, if you type 0 (zero) for Work Phone and 60 for Home Phone, for the first 60 minutes the messaging system tries to deliver new messages only to the Work Phone. After 60 minutes, it tries to deliver new messages to both phones.
Subscribers > Subscribers > Live Record Field Description Enable live record Enables subscriber call recording. Guests cannot record calls. Maximum record time… seconds The maximum length, in seconds, of a live record session. The maximum value is 6000 seconds. When a live record session reaches the maximum record time, the system plays three short beeps. Live record extensions for ViewMail Specifies the extensions a subscriber can use to record calls. • On subscriber's extension.
Subscribers > Subscribers > Fax Field Description Fax ID Callers dial this number to send faxes directly to the subscriber. No fax available Controls how the system handles the call when all fax ports are busy: • Take a message. the voice mailbox. • Route to operator. operator box. Records a message for the owner of Routes the caller to the system • Route to. Routes the call to another system ID. If selected, type a system ID or search and select a system ID. • Hang up.
Subscribers > Subscribers > E -mail Field Description E-mail Notification E-mail address The e-mail address used for notification messages. E-mail Reader (text-to-speech) Server type Select the e-mail server protocol: IMAP or POP3. Authentication Method Specifies the authentication type to use for outgoing e-mail: Plaintext or NTLM. Server name Type the name of the e-mail server.
Subscribers > Subscribers > Guests > Profile Field Description Guest of The subscriber hosting this Guest. Last name Guest’s last name. First and middle name Guest’s first and middle names. Personal ID Guest’s personal ID. Voice name Number of seconds the guest’s recorded name lasts. Click to record or rerecord the voice name. Language Guest’s selected language the guest hears when using a phone. New messages The number and length of the guest’s new messages.
Subscribers > Subscribers > Guests > Notification Field Select a device Description Select the device to configure for message notification: • Work phone. Select to configure the work phone. • Home phone. Select to configure the home phone. • Pager phone. Select to configure the pager. • Spare phone. Select to configure the spare phone. Enable Activates the selected device. At extension Type the number to dial in the text box.
Subscribers > Subscriber Template > Profile Field Description Personal ID The default numbering scheme used to create personal IDs. Assigns IDs based on the subscriber extension ID. Type the prefix for the IDs, followed by X for the subscriber’s extension ID. For example, type 9X. Language On a multilingual system, the language the system uses for subscriber account made with this template. If a default language for subscribers, the messaging system uses the messaging system default language.
Subscriber Template > Subscriber Template > Access Options Field Description Conversation Options Allow access to setup options Enable subscribers to use a phone to change personal greetings (unless Hear conversation in traditional order is set), message groups, call transfer, message delivery, recorded name, spelled name, security code, and directory listing. Announce message lengths The messaging system announces the total length of messages.
Field Allow to change phone notification settings Description Subscribers can change notification settings. NOTE FOR SECURITY REASONS, THIS ACCESS SETTING IS TURNED OFF BY DEFAULT. THIS SETTING MUST BE SELECTED TO ENABLE SUBSCRIBERS TO CONFIGURE CALL TRANSFER AND MESSAGE NOTIFICATION. Allow to change hold settings. The subscriber can change call holding using a phone. Allow personal greetings Subscribers can change personal greetings.
Field Description Allow to send urgent Subscribers can send urgent messages outside the message messages to remote site delivery schedule to subscribers and message groups at remote sites. This setting is used only on messaging systems with the network messaging feature. Play receipts when messages opened at remote sites Specifies whether the messaging system announces when a recipient at a remote site first listened to a message. Otherwise, the system announces when the message was transmitted.
Field Forward faxes to the e-mail system Description Subscribers can automatically forward fax mail from the voice message inbox to the e-mail inbox when using the e-mail integration feature. • Keep messages new on messaging system. Configures the system, after forwarding a fax message to the e-mail system, to retain a copy on the messaging system and announce it as a new message when the subscriber checks fax messages. This setting is only available if Forward faxes to e-mail system is selected.
Subscriber Template > Subscriber Template > Call Transfer Field Description Enable call transfer Turns call transfer on or off. Check for dialtone before transferring The messaging system listens for a dialtone before attempting to transfer the call. • Transfer to subscriber’s extension. Select to transfer calls to the extension specified on the subscriber profile page if transfer is enabled. • Transfer to. An alternate extension to transfer calls to if call transfer is enabled.
Field Description • Gather phone number. Asks callers to provide a phone number before routing the call. • Gather account number. Asks callers to provide their account number before routing the call. • Announce transfer. Generates a beep before connecting the caller. With most phone systems, this setting lets the subscribers know exactly when the call is connected or that the call is from an external caller. • Confirm before transfer.
Subscribers > Subscriber Template > Greetings Field Description When the subscriber’s extension is busy… Enable busy greeting Activates the greeting that plays when the subscriber’s extension is busy. If the subscriber has no standard greeting recorded and the Enable busy greeting field is not selected, callers hear “ is on the phone.” After greeting A group of settings that specify the action the messaging system takes after playing the greeting. • Take a message. the voice mailbox.
Subscribers > Subscriber Template > One -key Dialing Field Description One-key dialing (Fields 1 through 0) Each number represents a touchtone key. Routes callers to the associated system ID when they press a key on a touchtone phone. The messaging system listens for one-key dialing entries during the greeting and good-bye prompts. One-key delay… seconds The length of time, in seconds, the messaging system waits before acting on touchtone key presses.
Subscribers > Subscriber Template > Messages Field Description Unidentified Caller Messaging Allow callers to change messages they just recorded Callers can change newly recorded messages. Maximum message length to record from an unidentified caller… seconds. The maximum length, in seconds, of a message from an outside caller. Unidentified caller messages are marked urgent: Select one of the following: • Always. • Never. Automatically marks all messages urgent. Callers cannot mark a message urgent.
Field Maximum number of messages Description The maximum number of received messages a subscriber inbox contains. When this number is reached, the system does not record new messages until messages have been deleted. The system notifies the subscriber on log on that the limit has been reached and recommends deleting messages.
Subscribers > Subscriber Template > Notification Field Description Message indication Enable Message Waiting Indication (MWI) Select to activate message waiting indication. Then select one of the following: • At subscriber’s extension. The messaging system uses the subscriber's extension for message waiting indication. • At extension. Accepts the extension where the subscriber receives message waiting indication.
Field Description If delivery attempt failed, wait… minutes before retrying Accepts the number of minutes that the messaging system waits after an unsuccessful message delivery attempt before retrying the message delivery number. An attempt is unsuccessful when the device is busy, unanswered, answered by a person who does not enter a personal ID, or answered by an answering machine.
Subscribers > Subscriber Template > Live Record Field Description Enable live record Activates live record. Guests cannot record calls. Maximum record time… seconds The maximum length, in seconds, of a live record session. The maximum value is 6000 seconds. When a live record session reaches the maximum record time, the subscriber hears three short beeps. Live record extensions for ViewMail The extensions a subscriber can use to record calls. Select one of the following: • On subscriber's extension.
Subscribers > Subscriber Template > Fax Field Fax ID Description Specifies the default ID scheme to be used for fax IDs. NOTE AVAILABLE ONLY FOR MESSAGING ACTIVEFAX PACKAGE. SYSTEMS WITH THE Callers dial this number to send faxes directly to the subscriber. Add the starting digit to the subscriber extension, represented by X to create a unique fax box ID for every subscriber. No fax available Controls how the system handles the call when all fax ports are busy: • Take a message. the voice mailbox.
Field Fields 1 through 0 Page Field Descriptions Description Each number represents a touchtone key. Routes callers to the associated system ID when they press a key. The messaging system listens for one-key dialing entries during the greeting and good-bye prompt.
Subscribers > Subscriber Template > E -mail Field Description E-mail Reader (text-to-speech) Server type The e-mail server protocol: IMAP or POP3. Authentication Method The e-mail authentication used for outgoing e-mail. Server name The name of the e-mail server. Port The port number of the access port used by the SMTP or IMAP server. Use SSL Select to enable the SSL secure transport protocol. The Port field changes to 993 when SSL is selected.
Subscribers > Account Policy Field Description Permit blank password Subscribers are not required to set a security code. Minimum number of characters in password Requires subscriber security codes to contain the same or greater number of characters specified. Default password for each new subscriber Specifies the default security code assigned to all new subscribers. The code must be 3 to 10 digits in length.
Call Management > Extended Automated Attendant Field Description Activate automated attendant Select to activate the extended automated attendant. Extension (range) The list of extension numbers for the phone system line that extended automated attendant manages, in ascending order, separated by commas. If the numbers are sequential, type a range separated by a hyphen. Transfer type Configure how the messaging system and the phone system interact during call transfer.
Call Management > Opening Boxes > Profile Field Description Name The name of the opening box. System ID The system ID for the opening box. Voice name A recording of the name of the box. Restart IDs Code that controls how the messaging system restarts callers at a transaction box with recordings in the language selected by the caller. Use this field only with messaging systems that have language select boxes. If the messaging system uses only one language leave the fields blank. • Language.
Call Management > Opening Box - Greetings Field Active greeting Description The greeting used when the messaging system answers calls: NOTE IF 00:00 APPEARS ON A BUTTON LABEL, A GREETING HAS NOT BEEN RECORDED. • Day/Night greeting. Enables the day and night greetings for the opening greeting box. If 00:00 appears on the button label a greeting has not been recorded. Once the greeting has been played, the messaging system takes the action specified in After day greeting or After night greeting.
Call Management Opening Box - One-key Dialing Field Description One-key dialing (Fields 1 through 0) Each number represents a touchtone key and routes callers to the associated system ID. The messaging system listens for one-key dialing entries during the greeting and good-bye prompts. One-key delay… seconds The number of seconds that the messaging system waits for callers to enter additional digits before acting on the key press.
Call Management > System Operator Box - Profile Field Description System ID System operator box system ID. Voice name The system operator box recorded name. Language Specify the language used for the system operator box. Alternate system IDs for special operators on each port Alternate system IDs for special operators on each port. Callers pressing 0 (zero) are routed to a different operator depending on which port answers the call.
Call Management > System Operator Box - Call Transfer Field Day-transfer to Description Turn on call transfer during day mode and specify the extension where the messaging system transfers calls. CAUTION! FOR SV8300 PHONE SYSTEMS CLEAR THE Day-transfer to FIELD IF YOUR REGION DOES NOT SUPPORT ZERO FOR THE OPERATOR. Night-transfer to Turn on call transfer during night mode and specify the extension where the messaging system transfers calls.
Field Transfer options Description Set additional transfer settings to control how calls are transferred to the extension. For example, the system can play a beep or ask a caller to record a name before transferring the call. Some settings might not be available, depending on the phone system or selected call transfer type. • Gather phone number. Asks callers to enter their phone number before transferring the call.
Call Management > System Operator Box - Greetings Field Active greeting Description Select the greeting played when the messaging system answers calls. • Day/night greeting. Makes the standard day or night greeting active. When the box is in day mode, the standard day greeting is active. When the box is in night mode, the standard night greeting is active. • Alternate greeting. Makes the alternate greeting active. When the box is in day mode or night mode, the alternate greeting is active.
Call Management > System Operator Box - Messages Field Description Allow callers to change messages they just recorded Callers can change messages they have just recorded. Clear the field to prevent changes. Allow callers to leave urgent messages Asks unidentified callers if they want to mark a message as urgent. Clear the field to prevent unidentified callers from marking messages as urgent. Mark all messages urgent Marks all messages from unidentified callers as urgent.
Call Management > Transaction Boxes - Profile Field Description Name Transaction box name. System ID Transaction box system ID. Owner Transaction box owner. Voice name Displays the length, in seconds, of the recorded name. If this field 00:00 appears in the button label a transaction box name has not been recorded. Language The language callers hear when they reach the transaction box. If a language is not selected callers hear prompts in the messaging system default language.
Call Management > Transaction Boxes - Call Transfer Field Description Day - transfer to Turns on call transfer during day mode. In the field to the right, type the extension to which the messaging system transfers calls. Clear this check box to turn off call transfer. Night - transfer to Turns on call transfer during night mode. In the field to the right, type the extension to which the messaging system transfers calls. Clear this check box to turn off call transfer.
Field Transfer options Description Set additional transfer options to control how calls are transferred to the extension. For example, the system can play a beep or ask a caller to record a name before transferring the call. Some options might not be available, depending on the phone system or call transfer type chosen. • Gather phone number. Asks callers to enter their phone number before transferring the call.
Call Management > Transaction Boxes - Greetings Field Active greeting Description Accepts one of the following: • Day/Night greeting. Turns on the day or night greeting for the box. The first button to the right stores the recording for the day greeting. The second button stores the recording for the night greeting. • Alternate greeting. Turns on the alternate greeting for the box. The button to the right stores the recording for the alternate greeting.
Call Management > Transaction Boxes Field - Messages Description Allow callers to change messages they just recorded Select to let callers change messages they have just recorded. Clear to prevent message changes. Allow callers to leave urgent messages Select to ask unidentified callers if they want to mark a message as urgent. Clear to prevent unidentified callers from marking messages as urgent. Mark all messages urgent. Select to mark all messages from unidentified callers as urgent.
Call Management > Transaction Boxes - One -key Dialing Field Description One-key dialing (Fields 1 through 0) Each number represents a touchtone key that routes callers to the associated system ID. The messaging system listens for one-key dialing entries during the greeting and good-bye prompts. One-key delay… seconds Accepts the number of seconds that the messaging system waits for additional key tones before taking action. Enables callers to bypass the one-key dialing menu during the greeting.
Call Management > Interview Boxes - Profile Field Description Name The interview box name. System ID The interview box system ID. Owner The interview box owner. Voice name Displays the length, in seconds, of the recorded voice name. Language The language callers hear when they reach this transaction box. If a language is not selected, a caller hears prompts in the messaging system default language. Delete Messages Click to delete all messages from the box, whether they have been heard or not.
Call Management > Interview Boxes - Questions Field Description Fields 1 through 20 Numbers for the questions in the interview. Record up to 20 questions. Question Length The length of the recorded question. Reply Time Limit The maximum number of seconds for responses to a question.
Call Management > Interview Boxes - Messages Field Description Allow callers to leave urgent messages Select to ask unidentified callers whether to mark the message as urgent. Mark all messages as urgent Select to mark all messages from unidentified callers as urgent. After taking a message Specifies what the system does after recording a message from the caller. This setting applies only if the Take a message action was selected on the Greetings page for this interview box.
Call Management > Language Boxes - Profile Field Description Name The language box name. System ID The language box system ID. Introduction Recorded introduction for the language box. One-key delay… seconds The number of seconds the system waits, after a caller presses a touchtone key, for additional touchtone keys. This pause enables callers to bypass one-key dialing rules. Wait for touchtones… seconds The number of seconds the system waits for an additional tone.
Call Management > Language Boxes - Key Mapping Field Description Greeting The length of the greeting appears on the button label in minutes and seconds. If 00:00 appears on the button label, a greeting has not been recorded. Key The touchtone key assigned to the language. When a caller presses this touchtone, the system plays the conversation in the selected language. Language The language assigned to the touchtone key.
Call Management > Voice Detect Boxes - Profile Field Description Name The voice detect box name. System ID The voice detect box system ID. Owner The voice detect box owner. Voice name Recorded name for the voice detect box. Language For multilingual systems, the language callers hear when they reach this transaction box. If a language is not selected, a caller hears prompts in the default messaging system language.
Call Management > Voice Detect Boxes Field - Call Transfer Description Day - transfer to Turns on call transfer during day mode. Type the extension where the messaging system transfers calls. Clear this check box to turn off call transfer. Night - transfer to Turns on call transfer during night mode. Type the extension where the messaging system transfers calls. Clear this check box to turn off call transfer.
Field Transfer options Description Set additional transfer settings to control how calls are transferred to the extension. For example, the system can play a beep or ask a caller to record a name before transferring the call. Some settings might not be available, depending on the phone system or call transfer type chosen. • Gather phone number. Asks callers to enter their phone number before transferring the call.
Call Management > Voice Detect Boxes - Greetings Field Description Day/Night greeting Turns on the day or night greeting for the box. The length of the greeting appears on the button label. Click the button to re-record a greeting. Alternate greeting Turns on the alternate greeting for the box. After day greeting Select one of the following for the action taken after playing the greeting during the day schedule: • Take a message.
Call Management > Voice Detect Boxes Field - Messages Description Allow callers to change messages they just recorded Select to let callers change messages they have just recorded. Clear to prevent changes. Allow callers to leave urgent messages Select to ask unidentified callers whether to mark a message as urgent. Clear to prevent unidentified callers from marking messages as urgent. Mark all messages urgent Select to mark all messages from unidentified callers as urgent.
Call Management > Voice Detect Boxes Field - Voice Description After the caller speaks, route to The system ID where a caller is routed after speaking. If selected, type the system ID or click Search to find and select a system ID. If the caller remains silent, route to The system ID to which a caller routes when remaining silent. If selected, type the system ID or click Search to find and select a system ID.
Call Management > Public Fax Box Field - Profile Description System ID The public fax box system ID. Voice name Length of the recorded name for the public fax box. If 00:00 appears on the button label, a name has not been recorded.
Call Management > Public Fax Box Field - Call Transfer Description Transfer to Select to enable call transfer. Type the extension where the messaging system transfers calls. Clear to turn off call transfer. Transfer type Configure how the messaging system and the phone system interact during call transfer. Available transfer types are: • Await Answer. The system transfers the call to the extension if the call is answered within the number of rings specified in the Number of rings field.
Call Management > Public Fax Box Field If the fax extension does not answer or is busy - Action Description Specifies the action the voice message system takes when the fax extension does not answer or is unavailable: • Route to operator. operator box. Routes the caller to the system • Route to. Routes the caller to another system ID. If selected, type the system ID or click Search and select a system ID. • Hang up. Disconnects without saying good-bye. • Say bye.
Call Management > Fax Boxes - Profile Field Description Name The fax box name. System ID The fax box system ID. Owner The name of the fax box owner. Voice name Length of the recorded fax box name. If this field displays 00:00:00, the fax box name has not been recorded. Language The language callers hear when they reach this fax box.
Call Management > Fax Boxes - Voice Annotation and Fax Action Field Description Voice Annotation Maximum message length to record from an unidentified caller… seconds The maximum length of a message, in seconds, from an external caller. Ask for a voice annotation Select to prompt the caller to record a message and send a notification message to the fax box owner when the fax call is transferred. Allow edits to voice annotation Select to enable callers to change messages they have just recorded.
Call Management > Fax Boxes - One-Key Dialing Field Description One-key dialing (Fields 1 through 0) Each number represents a touchtone key that routes callers to the specified system ID. The messaging system listens for one-key dialing entries during the greeting and good-bye prompt. One-key delay… seconds Specify the number of seconds to pause waiting for a second touchtone key. This enables callers to bypass the one key dialing menu during the greeting.
Groups > Message Groups Field Name Description The message group name. If the group is to be used for outside caller group messaging, the group name must be less than 10 characters and cannot include any numbers or spaces. Owner The subscriber who owns the group. The owner of the group can add members to the group using a phone or delete the group. If this is a private group, the owner is the only person who can send messages to the group.
Groups > Directory Groups Field Name Description The name of the group. If the group is to be used for outside caller group messaging, the group name must be less than 10 characters and cannot include any numbers or spaces. Directory ID Callers can access the group when they enter the ID. Owner The subscriber who owns the group. The owner of the group can add members to the group using a phone or delete the group.
Groups > Directory Menus Field Name Description The name of the group. If the group is to be used for outside caller group messaging, the group name must be less than 10 characters and cannot include any numbers or spaces. Directory ID Callers can access the group when they enter the ID. Voice name Recording of the group name. Assign keys Click to open the Assign keys dialog box. Assign one-key dialing rules for directory groups. Maximum of 8 keys can be assigned.
Hotel Guests > Profile Field Description Last Name The subscriber’s name. With automatic directory assistance, callers spell the first three letters of the subscriber’s name to find the subscriber’s extension number. First and middle name Guest’s first and middle names. Personal ID The unique ID associated with the guest room. Extension The subscriber’s extension number Voice name The number of seconds the subscriber’s recorded name lasts.
Hotel > Guests > Guest Options Field Include in guest directory Description Shows whether guests have their names included in the hotel guest directory. NOTE THE GUEST MUST HAVE A NAME RECORDED TO APPEAR IN THE AUTOMATIC DIRECTORY. Allow personal greetings Allows guests to record a personal greeting for their room extension. If no personal greeting is recorded, the system plays a standard greeting. If the guest has recorded a voice name, it is included in the standard greeting.
Hotel > Guests Field > Guest Call Transfer Description Enable call transfer Turns call transfer on or off. Transfer to guest’s extension Select this setting to transfer calls to the extension specified on the hotel guest profile page if transfer is enabled. Transfer to Accepts an alternate extension to transfer calls to if call transfer is enabled. Transfer type Specifies how the phone system and messaging system interact during call transfers to the hotel guest's voice mailbox. • Await Answer.
Hotel Guests > Field Guests > Greetings Description Standard greeting Stores the hotel guest's personal greeting. If the field displays 00:00, a greeting has not been recorded and the system's default greeting is played. After greeting A group of settings that specify the action the messaging system takes after playing the greeting. The available settings are: • Take a message. • Route to operator. operator box. Records a message. Routes the call to the system • Route to.
Hotel Guests > Guests > Guest Messages Field Description Allow callers to change Callers can change a message they have just recorded. messages they recorded Maximum message length to record from an unidentified caller… seconds The maximum length of a message from an outside caller. Enable Message Waiting Indication (MWI) Select or clear this check box to turn message waiting indication on or off. • At guest’s extension. The hotel guest receives message waiting indication at the room’s extension.
Hotel Guests > Guests > Guest Notification Field Description Guest’s phone Enable Turns message delivery on or off. Select one of the following: • At guest’s extension. Sets the system to dial the hotel guest’s room extension to notify of new messages. • Other number. Sets the system to dial a number other than the room extension to notify of new messages. Wait… minutes before the first delivery attempt The number of minutes between the arrival of a new message and the first attempt to deliver it.
Hotel Guests > Guest Template Field Description Default guest ID Specifies the convention used to create each hotel guest’s personal ID. The default setting is “8x,” where 8 is the ID and “x” represents the guest’s extension. First time enrollment Select to play the guest enrollment conversation the first time they log on to the messaging system. Allow passwords Select to enable hotel guests to use passwords to retrieve voice messages.
Network > Local Site Setup Field Description Open Select if the phone system carrier is a public carrier. Local country code The local site country code. Contact your local phone service for country codes or use the Internet. Maximum of five digits. Area code The local site three-digit area code. Do not use parentheses in this field. Phone number The local site seven-digit phone number. Do not use hyphens. Other Carrier (Private) Select if the phone system carrier is a private business.
Network > Remote Sites Field Description System ID The remote site system ID. Remote site name The remote site name. Voice name Recorded remote site name. If 00:00 appears on the button label, a recording does not exist. Network site type The type of phone system used to exchange messages with the remote site. Specified when the remote site is added to the messaging system. • Open. The site uses the public phone network to exchange messages. • Other carrier (Private).
Field Description # Phone number Phone number, includes outdial access codes and other codes required by the phone system to dial the remote site. A maximum of two numbers. Interval The hours when this phone number is used for remote site message delivery. Day Sets the days when this phone number is used for remote site message delivery. Rings to wait Sets the number of rings allowed before the delivery attempt fails.
Network > Template Remote Sites Field Description Maximum failed calls allowed The number of times the system attempts to reach a remote site to deliver messages before preventing subscribers from sending messages to remote subscribers at the remote site. Restrictions Sets message delivery restrictions to or from the remote site. • Outgoing. Local site can only receive messages from the remote site. The local site cannot place message delivery calls to the remote site. • Screen.
System > Backup & Restore > Backup Field Description Daily Backup Enable daily backup (at …) Configures the system to automatically perform a backup each day. Specify a time for the daily backup. Include messages in backup Select to include messages in the backup. Clear to backup only configuration information, recorded names, recorded greetings, and prompts. CAUTION! INCLUDING MESSAGES INCREASES THE SIZE OF THE BACKUP FILE. Destination Select the location to save the backup file. • Hard Drive.
System > Backup & Restore > Restore Field Description Stop the messaging system Click to open the Server Control page, then click Stop to stop the messaging system. Upload an existing backup to the messaging system Type the path and file name, or use click Browse to browse for and select a backup file. Click Upload File. File name The names of five backup files saved on the messaging system server. Date The date on when the backup files were created.
System > Update Automatic Updates are automatically displayed on this page. Field Description Automatic Updates This table provides the following information: • Package. Displays the package information. • Status. Displays the current status of the automatic update. • Description. Describes what the update is adding/fixing. • Download. Click to download the update. • Install. Click to install the update. Upload Update Hotfix Page Field Descriptions Click to upload the update hotfix.
System > Logs CAUTION! THE TRACE LEVEL AND LOG LEVEL TABLES SHOULD ONLY BE CHANGED FROM THEIR DEFAULT VALUES AFTER TECHNICAL SUPPORT OR A QUALIFIED PHONE SYSTEM TECHNICIAN. CALL TECHNICAL SUPPORT BEFORE CHANGING FIELDS. SETTINGS IN THE CONSULTATION WITH VALUES IN THESE Field THE Description Number of days to keep log messages... days Specify the number of days that log messages are stored on the messaging system. Log messages are deleted at midnight on the day they expire.
System > Configuration > General System Field Call report aging… days Description The number of days the messaging system stores data files for reports. The default value is 14 days. The maximum value is 999 days. System ID to access to The system ID that subscribers use to send messages to groups and remote sites numeric groups or to subscribers at remote locations.
System > Configuration > System Settings Field Description Directory Assistance Directory Assistance The ID callers dial to be routed to the alphabetic directory. Transfer call automatically if there is only one possible match Select to have automatically route callers to the extension of the subscriber when there is only one who matches the specified spelling. When not selected the callers must dial the extension even if there is only one matching subscriber.
Field Startup Description Accepts the following values that are active when the messaging system is restarted: • C. Disable Disk Fault Tolerance. Disk Fault Tolerance is a type of error handling for the messaging system conversation. When the system encounters problems accessing the hard disk while playing a prompt or message, the system treats the prompt or message as if it were missing and continues the conversation.
System > Configuration > Languages Field Description System Languages Lists the licensed languages that are installed on the messaging system. Default Selects the default language. System Specifies the system languages that are installed and used for prompts and system conversations. Hotel Specifies the hotel languages installed for hospitality. Remove Remove only appears next to active languages. Click to remove the language pack from the system.
System > Configuration > Public Messages Field Description New public messages The number and total length of new public messages. Total public messages The total number and total length of public messages. Keep old messages for… days The number of days the system stores heard public messages. The default number of days is 0 (zero). Messages are deleted at midnight on the day they expire. Keep archived messages The number of days the system stores archived public for… days messages.
System > Configuration > Recordings Field Description Maximum message life… Type the number of days the system keeps new unheard days messages before automatically deleting them. Maximum recording time for a person-to-person message… seconds The number of seconds of message storage allowed for messages between subscribers or guests. This field controls the number of seconds of message storage for greetings. The default value is 300 seconds.
System > Configuration > Contacts Field Description Site name The company name. System administrator The name of the system administrator. Customer contact The name of the person responsible for the messaging system server maintenance if different than the system administrator. Customer phone number The phone number of the system administrator or contact. Type numbers only, do not use alphabetic or special characters.
System > Configuration > Calls Answered Field Description Total trunks/stations The number of phone system trunks and stations. Calls/day The average number of calls the phone system handles each day. Day calls answered Indicates which calls the messaging system answers based on how the phone system is programmed. Accepts one of the following values: • All trunks. Answers all incoming calls. • Some trunks.
System > Configuration > Access Numbers Field Description Trunk pilot # The phone number that external callers use to reach the messaging system. Leave this field blank if the messaging system answers only forwarded calls. # of trunks answered The number of trunks that the messaging system answers. Alternate trunk #s Other published phone numbers that external callers use to reach the messaging system, such as 800 numbers and service numbers.
System > Configuration > Message Sorting Field Select message order Description The table displays the order the messaging system plays the types of messages. The message type in the top row of the table is played first. Changing message order Click the red arrow to move a message up in the list. Click the green arrow to move a message down in the order. Types of Messages The types of messages sorted are: • Messages from subscribers. • Messages from guests.
System > Configuration > Hospitality Settings Field Description Reset message box ID Code to manually check out hotel guests and reset the voice mailbox for the next guest. Default is 636. Post checkout ID Access code for guest message storage for review of unheard messages after checkout. Default is 654. ID for guest directory The ID callers enter to access the guest directory. Leave this field blank if a guest directory is not available. • Auto xfer. extension.
System > Configuration > E-mail settings Field Description Server type The e-mail server protocol specified during installation. See the Installation Guide for details. Outgoing server The IP address or server name of the SMTP or IMAP e-mail server. Localhost is an acceptable server name. NOTE TO USE A SERVER NAME, A VALID DOMAIN NAME SERVER MUST BE SPECIFIED DURING INSTALLATION OR CONFIGURED USING THE MAINTENANCE MENU. Port The port number of the access port used by the SMTP or IMAP server.
System > Configuration > E -mail message template Field Description Language Select the language used for e-mail notification. When a language is not selected, the messaging system uses the messaging system language. See “System > Configuration > Languages.” Subject The text to appear in the subject line of e-mail notification messages. Message from . Body The text that appears in e-mail notification messages. See “E-mail Template Available Tags.
System > Fax Setup Field CSID Description The call station ID that appears in the TTI line of a fax sent from the system. This is the fax phone number. NOTE THIS SETTING APPLIES TO ALL FAX PORTS AND IS SHARED BY BOTH FAX MAIL AND FAX-ON-DEMAND. Additional TTI Select to configure the system to add a second TTI line at the top of each fax mail.
System > Schedules Field Description Time & Day (A, B and C) Set the times for day and night schedules in hh:mm format. Select the days that the use the schedule. For example, 9:00 for 9:00 A.M. or 21:00 for 9:00 P.M. Current mode The current schedule mode. • Day mode. The days and hours when the company is open or when standard phone service is available. • Night mode. Any time that is not during Day mode. • Holiday mode. The days when the company is closed.
System > Holidays > Holidays Schedule Field Description Holidays 1-18 Specify the organization holiday dates by selecting the Day and Month for each holiday. Greeting Sets the greeting number (from 1-18) for the holiday. These greetings are recorded on the System > Holidays > Greetings page.
System > Holidays > Holiday Greetings Field Greetings 1-18 Page Field Descriptions Description Record up to 18 holiday greetings. The length of the recording appears on the button label. If 00:00 appears on the button label a greeting has not been recorded.
System > Voice Prompts Field Description Language Select a language from the list of installed languages. Prompt set Select a prompt set. See the list of prompt sets below. Prompts Previous…Next Use to select the Previous or Next set of prompts. The number of existing prompts appears. Ports - Previous…Next Use to select the Previous or Next set of ports. The number of ports appears. # The number of the prompt for the selected Prompt set. Name The name of the prompt.
System > Licensing Field Description Serial Number Displays the system key serial number. This number is required when a license key is created or updated. License Counts Number of seats licensed: • UM seats. Total license count for unified messaging. • System Languages. languages. Total number of licensed system • Hospitality Languages. hospitality languages. • Fax Ports. system. Total number of licensed Total number of fax ports configured on the • Voice Ports.
System > Extension Remapping Field Find extension map matching the following criteria Description A search function to find the remapping rule. • From number. remapped. • To number. to. • Search. The extension or pattern to be The extension or pattern being remapped Click to find the matching rule. Active Select to activate the rule. Clear to deactivate the rule. From number The extension or number to be remapped. Offset The extension or pattern to which the extensions is remapped.
System > Trunk Mapping There are twenty trunk maps that can be defined. Each trunk map requires the following information: Field Description Start trunk The Start or first trunk in the range to be routed to a specified system ID. Stop trunk The Stop or last trunk in the range to be routed to a specified system ID. Route to ID The system ID all calls on the specified range of trunks are routed to.
Switch > Information Consult the phone system documentation for a thorough explanation of integration options. Field Description Switch Specifies the phone system manufacturer, model and if applicable, the integration type. Integration options Type the appropriate integration options for the switch installed. Valid integration options are listed in the following table.
Integration Options DT Dial Tone Detection. Description When recording a message, the messaging system listens for a dial tone, reorder tone, or busy tone. If the system detects a dial tone, it assumes that the caller has hung up and ends the recording and the call. The following integration settings control different aspects of the system dial tone detection sensitivity: • DT2=n. Dialtone Detection Recording Cutoff Value.
Integration Options HLOG= Hospitality Auto Log on. Description Controls auto-log on for hotel guests. The value of is 0 (enabled) or 1 (disabled, default). To disable automatic log on, delete HLOG=1 or replace it with HLOG=0. With automatic log on enabled, hotel guests are not asked to enter their personal ID or password before hearing messages when calling the system from their room extension. Automatic log on is only available to those subscribers designated as “hotel guest.
Integration Options Description OTL= Outdial Trigger Length. Represents the number of characters in a phone number, including any special dialing characters, that the messaging system treats as an external number. To change the outdial trigger length, type OTL= where is a number between 4 and 15. For example, setting OTL=10, the system considers phone numbers with more then ten to be external phone numbers. P Pause Before Greeting.
Integration Options TM –= Trunk Map. Description Maps trunk calls to specific system IDs, where is the number of the first trunk in the range, is the number of the last trunk in the range and is the system ID. For example, type tm1-3=987 to map trunks 1, 2, and 3 to box ID 987. To map to more than one system ID, follow the first range of trunk numbers with a comma and then the next range of trunk numbers and system ID.
System > Switch > Switch Extensions Field Description Edit All Click to edit all switch extensions. Cancel All Click to cancel all changes made to all switch extensions. Port The number of the incoming phone line represented by each row in table. Status Select one of the following values to set the port status. The status indicates how the messaging system uses the port to answer and route calls, and dial numbers for outgoing calls. • A/D (Answer/Dial out). Answers incoming calls.
Field Port status Description Accepts one of the following values to set the fax port status. The status indicates how the messaging system uses the port to answer and route incoming faxes and to dial numbers for outgoing faxes. • Fax. Answers incoming faxes. When not answering incoming fax calls, dials out to deliver faxes. • Busy. Makes the fax port busy. Use for testing or to temporarily take a port off line.
System > Switch > Dialing Codes Field Outdial access code Description The outdial access number that the messaging system dials to call outside the system. For example, if you type 9, (nine comma), the system dials 9 and pauses before dialing the external number. The system automatically dials the outdial access number before dialing any message delivery number that is greater than or equal to the outdial trigger length.
System > Switch > Touchtones CAUTION! CONSULT WITH TECHNICAL SUPPORT OR A LICENSED PHONE TECHNICIAN BEFORE CHANGING ANY VALUES ON THIS PAGE. Field Description Touchtone sensitivity (minimum touchtone lengths) When playing a prompt… milliseconds The minimum duration of touchtones when the messaging system plays a prompt and expects the caller to press a touchtone. Do not change the default setting unless the system fails to accept touchtones. The maximum setting is 150 milliseconds.
System > Switch > Incoming Calls CAUTION! CONSULT WITH TECHNICAL SUPPORT OR A LICENSED PHONE TECHNICIAN BEFORE CHANGING ANY VALUES ON THIS PAGE. Field Description Ringing Ring-on time… milliseconds Used by the messaging system with the ring-off time setting to identify a ring signal. The ring signal consists of voltage that alternates on and off. The field accepts the length (in tenths of a second) for the “on” period in the ring cycle. For example, set it to 10 for an “on” period of 1 second.
System > Switch > Dialout CAUTION! CONSULT WITH TECHNICAL SUPPORT OR A LICENSED PHONE TECHNICIAN BEFORE CHANGING ANY VALUES ON THIS PAGE. Field Description Dialout pause time definition Comma (,) =… milliseconds The number of milliseconds the system pauses for a comma (,) in a dialing sequence. Semi-colon (;) =… milliseconds The number of milliseconds the system pauses a semi-colon (;) in a dialing sequence.
System > Switch > Message Waiting Indication Field Enable message waiting indication Description Select to enable message waiting indication systemwide. When not selected, disables message indication. NOTE WHEN THIS FEATURE IS DISABLED THE FIELDS IN THE MESSAGE WAITING INDICATOR CODES SECTION ARE DISABLED. THE CONTENTS OF THE FIELDS ARE RETAINED, SO THAT IF MESSAGE WAITING INDICATION IS REACTIVATED THE SETTINGS RETURN.
System > Switch > Call Holding Field Description Maximum number of lines allowed on hold at one time The maximum number of calls allowed on hold at one time for the entire messaging system. Maximum number of calls allowed to hold at one time for an extension The maximum number of calls allowed on hold at one time for any one physical extension.
System > Switch > Park and Page Field Description Park and page ID The system ID for call paging. Use this ID for a one-key dialing rules for individual subscribers. Park code The park sequence used by the phone system. Pickup code The pickup sequence used by the phone system. Park pool Select to have the system use only one port for cut-through paging. Clear to use two ports for cut-through paging. Internal paging code The transfer sequence to transfer the call for internal paging.
System > Switch > Cut -through Paging Field Description Enable cut-through paging Select to enable cut-through paging. Cut-through page ID The system ID for cut-through paging. This system ID is used with one-key dialing. For example, $CUT. Cut-through page type There are three types of cut-through paging: • Attended. After placing the caller on hold, the messaging system dials the subscriber’s pager and sends the phone number.
System > Switch > Live Record Field Barge-in code Description Type the barge-in code for the phone system. This code is required to enable the live record feature. If you do not know the barge-in code for your phone system, see the manufacturer documentation. Live record beep interval Set the number of seconds between beeps during a live record conversation. Select any value between 1 – 60 seconds. Set the interval to 0 (zero) to turn off the beep.
System > Switch > Dialogic Settings Field Description Call Analysis Delay Defines the amount of time, in centiseconds, that the messaging system will pause before attempting to detect a signal pattern on the phone line. Ring to begin on Specifies the number of signal patterns the messaging system will ignore before attempting to identify the incoming signal.
Page Field Descriptions 464
System > Import & Export > Import Field Select entity type Description Specify which type of messaging entity to import: • Subscribers. Import subscribers. • Transaction boxes. Import transaction boxes. • Private groups. Import private groups. • Open groups. Import open groups. • Local groups. Import local groups. Separator Select the text character used to separate fields in the CSV or other text-based database file to be imported. Available choices include comma, semi-colon, or tab.
System > Import & Export > Export Field Select entity type Description Specifies which type of messaging entity to export: • Subscribers. Import subscribers. • Transaction boxes. Import transaction boxes. Boxes Select the type of box to export: • Private groups. Import private groups. • Open groups. Import open groups. • Local groups. Import local groups. Separator Select the text character used to separate fields in the CSV or other text-based database file to be imported.
Port Status Field Description Ports Per Page Select the number of ports to display on each tab. Ports n-n Tabs listing the specified number of ports per page. Port status: Type Page Field Descriptions • Ans. Answer. • A/D. Answer and dial Phone and fax icons.
Server Control Field Description Start Click to Start the messaging system. When the icon is gray, it indicates that the messaging system is running. Stop Click to Stop the messaging system. When the icon is gray, it indicates that the messaging system is stopped. View the startup log file Page Field Descriptions Click to view the startup log file.
Liability Disclaimer NEC Unified Solutions, Inc. reserves the right to change the specifications, functions, or features at any time without notice. NEC Infrontia Inc. has prepared this document for the exclusive use of its employees and customers. The information contained herein is the property of NEC Infrontia Inc. and shall not be reproduced without prior written approval from NEC Infrontia Inc. NEC Unified Solutions, Inc. has prepared this document for use by its employees and customers.