
Specification


7
Beyond LED Technology | 1939 Parker Ct, Stone Mountain, GA, 30087
Due to continuous product improvement, information in this document is subject to change.
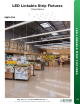
Installation
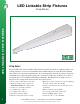
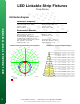
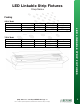
LED Linkable Strip Fixtures
Crisp Series
LED LINKABLE STRIP FIXTURES
LED Strip Installation Instruction
Cautions:
1. Can not use the electric generator to test the LED lamp.
2. Please abide by related country, regional and local law and regulations when install this fixture.
3. Please turn off the power before installation or maintenance.
4. Proper earth grounding is required to ensure safety.
Notice:
1. To avoid possibility of electrical shock or fire, the installation personnel must have professional electric knowledge.
2. Please wear gloves to avoid injury before installation.
3. If any smoke or spark of the wire happened, please turn off the power immediately and notify relevant personnel.
Attention:
1. Please check if there is any damage during shipping. If so, please contact manufacturer timely.
2. Please read the installation instruction carefully to check whether all the accessories are complete. After
confirmation, then install the fixture according to installation steps.
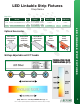
Wiring Diagram & Instruction:
3 dimming functions are available in this high bay light:
1. Constant current can be achieved by 0-10VDC dimming;
2. PWM signal dimming;
3. Variation of resistance unit dimming.
Please choose the appropriate dimming way according to your needs.You can also choose not to use this function.
Round lampshade or square lampshade will not affect the installation method or function expansion of the product.
CCT or Wattage Tunnable:
Step1. Press the screws on both sides of the lamp by hand to open the lamp,
Wattage can be adjusted via dialing.
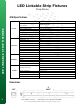
Two installation methods: A Surface Mounting, B Hanging Installation
(Please choose the most suitable installation method for the purchased product as per your needs.)
A. Surface Mounting
Step1. According to the different lengths of the product, drill holes at the corresponding positions and drive the rubber
plugs from the accessory kit into the holes (Figure 1)
Step2. Clamp the disc from the accessory kit to the lamp (this step can be omitted if the light fixture can completely
cover the junction box on the wall) (figure 2)
Step3. Press the screws on both sides of the lamp by hand to open the lamp (Figure 3)
Step4. Lead the wire into the lamp and install the lamp chassis by using the screws in the accessory kit (figure 4)
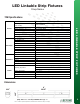
Step5. Connect the wires according to safety requirements, and then install the lamp body back to the chassis, By
using a extra mounting bracket, the lights can be connected in series (Figure 5)
(Product connection: 20W lamps can be connected to maximum 50pcs, 40W 20pcs, and 60W 10pcs)