
User Manual


Quinta – Charger
16
5. Quinta CD 2 Charger in the Quinta CC 2 | CC 2 / 600 Case
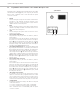
Quinta CC 2 is a modular charging and transport case. The basic version the Quinta CC 2 consists of a top cover (Quinta CT 2), a charger
(Quinta CD 2) for 10 microphone unit and a bottom with casters (Quinta CW 2). This version is suitable for microphone units using the
Classis GM 313 Q, GM 314 Q and GM 315 Q microphones.
For microphone units using the Classis GM 316 Q microphone the version Quinta CC 2 / 600 with a higher top cover (Quinta CT 2 / 600) will
be available.
• With the Quinta CD 2 charger integrated in the Quinta CC 2 or CC 2 / 600 case you can charge a maximum of 10 Quinta MU 23/22/21
microphone units with the Classis GM 313 Q, 314 Q, 315 Q or Classis GM 316 Q microphone. The charging state can be seen from the
outside through a glass panel.
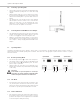
• The Quinta CC 2 charging and transport case can be extended with another Quinta CD 2 charger for 10 microphone units. Because of a
possible instability more than two Quinta CD 2 chargers must not be piled up. Quinta CD 2 chargers that contain microphone units with
the Classis GM 316 Q microphone cannot be piled up because of the microphone length.
• For the Quinta CC 2 or CC 2 / 600 charging and transport case there is an optional compartment available for storing the Quinta CU
control unit and accessories such as cables and gooseneck microphones.
5.1 How to Use the Charger
• To achieve a 100% battery capacity of the rechargeable batteries, all microphone units should have 2 complete charging cycles (charging
and discharging) at least. Only after several charging and discharging cycles, the rechargeable batteries will achieve their full capacity.
• The Quinta MU microphone units are provided with high-performance nickel-metal hydrid (NiMH) batteries. These guarantee minimum
operating times of 20 hours. It takes about 2.5 hours to charge them.
• The service life of the batteries largely depends on the manner in which they are looked after and on how well the user recharges them. To
extend the service life of the batteries for as long as possible, the following charging cycle is recommended:
– Do not keep the microphone units in the charging case when it is switched on.
– Only put the microphone units in the charging case before a conference / application and fully charge them until the “fully charged”
status is shown.
– In particular, when the microphone units are inserted, the charging case should not be constantly switched on and off. For each
charging cycle, there is an initial 5-minute charge to check the battery status. If the case with the microphone units is switched on every
day (for example, because the mains is switched off automatically or by a cleaner), the microphone units will be slowly but constantly
overcharged and this will damage the batteries.
– The NiMH batteries used minimise the so-called “memory effect”, but their capacity is reduced when they are only partially discharged
on a regular basis. For this reason, the microphone units should be fully discharged every three months until they switch off auto-
matically. They can then be fully recharged. This procedure can, if necessary, be repeated a second time.
– If, despite this measure, the microphone unit does not operate for a sufficiently long period of time, the battery has reached the end
of its service life and must be replaced. The typical service life of the battery is greatly dependent on whether or not the above points
are observed. This is why batteries are not covered by warranties. If the above points are observed, a battery typically has a service life
of at least two years or 500 complete charging cycles, depending on which occurs first.
5.2 Charging Process
1. Connect the charger to AC power and switch it on. The switch will illuminate.
2. Put the switched-off microphone units into the charging compartments. If microphone units are switched on, they are switched off auto-
matically. When the microphone units are used again, they must be switched on by hand.
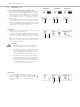
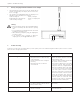
3. The charging process is indicated by the LED of the gooseneck and can be seen from the outside through a glass panel.
LED indicator when the batteries are recharged:
a) Gooseneck LED is flashing red . . . . . . . . . . . . . . . . . . . Battery is charged
b) Gooseneck LED illuminates red permanently. . . . . . . . . Battery is completely full
c) Gooseneck LED is flashing red rapidly . . . . . . . . . . . . . . Error
Note:
• If an error has occurred, try to restart the charging process. If the LEDs are still flashing rapidly, please contact your beyerdynamic
dealer.
• After some time the capacity of the rechargeable batteries is reduced technically. This will reduce the operating time.
• It is normal that the rechargeable batteries are heated up during the charging process.
• Clean the charging contacts with spirit or isopropyl alcohol from time to time. While cleaning avoid contact with the painted
surface.