
Operating instructions


10
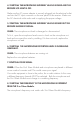
Please make sure that the other handheld microphone is turned off when adjusting the
frequency on one microphone.
Each unit is fully tested and qualified by the manufacturer. However, due to the nature of wireless
connection, interference may occur because of local environments and/or radio signals emitted
by other wireless devices within the household.
NOTE
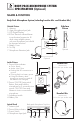
HOW TO MATCH RECEIVER’S FREQUENCY WITH MICROPHONE
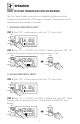
STEP 1: Press “SET” on the receiver to allow the “CH” text to blink.
STEP 2: Press “UP” or “DOWN” until “IR” is blinking and press “SET”.
AF
CH IRFRQ SCAN
RF
750.000
MH Z
BAT
A
UP
SET
DOWN
MIC 1
UP
SET
DOWN
MIC 1
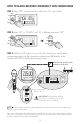
STEP 3: While the “IR” light is on, turn ON the microphone, open battery
compartment and point the microphone infrared port (IR) directly at the
receiver’s IR PORT to initiate the syncing process.
IMPORTANT: IR should be visible to
the receiver. Twist battery cover off if
frequencies are not synching.
AF
CH IRFRQ SCAN
RF
CH----00
MH Z
BAT
A
UP
SET
DOWN
MIC 1
POWER
iR
VM-92U G2
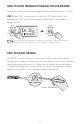
AF
CH IRFRQSCAN
RF
B
75 0.0 00
MHZ
BAT
AF
CH IRFRQSCAN
RF
72 5.0 00
MHZ
BAT
A
UP
SET
DOWN
MIC 2
UP
SET
DOWN
MIC 1
2-IN-1 BA SE R ECEIV ER M ODUL EDUAL CHAN NEL R ECEI VER
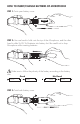
UHF
ON/OFF
725.00
5mW
MHz
iR
SET
LEVEL
L H
iR
SET
LEVEL
L H
725.00
5mW 10mW
MHz
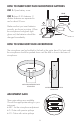
MICROPHONE AND RECEIVER
FREQUENCY MATCHED
Matching Frequencies
Distance: 3-inch
iR
AF
CH IRFRQ SCAN
RF
B
725.000
MH Z
BAT
UP
SET
DOWN
MI C 2