
Operating Guide

11
Assembly Instructions
A. Choose a good location to assemble the sauna
1. The location must be dry, leveled, and away from any source of water
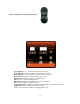
2. MAIN POWER cord must be easily accessible
3. Two adults are required for installation
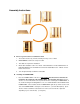
4. Wood cabin installation order: Floor Panel Front Wall Panel Left Side Wall Panel
Right Side Wall Panel Rear Wall Panel Bench Heat Emitter Panel Bench Roof
Panel Roof Cover
5. Tools Required: Philips Screwdriver and Ladder
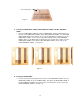
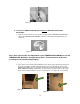
B. Installing the FLOOR PANEL
1. Place the FLOOR PANEL on the floor. Some models have wood braces that must be
installed on the underside of the FLOOR PANEL. Not all models have these. Please
check to see if such wood braces were packed in the box containing the FLOOR PANEL. If
so, mount according to the designated “A”, “B”, or “C” labels located on the underside of the
FLOOR PANEL. Once installed, turn the FLOOR PANEL right side up. Make sure the front
side of the FLOOR PANEL is facing the correct direction. (see Panel Descriptions) (Note:
The floor heater cord will be located at the rear of the sauna room at left or right side
depending on your sauna model.) (see Figure 8)