
Installation Guide

10. Once the brackets have been installed and levels checked the track is ready to be installed into the brackets
11. Before going any further if pelmet is required, please see fitting pelmets section below.
12. Install the track by placing the front section of the track into the allocated and matching clip end, lift the rear section of the
track into the bracket until it locks in. If correctly installed it will click when locked firmly in place. Working from one side to
the other. Check that each clip is secure in place before moving to the next.
13. Cord operated verticals - Once the blind has been securely mounted to the window, mount the cord tensioner to the
window opening. Determine the correct mounting option: (inside frame) or to the wall (outside frame).
NOTE: The tensioner should be located as close to the window as possible to limit the reach of children and pets. It
should be secured so that the cords are tensioned while still allowing the blind to be operated.
14. When installing and handling fabric blinds, use clean, soft cotton gloves (or the gloves supplied) must be worn to avoid
marking the fabrics.
15. Remove the fabric from its packaging on a flat surface (a clean floor is often best) allowing them to lay flat.
16. To make it easier to attach blades: Track should be in a stacked position and the blade hangers in an open position. Lay the
blades over your shoulder. Take one at a time and slide hanger over track hook and feel blade drop into position. Make sure
the sewn side of blade is facing the same way on all blades.
17. After installing use the wand or cord to draw the blades in the required direction to check the mechanism’s operation and
also to make sure that the fabric is not rubbing against any obstacles. Also, open, and close blades looking for any
obstacles. This can damage the blind if left untreated.
NOTE: The wand mechanism is off centre, so it needs to be in the correct position for the wand to hang correctly.
Please see the attached video:
https://www.loom.com/share/6613b88d011a458d80f126c389a76e99
18. If using bottom chain, attach each clip on to the weight of each blade. Trim off excess.
19. It is important when using this blind that it is operated carefully to prolong the life of the product and maintain the warranty
period.
20. Providing that the handling, installation and care and maintenance are carried out correctly, the quality of this product can
supply many years of trouble-free operation.
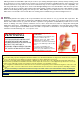
127mm Aluminium pelmet for Vertical Blinds
Face Fit:
1. Evenly space and snap the aluminium bracket on the top of the vertical track with even load bearing distribution. The end
brackets should be mounted no further than 50mm from the end of the blind. Make sure pelmet brackets do not interfere with
vertical track mounting brackets.
2. Check that all brackets are straight.
3. After installing the track squeeze the prongs of the pelmet bracket into the grooves at the back of the pelmet until they click
into place. Working from one side to the other. Check that each prong is secure in place before moving to the next.
Reveal Fit:
1. Evenly space and snap the aluminium bracket on the top of the vertical track with even load bearing distribution before
installing the track. The end brackets should be mounted no further than 50mm from the end of the blind. Make sure pelmet
brackets do not interfere with vertical track mounting brackets.
2. Check that all brackets are straight.
3. After installing the track squeeze the prongs of the pelmet bracket into the grooves at the back of the pelmet until they click
into place. Working from one side to the other. Check that each prong is secure in place before moving to the next.
Maintenance and cleaning
Regularly remove surface dust gently with a clean dry soft cloth, feather duster or soft brush or wipe with a dry sponge.
Recommended cleaning agent is mild detergent in lukewarm water. Stains and smudges can be removed with lukewarm
water and neutral soap on a sponge. The sponge should be squeezed almost dry. Fabric may be sponged but severe