
Installation Guide


21. Place the awning back into the pelmet. The motor end / crank end (square tube end) goes in first. Drop the
other end onto the slotted part of the pin. Secure this end with the split pin supplied.
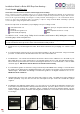
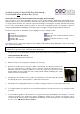
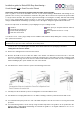
22. Installing the arms: Wind the awning down so you can easily access the bottom rail. Attach the first arm to the
bottom rail. The threaded flat bar is already inside the bottom rail. (See Pic 1) Make sure the foot of the arm is
facing inwards as shown in Pic 2. Attach the arm by screwing the bolt into the threaded flat bar. The two
washers supplied should be used when fastening the bolt. Attach the second arm to the bottom rail with the
foot facing in.
Pic 1 Pic 2 Pic 3
23. Wind the awning up to its desired top finish position. The arms should be hanging downwards.
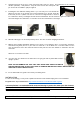
24. With the arms hanging downwards mark the holes where you are fixing the arm to your structure. Drill holes
and attach using bolts (See Pic 3) The arms are universal so can be fitted face or reveal fit. Make sure the
arms are fitted level. If the arms fall in line with a mortar joint move the arms inwards or outwards to miss the
mortar line.
Attach the second arm to the wall.
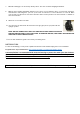
25. Once the arms are attached to the wall remove the grey pin refer to picture that holds the
spring in position.
NOTE: DO NOT REMOVE THE GREY PINS UNTIL BOTH ARMS ARE ATTACHED TO
THE BOTTOM RAIL AND TO THE STRUCTURE. IF REMOVED BEFORE THE SPRING TENSION ON THE
ARM COULD CAUSE SERIOUS INJURY
26. Insert crank handle into gearbox and crank your awning down.
27. Close cassette