Contents 1.Product List 2. Preflight Checks 3.Quick Start Guide 3.1 Quick Start 3.2 Flight Operation 3.3 First Parson View (FPV) Display (OSD) 3.5 Flight Modes. 3.6 Battery Changing 4.Remote Control Radio Transmitter 4.1 Switch Functions 4.2 Joystick Functions 4.3 Button Functions 4.4 Switching Protocol 4.5 Charging the Re mats Control Radio Transmitter 5.FPV Goggles 5.1 Button Operation 5.2 Frequency Selection 5.3 Charging the FPV Goggles 6. Quadcopter OSD Menu Operation 6.
7.LED Light/Beep Status Codes 7.1 Quad copter LED Light 7.2 Remote Control Radio Transmitter LED Light & Beep Status Codes 7.3 FPV Goggles LED Light Status Codes 8.Advanced Settings 8.1 Re-Bind for Quadruplicate Quad copter Level Calibration 8:3 Remote Control Radio Transmitter Calibration 8.4 Tum OFF/ON the Optical Flow Positioning Function 8.5 Tum OFF/ON Laser Altitude Determination 9.Supplement 9.1 Warning & Security 9.2 Precautions for Battery Use and Charging 9.3 Specification 10.FAQ 10.
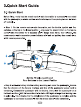
1.Product List 1x Cetus Brushed Whoop Quad copter 1 x Traditional 2 SE Transmitter (CC2500 Version) 1x BEATIFY FROZE FPV Goggles Box Contents: 2x BT20:300 mAh 15 Lip Battery 1x BT2.
2. Preflight Checks 1. Verify that all components are Included, without damage and the bicameral Is with no deformation 2. Verify that propellers and motors are installed comely and stably. 3. Ensure that propellers do nat scratch against frame ducts and motors spin smoothly. 4. Verily baristas {of quadruplet, remote control radio transmitter, and FPV goggles) are fully charged. 5. Be sure pilot Is familiar with ail fight controls. (Refer "Remote Control Radio Transmitter) 6.
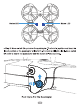
3.Quick Start Guide 3.1 Quick Start Before fining, verify that tha remote control radio transmitter is successfully connects with the quadriceps, all basic controls are functional, and the quad copter can be taken off normally, » Step 1: On the remote control radio transmitter, set the throttle Joystick and four ‘switches on the top to the lowest potion. Long press the power button on the remote control radio transmitter for 5 seconds until it beeps three times, then release.
» Step 3: Move switch SA up to arm the quadruplicate. The thralls joystick must be at the lowest position or the quadruplicate will not arm. The motors will pain slowly.
The completion of these steps verifies that the quad copter and the remote control radio transmitter can work normally, and the following flight operations can be continued. 3.2 Flight Operation » Step 4: Re-arm quadruplet (step 3). Motors wil spin at a low sped.
Right Joystick playwright Boors flying with goggles, It Is recommended to practice and become familiar with the controls and sensitivity of the Joysticks by following the above-mentioned operation stops. Caution: ©. Fed a settable open place for Bie fest Sight.
3.3 First Person View (FPV) First Person View {FPV) is the real-dims transmission of the camera image to FPV goggles « Take out the goggles, Install the headband; + Silas the power switch to the right The screen lights up and the FROZE goggles are fumed on; » Long press the "S" button for 1 second to tum on the fast frequency search function. After 3 seconds, a neap will sound and the corresponding FPV cross-machine screen is displayed In the goggles, Indicating they the frequency search Is complete.
DISARM v3.89 00.00 S MODE SLOW Fight Time Quad Battery Volta's Fight Mods Speed Threshold About OSD Information: «The fight status of the quadraphonic Is displayed In the center. DISARM Indicates locked status. LOW VOL Indicates that the battery voltage of tha quad copter Is low.
1. Normal Mode: When tha quad copter ascends, nectar the two joysticks at the same time, the quad copter will maintain at a fixed point in a horizontal attitude. The position of the direction Joystick controls the tit direction and Hit angle of the quarterdeck. The quad copter has an auxiliary fight function that can assist In adjusting the altitude and horizontal position, which makes It leaser for plot to control. N MODE Is displayed In the 0sD. 2.
Output 5V ¥ Charging Two batteries oan be charged at the same time. Charging a fully discharged battery takes approximately 20 minutes. When the battery Is Inserted Into the TEST port and the charger ls not plugged In via USE cable, the current battery level wil be displayed. The number of represents a fully charged battery while 3.30 or lower indicates a low battery. Voltage Test Port 4.254.365, Full Charged «3.
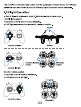
4.Remote Control Radio Transmitter The remote control radio transmitter Included In this kit Is the Literate 2 SE model {CC2500 Version). Instructions of its buttons are shown below. Switch SB.
4.1 Switch Functions Four switches are provided on the front of the remote control radio transmitter: switch SA, switch SB, switch SC, and switch SD, as shown below. Plot can change different modes and parameters of the quad copter with these switches. Please caution that only fare the remote control radio transmitter and the quadruple are connected successful Iy, the switches can work. Switch SA: A/Disarm Quad copter « Quad copter will be disarmed if switch SA is down.
4.2 Joystick Functions Two Joysticks (throttle & direction Joysticks) on the front of the remote control radio transmitter control the quadruplicate: Ascertainment (throttler, forward/backward tht (pitch, firefight ti (role, and rotation of fight directional) Throttle (left) Joystick Incandescent (Wattle) and rotation of fight direction (yaw) ©.0 Joystick Fistfight Counterclockwise rotation Dir action (right) Joystick Forward/backward tilt (pitch) and left/right tilt (roll).
Right Joystick Rightist 4.3 Button Functions Hers are three buttons on tha remote control radio transmitter « Power button: Tums the remote control radio transmitter on/off with a long pres.
2. Press and hold the BIND button while power the radio transmitter back on; 3. Then the fish times of the red LED before buzzer alarm will change, according to the tables above. Nat Reclines 2 SF only work with [18 COST 1.x Fray profit. Sc you ues & Fray restate wilt £18 ACTOR 2X version or ACCESS version, birding wit i 4.4 Charging the Remote Control Radio Transmitter The remote colorful radio transmitter has a but In 1000mAh battery.
5.
5.1 Button Operation Type C Port Charging Indicator LED Power Switch Band Search Channel « Power switch Tum the power switch left and right to fum the goggles on or off. When facing the switch, the left position is off, the opposites of the position is on » Search button (8) Quick frequency search: Press and hold the frequency search button for 1 second to start the frequency search. After 3 seconds, a beep will sound and the best available frequency wil be selected. Quick frequency search is completed.
Frequency Position Frequency RSFSR Display Bar RSFSR Coordinate | BAND: Al 5865 8 Goggles Voltage Frequency Scanning Results Table Crass and hold for 1 second to start the frequency scan, and the frequency scan result will ba displayed after 3 seconds, The different colors in the screen indicate the current ‘status of each frequency as follows:
« Band Key and Channel Kay In the frequency scan interface, the Band Key can be cycled down to select different bands, and the Channel Kay can ba cycled to the right lo select different channels. Plot can select the goggles frequency by pressing the Band Key and Channel Key. For example, select a band and channel with green status since these frequencies are not occupied and signal Interference Is relatively weak. Then, set the quad copter to the corresponding frequency and adjust the goggles to match.
5.2 Frequency Selection The FPV goggles can receive 49 frequency points In the 5.
5.3 Charging the FPV Goggles The FPV goggles have a builtin 2000mAh battery and no extremism battery Is required When voltage ke below 3 55V, a beep wil sound In every 10s and I needs to be recharged. We can also press the S button to check the voltage.
6. Quadcopter OSD Menu Operation The OSD menu is a set of operation interfaces designed to modify the configuration of the quad copter. « Tum falloff quad copter RGB LED lights; » Tum on off sensor; » Add/Remove Information from the fight OSD. 6.1 How to Access/Operate OSD Setting Menu The position of joysticks to access the OSD setting menu is as shown below.
Om zo vv The OSD menu cursor can be controlled by the right Joystick to operate the OSD interface: « Up: move the cursor up + Down: nave the cursor down » Right: confidentiality selection Joystick up: Joystick down...
6.2 Turn Quad copter RGB LED ON/OFF The quadruplicate status LED light is normally solid blue when dying, This can be changed to coral eyeing: » In the MAIN menu, select CON FIG and enter the CON FIG menu, as shown below; » Select LED, select OFF (for dolls bite) or ON (for RGB color cycling effect); » Select BACK to exit CON FIG sub-menu; Select SAVE in the MAIN menu to save changes and exit the OSD.
6.3 OSD Other Options Perform advanced calibration of the quad copter. » Enter OPTION, select GAL-PRO and confirm, » The Blue LED of the adopter flashes for about 35 seconds, and the screen automatically exits the OSD Interface, this means the advanced calibration of the quad copter Is completed.
7.LED Light/Beep Status Codes 7.1 Quad copter LED Light There are two RGB status LESS on the bottom of tha quad copter.
Replace the battery — of quadruple ls abnormal of off and power on again Red Flashing slowly Quad copter batty | Carapace the battery The quad copter ai Said connected with the ue ol remote control radio transmitter Quad copter is Place the quadrupedal Flashing fast | horizontal tor on a horizontal calibrating surface and wat for awhile Purple Sold candor ho OSD menu ’ Quadruplet is in Green Flashing fast | corgi are b Arming failed because the throttle | Disarm,and place White Flashing fast | joystickwasno
7.2 Remote Control Radio Transmitter LED Light & Beep Status Codes There is a blustered LED indicator light around the power bunion which indicates the ‘status of the remotes control radio transmitter. .
Hers is & built-in beeper, pilot can recognize the working status of the remote control radio transmitter by its sound, The buzzer alarms twice: DI-dI 7.3 FPV Goggles LED Light Status Codes The FPV Goggles have a LED Indicator lights which Indicate battery power.
8.Advanced Settings Additional advanced settings are available in case of special operations. 8.1 Re-Bind for Quad copter Quadruplicate and remote control radio transmitter cannot bs connected successfully, the pilot may sand to re bind. This can happen when replacing new electronics parts of the ‘quarterdeck during maintenance or upgrading the remote control radio transmitter.
8.2 Quad copter Level Calibration After the quad copter has taken off and landed several times, the quad copter gyroscope may become offset. This wil cause the quad copter to sways tit In the same direction during a fight. To fbx up I, the quad copter gyroscope can be calibrated.
8.3 Remote Control Radio Transmitter Calibration After repeated uss of If the rematch control radio transmitter is subjected to physical Impact, the Joysticks may no longer read correctly and require recall oration » Afar powering on, press the SETUP button on the back of the remote control radio transmitter which wil beep twice, and LED will fish red twice quickly. The remote control radio transmitter has entered calibration mode. » Move throttle joystick and direction joystick to middle position.
CON FIG TOF OFF >0PF ON LED OFF CALI aK VTX FCC BACK 8.5 Turn OFF/ON Laser Altitude Determination In Normal Mode, the laser altitude determination function Is fumed off by default Turing on this function can make the hovering of the quad copter more accurate and the quarterdeck can maintain & fixed relative height with ground objects to achieve autonomous obstacle avoidance and filing.
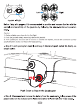
9.Supplement 9.1 Warning & Security » Move the throttles Joystick as gently as possible to avoid the quad copter ascending and descending too suddenly. Push switch SA down on the remote control radio transmitter immediately if the quarterdeck collides with any object, « Please try to kep motors perpendicular to the body.
10.FAQ 10.1 How to Replace Propellers and Motors Propellers can bs deformed or fal off when quadruplet collides with an object Bent or missing propellers need to be replaced. Firstly, uss the included propel removal tool to remove propellers from the motor. Tha tool is placard between the motor and the propellers. Pleads hold the motor instead of the frame duct with your hand when removing propellers to protect the frame from being deformed by overexertion.
10.2 How to Adjust When the Quad copter Drifts or When It's Difficult to Control In Normal Mode In Normal Mods, tha optical flow positioning function of Cetus quadrilateral is muted on by default. Try to avoid an unsatisfactory environment of which ground features are difficult to Identify. Otherwise, the quad copter may drift or become difficult to control. The following are common unsatisfactory environments: « Derek environment; « Above the water surface; Above smooth ils o single-color smooth ground.
10.3 How to Use FPV Simulator “The safest and quickest method to get started is to use an FPV simulator. Tha Lite Radio 2 SE remote control radio transmitter supports most FPV simulators on the market with a comprehensive configuration. FPV Simulator USB Eta Cabs. Operation steps below: « Tun off radio transmitter. » Connect the transmitter to computer via USB data cable.