
Installation Guide


- 14 -
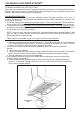
INSTALL FILTERS AND DRIP
TRAY
DUCTED AND NON-DUCTED HOODS
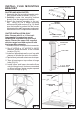
1. To remove the GREASE fi lter, (Fig.21) push
the fi lter towards the front so that it clears the
fi lter channel, then pull down on the handle
to disengage the fi lter from the hood. Tilt the
fi lter downward and remove.
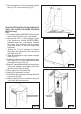
2. To install the DRIP TRAY (Fig.22), lift it
up and into the track on the hood. Install
thumbscrews and baffl e grease fi lters.
3. To install the GREASE fi lter, align rear fi lter
tabs with spring in the hood. Pull down
handle, push fi lter into position and release.
Make sure the fi lter is securely engaged after
installation.
NOTE: Prior to use, remove protective fi lm
from the fi lter frame.
NON-DUCTED HOODS (SINGLE MOTOR
VERSION
WPP9IQ only)
1. Non-ducted recirculation fi lters not includ-
ed. They must be purchased separately
(ANKWPP9 Kit).
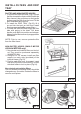
2. Using no.6 x 1/2” screws, install one fi lter
support on each side (provided) of the
internal blower (Fig.23).
3. Position each fi lter over its support, insert
both pins (B) into the round slot (C) on fi lter
side and rotate to lock in place (Fig.24).
Non-ducted recirculation fi lters
The non-ducted recirculation fi lters should be
changed every 6 months. Rotate the fi lters to
remove and replace.
FIG. 21
FIG. 23 FIG. 24
FIG. 22