INSTALLATION INSTRUCTIONS HB0113 WPD38I SERIES SUITALE FOR USE IN DAMP LOCATIONS WHEN INSTALLED IN A GFCI PROTECTED BRANCH-CIRCUIT. INTENDED FOR OUTDOOR COVERED PATIO OR LANAI AREA. ! INTENDED FOR DOMESTIC COOKING ONLY ! READ AND SAVE THESE INSTRUCTIONS INSTALLER: LEAVE THIS MANUAL WITH HOMEOWNER. HOMEOWNER: USE AND CARE INFORMATION ON PAGES 9 AND 10. BEST; Hartford, Wisconsin www.BestRangeHoods.com 800-558-1711 BEST; Drummondville, QC, Canada www.BestRangeHoods.
! WARNING ! WARNING TO REDUCE THE RISK OF FIRE, ELECTRIC TO REDUCE THE RISK OF INJURY TO SHOCK OR INJURY TO PERSONS, PERSONS IN THE EVENT OF A RANGE TOP OBSERVE THE FOLLOWING: GREASE FIRE, OBSERVETHE FOLLOWING*: 1. Use this unit only in the manner intended by the manufacturer. If you have questions, contact the manufacturer at the address or telephone number listed in the warranty. 2.
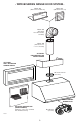
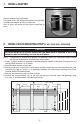
- WPD38I SERIES RANGE HOOD SYSTEM MODEL 437 (HIGH CAPACITY ROOF CAP) MODEL 441 (10’’ ROUND WALL CAP) MODEL 418 (10” ROUND ADJUSTABLE ELBOW, OPTIONAL) MODEL 410 (10” ROUND DUCT — 2 FT.
1. INSTALL DUCTWORK AND ELECTRICAL WIRING CAUTION This range hood is intended for outdoor covered patio or lanai area. As with all electric appliances, this unit must be protected from the effects of weather. ! WARNING This range hood is not designed for use with a charcoal grill. ROOF CAP 10" ROUND DUCT Plan where and how the ductwork will be installed. OPTIONAL DECORATIVE FLUE OR SOFFIT A straight, short duct run will allow the hood to perform most 10" ROUND ELBOW efficiently.
2. PREPARE INSTALLATION (CONT'D) Parts sold separately: - ABWPD Series Backsplash, 36’’ or 48’’ width (optional) - AEWPD Series Decorative Flue, to be installed over the hood (optional) - AWWPD Series Wall Extension, 36’’, 48 or 60’’ width (optional) - Transitions, duct, elbows, dampers, wall and roof caps. Refer to pages 3 for a complete list of venting options and model numbers. NOTE: During installation, protect countertop and/or cooktop. 3.
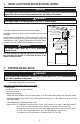
7. INSTALL ADAPTER MOUNTING SCREW LOCATIONS Remove adapter from inside hood. Using both no. 8 x 3/8” zinc-plated screws from parts bag, assemble the adapter on the top of the hood. Seal all joints with metal foil duct tape to eliminate air leaks. HJ0069 8. INSTALL WOOD MOUNTING STRIP (IF NOT USING WALL EXTENSION) CAUTION Due to the weight of this hood, ensure that the wood strip is attached to all of the available studs and blocking; not into the wall alone.
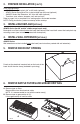
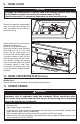
9. INSTALL HOOD CAUTION • Although not recommended, if blowers need to be removed, reinstall them using 10-32 locknuts included in parts bag (maximum torque of 20 lb.). • Hold the hood until it is completely secured to the wood mounting strip. ELECTRICAL COMPARTMENT COVER Remove the electrical compartment cover. Insert the house wiring in the hood and tighten the wire clamp to secure the wiring. HD0464 Rest the back cavity of the hood on the wood mounting strip. Attach 10” round duct to adapter.
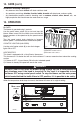
11. CONNECT WIRING (CONT'D) Connect cable into electrical compartment using provided waterproof wire connectors. Connect BLACK to BLACK, WHITE to WHITE and GREEN or bare wire under GREEN ground screw. Reinstall electrical compartment cover. HE0138 12. REINSTALL GREASE DRIP RAIL AND BAFFLE FILTERS Reinstall grease drip rail. The illustration at right shows how to reinsert the grease drip rail into the range hood. HD0465 CAUTION Remove protective plastic film covering filters before installing them.
13. LIGHT BULBS REPLACEMENT This range hood requires shielded halogen bulbs (120 V, 50 W, MR16 with GU10 base) included (2 for 36” width hood, 3 for 48” and 60” width hoods). ! WARNING Do not touch lamps during or soon after operation. Burns may occur. In order to prevent the risk of personal injury, only install shielded halogen lamps. Also, never install a cool beam, a dichroic lamp, a lamp not suitable for use in recessed luminaires or identified for use in enclosed fixtures. 1.
14. CARE (CONT'D) Avoid when choosing a detergent: - Any cleaners that contain bleach will attack stainless steel. - Any products containing: chloride, fluoride, iodide, bromide will deteriorate surfaces rapidly. - Any combustible products used for cleaning such as acetone, alcohol, ether, benzol, etc., are highly explosive and should never be used close to a range. 15. OPERATION BLOWER The blower is operated using 2 controls. 1 Use the on/off rocker switch (2) to start and stop the blower.
16. WIRING DIAGRAM FAN SWITCH WHT OR BLU FAN SWITCH GRY MAIN SWITCH BLK GRY RED 1 2 3 4 A B BLU WHT ORA BLK 120 VAC ORA M BRN RED BLU WHT ORA BLK BLK LINE NEUTRAL GROUND GRY WHT BLK RED HEAT SENTRY THERMOSTAT BLK BLU WHT ORA BLK WHT WHT WHT WHT BLU BLK BLU WHT ORA BLK WHT WHT LAMP SWITCH YEL YEL YEL ORA M BRN BLK YEL RED WHT WHT GRY WHT WHT COLOR CODE BLK BLACK BLU BLUE BRN BROWN GRY GREY ORA ORANGE RED RED WHT WHITE YEL YELLOW LAMP HE0136A LAMP LAMP 17.
18. SERVICE PARTS REPLACEMENT PARTS AND REPAIRS B NM JI C L D F In order to ensure your unit remains in good working condition, you must use Broan-NuTone genuine replacement parts only. Broan-NuTone genuine replacement parts are specially designed for each unit and are manufactured to comply with all the applicable certification standards and maintain a high standard of safety.