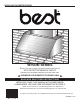
INSTALLATION INSTRUCTIONS HB0113 WPD38I SERIES SUITALE FOR USE IN DAMP LOCATIONS WHEN INSTALLED IN A GFCI PROTECTED BRANCH-CIRCUIT. INTENDED FOR OUTDOOR COVERED PATIO OR LANAI AREA. ! INTENDED FOR DOMESTIC COOKING ONLY ! READ AND SAVE THESE INSTRUCTIONS INSTALLER: LEAVE THIS MANUAL WITH HOMEOWNER. HOMEOWNER: USE AND CARE INFORMATION ON PAGE 9. BEST; Hartford, Wisconsin www.BestRangeHoods.com 800 558-1711 BEST; Drummondville, QC, Canada www.BestRangeHoods.
! WARNING ! TO REDUCE THE RISK OF FIRE, ELECTRIC SHOCK OR INJURY TO PERSONS, OBSERVE THE FOLLOWING: WARNING TO REDUCE THE RISK OF INJURY TO PERSONS IN THE EVENT OF A RANGE TOP GREASE FIRE, OBSERVE THE FOLLOWING*: 1. Use this unit only in the manner intended by the manufacturer. If you have questions, contact the manufacturer at the address or telephone number listed in the warranty. 2.
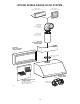
- WPD38I SERIES RANGE HOOD SYSTEM MODEL 437 (HIGH CAPACITY ROOF CAP) MODEL 441 (10’’ ROUND WALL CAP) MODEL 418 (10” ROUND ADJUSTABLE ELBOW, OPTIONAL) MODEL 410 (10” ROUND DUCT — 2 FT.
1. INSTALL DUCTWORK AND ELECTRICAL WIRING CAUTION This range hood is intended for outdoor covered patio or lanai area. As with all electric appliances, this unit must be protected from the effects of weather. ! WARNING This range hood is not designed for use with a charcoal grill. Plan where and how the ductwork will be installed. A straight, short duct run will allow the hood to perform most efficiently. Install proper-sized ductwork, elbows and roof or wall cap.
3. INSTALL BACKSPLASH (OPTIONAL) ABWPD Series (for 36", 42" and 48" widths range hoods only) Backsplash must be installed before the hood shell and wall extension (if needed) because the hood shell (and wall extension) covers the backsplash top mounting screws (see instructions packed with backsplash). 4. INSTALL WOOD MOUNTING STRIP CAUTION Due to the weight of this hood, ensure that the wood strip is attached to all of the available wall studs and blocking; not into the wall alone. Back of Hood 1.
7. INSTALL ADAPTER MOUNTING SCREW LOCATIONS Remove adapter from inside hood. Using both no. 8 x 3/8” zinc-plated screws from parts bag, assemble the adapter on the top of the hood. Seal all joints with metal foil duct tape to eliminate air leaks. HJ0069 8. INSTALL WALL EXTENSION (OPTIONAL) AWWPD Series Wall extension must be installed before the hood (see instructions packed with wall extension). 9.
11. CONNECT WIRING ! WARNING Risk of electric shock. Electrical wiring must be done by qualified personnel in accordance with all applicable codes and standards. Before connecting wires, switch power off at service panel and lock service disconnecting means to prevent power to be switched on accidentally. WATERPROOF WIRE CONNECTORS INSTRUCTIONS: 1. Strip wires 3/8". 2. Align frayed strands or conductors. 3. Do not pre-twist.
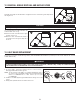
12. REINSTALL GREASE DRIP RAIL AND BAFFLE FILTERS Reinstall grease drip rail. The illustration at right shows how to reinsert the grease drip rail into the range hood. HD0465 CAUTION Remove protective plastic film covering filters before installing them. It is recommended to install side filters first and finish with center one(s). 1 2 Insert front end of the filter into the upper channel of the hood. Raise the other end toward the inside of hood and insert in the grease drip rail of the hood.
14. CARE Baffle Filters The baffle filters should be cleaned frequently. Use a warm detergent solution. Wash more often if your cooking style generates greater grease like frying foods or wok cooking. Remove baffle filters by pushing them towards the side of the hood and rotating filters downward. Baffle filters are dishwasher safe. Allow filters to dry completely before reinstalling them in the hood. Clean all-metal filters in the dishwasher using a non-phosphate detergent.
16.
17. WARRANTY FIVE-YEAR LIMITED WARRANTY FOR BEST® PRODUCTS Warranty Period and Exclusions: Broan-NuTone, LLC (the “Company”) warrants to the consumer purchaser of its product (“you”) that the product (the “Product”) will be free from material defects in the materials or its workmanship for a period of five (5) years from the date of original purchase (or such longer period as may be required by applicable law) or a period of two (2) years from the date of service for any labor provided on the Product.
18. SERVICE PARTS B REPLACEMENT PARTS AND REPAIRS NM JI C L D F K In order to ensure your unit remains in good working condition, you must use Broan-NuTone genuine replacement parts only. Broan-NuTone genuine replacement parts are specially designed for each unit and are manufactured to comply with all the applicable certification standards and maintain a high standard of safety.
GUIDE D’INSTALLATION HB0113 SÉRIE WPD38I CONVIENT À UNE INSTALLATION DANS DES LIEUX HUMIDES LORSQU'ELLE EST RACCORDÉE À UN DISJONCTEUR DE FUITE À LA TERRE (DDFT). CONÇUE POUR FONCTIONNER SUR UN PATIO COUVERT OU UNE VÉRANDA. ! CONÇUE POUR USAGE DOMESTIQUE SEULEMENT ! LIRE ET CONSERVER CES DIRECTIVES INSTALLATEUR : LAISSER CE GUIDE AU PROPRIÉTAIRE. PROPRIÉTAIRE : DIRECTIVES D’UTILISATION ET D’ENTRETIEN EN PAGE 21. BEST; Hartford, Wisconsin www.BestRangeHoods.
! AVERTISSEMENT ! AFIN DE RÉDUIRE LES RISQUES D’INCENDIE, D’ÉLECTROCUTION OU DE BLESSURES CORPORELLES, SUIVEZ LES DIRECTIVES SUIVANTES : AFIN D’ÉVITER TOUT RISQUE DE BLESSURES LORS D’UN FEU DE CUISINIÈRE, SUIVEZ CES DIRECTIVES* : 1. Étouffez les flammes avec un couvercle hermétique, une tôle à biscuits ou un plateau métallique et ensuite, éteindre le brûleur. PRENEZ SOIN D’ÉVITER les brûlures. SI LES FLAMMES NE S’ÉTEIGNENT PAS IMMÉDIATEMENT, ÉVACUEZ LES LIEUX ET APPELEZ LES POMPIERS. 2.
- SYSTÈME DE HOTTE DE CUISINIÈRE SÉRIE WPD38I MODÈLE 437 (CAPUCHON DE TOIT À HAUT RENDEMENT) MODÈLE 441 (CAPUCHON MURAL DE 10 PO ROND) MODÈLE 418 (COUDE AJUSTABLE DE 10 PO, ROND, OPTIONNEL) MODÈLE 410 (CONDUIT ROND DE 10 PO, SECTIONS DE 2 PI) CHEMINÉE DÉCORATIVE OPTIONNELLE SÉRIE AEWPD RALLONGE DE HOTTE OPTIONNELLE SÉRIE AWWPD ADAPTATEUR ROND DE 10 PO (INCLUS) HOTTE SÉRIE WPD38I DOSSERET OPTIONNEL SÉRIE ABWPD LARGEUR DE 36 PO, 42 PO OU 48 PO (RECOUVREMENT DE MUR EN ACIER INOXYDABLE AVEC SUPPORT ASSIE
1. INSTALLER LES CONDUITS ET LE CÂBLAGE ÉLECTRIQUE ATTENTION Cette hotte est conçue pour être utilisée sur un patio couvert ou une véranda. Comme tous les électroménagers, cet appareil doit être à l’abri des intempéries. ! AVERTISSEMENT Cette hotte n’est pas conçue pour être utilisée avec un barbecue au charbon de bois. CAPUCHON DE TOIT Déterminer à quel endroit et comment les conduits seront installés. Un conduit droit et court permettra à votre hotte de fonctionner plus efficacement.
3. INSTALLER LE DOSSERET (OPTIONNEL) Série ABWPD (seulement pour les modèles de 36 po, 42 po et 48 po de largeur) Le dosseret doit être installé avant la hotte et la rallonge de hotte (si installée) puisque celles-ci couvrent les vis d’installation du dosseret (voir les directives fournies avec le dosseret). 4.
7. INSTALLER L'ADAPTATEUR EMPLACEMENT DES VIS D'ASSEMBLAGE Retirer l'adaptateur de l'intérieur de la hotte. À l'aide des 2 vis n° 8 x 3/8 po plaquées zinc (incluses dans le sac de pièces), assembler l'adaptateur sur le dessus de la hotte. Sceller les joints avec du ruban adhésif de métal pour éliminer les fuites d'air. HJ0069 8. INSTALLER LA RALLONGE DE HOTTE (OPTIONNELE) Série AWWPD La rallonge de hotte doit être installée avant la hotte (voir les directives fournies avec la rallonge). 9.
11. BRANCHEMENT ÉLECTRIQUE ! AVERTISSEMENT Risque d’électrocution. Le raccordement électrique doit être effectué par du personnel qualifié conformément aux codes et aux standards en vigueur. Avant d’effectuer le branchement, coupez l’alimentation électrique au panneau de distribution et verrouillez-le pour éviter une mise en marche accidentelle. DIRECTIVES POUR L’UTILISATION DES CAPUCHONS DE CONNEXION ÉTANCHES : 1. Dégainer les fils d’une longueur de 3/8 po. 2. Égaliser les brins ou les conducteurs. 3.
12. RÉINSTALLER LA GOUTTIÈRE ET LES FILTRES À CHICANE Réinstaller la gouttière. L'image ci-contre illustre la façon de réinsérer la gouttière dans la hotte. HD0465 ATTENTION Avant d’installer les filtres à chicane, retirer la pellicule de plastique protectrice de ceux-ci. Il est recommandé d'installer d'abord les filtres situés aux extrémités et de terminer par le(s) filtre(s) du centre. 1 2 Introduire une extrémité du filtre dans le rail avant de la hotte.
14. ENTRETIEN Filtres à chicane Les filtres à chicane doivent être nettoyés fréquemment. Utiliser une solution d’eau chaude et de détergent. Les filtres à chicane doivent être lavés plus souvent si vos habitudes de cuisson génèrent plus de graisse, par exemple de la friture ou des aliments sautés au wok. Retirer les filtres en les poussant vers l'avant de la hotte et en les retournant vers le bas. Les filtres à chicane sont lavables au lave-vaisselle.
16. SCHÉMA ÉLECTRIQUE INTERRUPTEUR DU VENTILATEUR B OU N INTERRUPTEUR PRINCIPAL G 1 2 3 4 A B BL B O N O 120 V C.A.
17.
18. PIÈCES DE REMPLACEMENT B PIÈCES DE REMPLACEMENT ET SERVICE NM JI C L D F K Pour assurer le bon fonctionnement de votre appareil, vous devez toujours utiliser des pièces d’origine provenant de Broan-NuTone. Les pièces d’origine de Broan-NuTone sont spécialement conçues pour satisfaire toutes les normes de certification de sécurité applicables.
INSTRUCCIONES DE INSTALACIÓN HB0113 SERIE WPD38I ADECUADA PARA LUGARES HÚMEDOS CUANDO SE INSTALA EN UN CIRCUITO DE DERIVACIÓN PROTEGIDO CON UN DISYNUNTOR. PREVISTA PARA PATIOS O TERRAZAS CUBIERTAS. ! EXCLUSIVAMENTE PARA COCINAS DOMÉSTICAS ! LEER Y CONSERVAR ESTAS INSTRUCCIONES INSTALADOR: ENTREGUE ESTE MANUAL AL PROPIETARIO DE LA CASA. PROPIETARIO: INFORMACIÓN SOBRE LIMPIEZA Y FUNCIONAMIENTO EN LA PÁGINA 33. BEST; Hartford, Wisconsin www.BestRangeHoods.
! ADVERTENCIA ! PARA REDUCIR EL RIESGO DE INCENDIO, DESCARGA ELÉCTRICA O LESIÓN CORPORAL, RESPETE LAS SIGUIENTES INDICACIONES: ADVERTENCIA PARA REDUCIR EL RIESGO DE LESIONES CORPORALES EN EL CASO DE QUE ARDA LA GRASA EN LA PARTE SUPERIOR DE LA COCINA, SIGA ESTAS INDICACIONES*: 1. Utilice esta unidad únicamente de la forma en que indica el fabricante. Si tiene cualquier pregunta, póngase en contacto con el fabricante en la dirección o el teléfono que aparecen en la garantía. 2.
- SISTEMA DE LA CAMPANA DE COCINA DE LA SERIE WPD38I MODELO 437 (REMATE DE TECHO DE ALTA CAPACIDAD) MODELO 441 (REMATE DE PARED DE 10” REDONDO) MODELO 418 (CODO AJUSTADO DE 10” REDONDO, OPCIONAL) MODELO 410 (CONDUCTO REDONDO DE 10”, SECCIONES DE 2’) SERIE AEWPD, CHIMENEA DECORATIVA OPCIONAL SERIE AWWPD, EXTENSIÓN MURAL OPCIONAL ADAPTADOR REDONDO DE 10” (VIENE CON LA CAMPANA) CAMPANA DE LA SERIE WPD38I SERIE ABWPD, PLACA POSTERIOR OPCIONAL 36”, 42” O 48” DE ANCHO (CUBIERTA PARA PARED DE ACERO INOXIDAB
1. INSTALACIÓN DE LAS TUBERÍAS Y DEL CABLEADO ELÉCTRICO PRECAUCIÓN Esta campana está prevista para patios o terrazas exteriores cubiertos. Como ocurre con todos los aparatos eléctricos, se debe proteger esta campana todo lo posible de la intemperie. ! ADVERTENCIA Esta campana no está pensada para usar con una parrilla de carbón. Planifique el lugar y la forma en que instalará las tuberías. Un tubo recto y corto permitirá que la campana funcione más eficazmente.
3. INSTALACIÓN DE LA PLACA POSTERIOR (OPCIONAL) Serie ABWPD (sólo para campanas de 36", 42" y 48" de ancho) La placa posterior debe instalarse antes del revestimiento de la campana y de la extensión mural (si instalada) ya que éste cubre los tornillos superiores de montaje de la placa (vea las instrucciones que vienen con la placa posterior). 4.
7. INSTALACIÓN DEL ADAPTADOR UBICACIÓN DE LOS TORNILLOS Saque el adaptador de la campana. Utilice 2 tornillos galvanizados n.° 8 x 3/8'' de la bolsa de piezas para colocar el adaptador en la parte superior de la campana. Selle todas las juntas con cinta metálica para evitar las fugas de aire. HJ0069 8. INSTALACIÓN DE LA EXTENSIÓN MURAL (OPCIONAL) Serie AWWPD La extensión mural debe instalarse antes que la campana (vea las instrucciones que vienen con la extensión mural). 9.
11. CONEXIÓN DEL CABLEADO ! ADVERTENCIA Riesgo de choque eléctrico. La conexión eléctrica debe hacerla personal competente con arreglo a los códigos y normas en vigor. Antes de conectar los hilos, corte la alimentación en el tablero de servicio y bloquee los medios de desconexión para impedir que la corriente se conecte accidentalmente. INSTRUCCIONES PARA LOS CONECTORES DE HILOS IMPERMEABLES: 1. Pele 3/8 de pulg. de los hilos. 2. Junte las puntas peladas o conductores. 3. No las retuerza.
12. REINSTALACIÓN DEL RIEL DE VERTIDO DE LA GRASA Y DE LOS FILTROS Vuelva a instalar el riel de vertido de la grasa. La ilustración de la derecha muestra la manera de introducir el riel de vertido de la grasa en la campana. HD0465 PRECAUCIÓN Retire la película protectora de plástico que cubre los filtros antes de instalarlos. Se aconseja instalar primero los filtros de las lados y, por último, el o los del centro. 1 2 Introduzca un extremo del filtro en la ranura superior de la campana.
14. CUIDADO Filtros Los filtros deben limpiarse con frecuencia. Utilice una disolución de detergente con agua templada. Lávelos con mayor frecuencia si su tipo de cocina genera más grasa (alimentos fritos o cocina con wok). Retire los filtros empujándolos hacia la parte delantera de la campana y girándolos hacia abajo. Las placas de los filtros pueden lavarse en el lavavajillas. Deje que los filtros sequen completamente antes de volver a instalarlos en la campana.
16.
17.
18. PIEZAS B SUSTITUCIÓN DE PIEZAS Y REPARACIÓN NM JI C L D F K Para que la unidad se conserve en buen estado, debe usar repuestos genuinos de Broan-NuTone únicamente. Estas piezas se han diseñado especialmente para cada unidad y se han fabricado conforme a las normas de certificación aplicables y un elevado nivel de seguridad. El uso de repuestos de otros fabricantes podría causar daños graves y reducir radicalmente el desempeño de la unidad, causando así fallas prematuras.