
Installation Guide


- 8 -
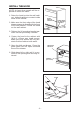
PREPARE THE HOOD
1. Loosley assemble both mounting
brackets to the hood using M4 x
50mm machine screws and flat wash-
ers.
2. Place the 8” damper/duct connector on
top of the range hood discharge open-
ing. Remove tape from damper flaps.
Secure with (4) 3.9 x 9.5mm screws.
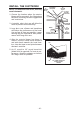
3. Assemble wall spacer to the hood with
(3) 3.9 x 9.5mm screws.
NOTE: The spacer is designed to
fill a 5/8” gap between the wall and
the back of the hood. If the gap is
larger, a non-combustible material
that is in compliance with local build-
ing codes must be used to fill this
gap.
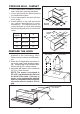
PREPARE WALL CABINET
1. Prior to wall cabinet installation, remove
doors and door mounting hardware.
2. Cut an opening into the bottom panel to
the dimensions shown.
3. Cut out openings for the duct and elec-
trical wiring.
4. Install cabinet on the wall and secure
per cabinet manufacturer’s recom-
mendations. The cabinet must be se-
curely fastened to studs and framing
behind the drywall prior to hood instal-
lation.
MOUNTING SCREWS
(3.9 x 9.5mm)
WALL
SPACER
MACHINE SCREWS
(M4 X 50mm)
WASHER
MOUNTING SCREWS
(3.9 x 9.5mm)
CABINET
WIDTH
9” Dia.
15”
MIN.
1” Dia. 7-3/16”
4-5/8
10”
12”
FRONT
B
FRONT
CABINET
WIDTH
3/4”
3/4”
10-3/4”
A
BOTTOM
OPENING
-tenibaC
htdiW
"A""B"
"03"2/1-82"51
"63"2/1-43"81
"42 40-1/2" 21"