BEST KITEBOARDING USER MANUAL Thank you for purchasing a Best kite. Please read this manual carefully and in its entirety before using your new Best kite. WARNING Kiteboarding/kitesurfing/snowkiting are extreme sports. They have numerous inherent risks and dangers, and pose substantial risk of cuts, scrapes, bruises, broken bones, loss of limbs, loss of vision, paralysis, and other serious, permanent and disabling injuries and death to the rider and others.
Introduction: Best Kiteboarding would like to thank you for choosing one of the new kites from our 2012 line up. These represent the current state of the art in kitesurfing equipment design and manufacture; we know that it will provide you with huge amounts of enjoyment. Should you at any time need to take advantage of our Lifetime Fair and Reasonable warranty please check the warranty policy information online at http://www.bestkiteboarding.
Riders choose different size bars to suit their own personal requirements. The larger the bar you choose the faster your kite will turn and vice versa. We provide the following info as advice only, ultimately you should ride the bar that feels right for the way you ride. • • • For kites 13m and above we recommend the large size bars. For kites 9m-14 any bar size will work. For kites 9m and smaller we recommend you use the smallest bar sizes.
Self launching: All Best kites can be self-launched. Connect the flying lines of the bar to the kite following the line convention, centerlines from the bar to the front bridle attachment points and color coordinated rear flying lines to the matching rear pigtails. Check and double check that your flying lines are free from twists before proceeding any further. If your lines are twisted disconnect them and 'walk' out your lines from the bar to the kite to ensure you have removed any twists.
Wind ranges and performance characteristics: The suggested wind range chart for each kite is to be used as a guide. Always know your limits, and when in doubt rig a smaller kite, if possible.
Wind speeds may vary according to where they were measured. Always take a wind reading more than 100m past the nearest upwind object to get an accurate maximum reading. If flying in the mountains, always take a wind reading towards the highest point of land as wind accelerates up hill. The wind ranges given above are based on a 75kg/165lbs rider and kitesurfing usage.
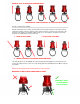
PUSH UP CUFF TO ACTIVATE QUICK RELEASE CHICKENLOOP LINE PULLED OUT BY LOAD ON FRONT LINES How do I reload the Pro-cuff QR? Hold the chickenloop in one hand so that the hinged section points towards your free hand, (hold in left hand in example). Take the chickenloop line and insert it into the channel on the underside of the chickenloop assembly, push upwards until the hinge closes. Then pull the cuff down over the main body of the assembly until you here it click shut. 1. HOLD IN LEFT HAND 3.
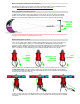
Where can I get more details on the bar for my kite? Full details and complete user manuals for both the current 2012 GP 5th-line bar and RP-bar can be found at http://media.bestkiteboarding.com/manuals/2012_Bars_Manual.pdf What safety features are built into the bar? In addition to the Redline safety system built into the RP bar we also provide dual rear line OSR handles. To land the kite using the OSR handles you must first unhook the bar and lower the kite towards the ground.
2012 KITES FAQ: How can I repair my kite if it becomes damaged? For small areas of damage to your kite we recommend the range of products made by Kitefix.com. Their range of sail tapes, repair cloths and Glue-fix kits are easy to use and ideal for working repairs, they will find an emergency Kitefix 1st aid kit in the bag with your kite. For larger repairs requiring professional attention your Best Kiteboarding retailer can point you towards your best, approved, local repair facility.
Instructions for use: Required tools: Pliers, sharp knife. 1. Using pliers, crush and remove zip ties from EZ-Pump inflation hose. 2. Pull inflation hose from strut and LE valve- hold the base of valve while removing hose. 3. Remove neoprene click-valve cover. 4. Remove click-valve. Retain for later use if in good condition. 5. Cut new inflation tube to appropriate length- measure using old hose. 6. 7. 8. 9. 10. Slide click-valve onto new tube. Slide neoprene cover over click-valve.
11. Locate zip-tie around centre of overlap between tube and EZ-valve. 12. Cinch up zip tie using pliers- repeat for other end of tube. 13. Inflate kite to normal pressure and use water to check new tube is airtight at both ends. 14. Go-kite. What safety systems are built into my kite? Any Best kite flown with any Best bar has multiple redundant safety systems. First and foremost, pushing the bar away and forcing it to slide up to the trim strap will depower the kite to its depower limit.
If the wind has switched to an offshore direction having your kite inflated at this point will only drag you further out to sea, so it is not recommended in this instance that you leave your kite inflated. If you intend to swim back to shore under your own power, then you need to pack down your kite as follows. If possible, release the OSR handle to flag the kite and wind the lines onto the end posts.
rd th 1. Place an additional knot, above the current 3 knot in the 5 -Line attached to the center of the LE of your kite. Your 5th line should now have 4 knots, please use the knot closest to the kite to reduce back-stall. nd 2. Place an additional knot, above the current 2 knot, in the front line attachments on the wingtip on either side of the kite. Your front line attachments should now have 3 knots, please use the knot closest to the kite to reduce back-stall.
To rectify this situation please take the following two steps. 1. Twist the zip-tie around the inflation hose so that the cut tail of the zip-tie is pointing away from the canopy and instead towards the front of the kite. Applying a little soapy water to reduce friction will help you reposition the zip-tie. 2. Ensure before and after each session that the zip-tie covers are correctly located over the zipties. Be sure to check the covers before leaving the kite inflated on the beach for any length of time.