
Specifications


®
Counter Support Bracket
Information & Installation
Engineered and manufactured in the United States by:
Rangine Corporation, Needham Massachusetts 02494
Tel: 781-455-8700, 800-826-6006 Fax: 781-455-8702
www.rakks.com
Rakks Counter support brackets come in a variety
of sizes, configurations and finishes to provide
sturdy and unobtrusive support for counters,
work surfaces, vanities and benches.
Surface Mounted Installation
Rakks Counter Support Brackets can carry significant loads but
they must be securely fastened to the wall. With continuous
blocking, or double-stud construction, brackets can be spaced as
much as 4 feet apart.
Recommended hardware: 1/4” x 2” Philips pan head sheet metal
screws or heavy duty Toggle Bolts.
When mounting into wood studs ”toeing” into the stud will
ensure that all screws are fully engaged. Otherwise, align the
bracket so
that one top and one
bottom screw are fully engaged.
Heavy duty toggle bolts are recommended for mounting into
metal studs. We suggest spacing brackets every 32” when
installing into metal studs or in any application where just two
screws are securing the bracket to the wall.
Attach the counter to the bracket using appropriate length
screws or construction adhesive. Two counter sections can join
easily and securely at the bracket.
Flush Mounted Installation
Flush mounted counter supports are attached to the side of the
stud prior to the application of wall board. Flush mounted
brackets are ALWAYS mounted to the right side of the stud
facing the wall (see drawing at left). Brackets should be
screwed into wood studs with #14 screws in 3 places. For
installation into metal studs, additional wood blocking should be
placed inside the stud for maximum strength. Drill through the
stud and wood b
locking and secur
e with 1/4-20 x 2” bolts and
nuts.
continued other side….
July 2011
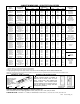
7 max
Installation Note: check with counter manufacturer to
determine maximum unsupported spans and overhang.
Installation Note: To minimize shimming, be sure to
install the brackets so that the supporting arm is parallel
to the floor. Install so that the vertical support is flush
with, or slightly behind the stud to allow for application
of sheet rock.
1.25
Typical Hole
Locations
2
Flush Mounted
configuration mounted to
side of stud inside wall
Counter sections
join at bracket