
Use & Care Guide


17
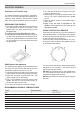
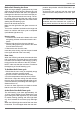
OVEN TEMPERATURE INDICATOR
The range is equipped with a device to indicate
the temperature in the middle of the oven. This
lets you check the temperature inside the oven
and adjust food cooking temperatures more ac-
curately.
When the oven is turned on, the heating elemen-
ts will start working at maximum and the ther-
mometer dial will start to move towards the set
temperature. Heat is optimally distributed inside
the oven when the thermometer dial has stopped
and pre-heating is fi nished. When the oven is tur-
ned off , the temperature on the thermometer will
slowly drop until it reaches room temperature
.
• the gauge is for reference only.
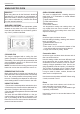
The Gauge is equipped with a digital interface that
show the selected functions and manage the co-
oking time.
Set the gauge:
1. Press MODE.
2. Use the “<” and “>” buttons to select SET-UP
3. Press MODE.
4. Press the “<” and “>” buttons to select desired
funtions: language, 12h/24h, time, volume,
alarm vol., showroom.
•Language press “<” and “>” buttons to select de-
sired language and press MODE to confi rm
•12h/24h press “<” and “>” buttons to select desi-
red clock indication and press MODE to confi rm
•Time press “<” and “>” buttons to select desired
time (keep on press the button to fast forwording)
and press MODE to confi rm
•volume press “<” and “>” buttons to select desi-
red volume control and press MODE to confi rm
•alarm vol. press “<” and “>” buttons to select desi-
red alarm vol. control and press MODE to confi rm
•showroom: function reserved for retailer use only.
End/delay mode:
1. Press MODE.
2. Press the “<” and “>” buttons to select the desi-
red cooking time and press MODE.
3. Press M to start cooking, press < or > buttons
to set a diff erent end of cooking time (in this
function the set time is the end of cooking) than
press MODE to confi m.
4. Set function and temperature with the knobs.
5. If the delay start is settled the display will show
the cooking start time otherwise the oven will
switch on.
6. Once the set end of cooking time is fi nished, a
sound will be heard and the oven automatically
switches off .
Note: to change selected time restart from point
1.
Timer:
1. Press MODE.
2. Use the “<” and “>” buttons to select TIMER
3. Press MODE.
4. Press the “<” and “>” buttons to select the desi
red time and press MODE
5. The countdown start immediately and the di-
splay will show the remaining time
6. Once the set time is fi nished, a sound will be
heard
Note: to change settled time restart from point 1.
This function is only a minute minder and does not
stop the cooking process.
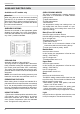
Meat probe
The meat probe allows you more control over
how your foods are cooked by automatical-
ly disabling the specifi ed cooking mode when a
dish's desired temperature, defi ned by the cook,
has been reached. The probe will indicate the in-
ternal temperature of the meat as it cooks.
Programming the meat probe
1. Insert the food probe in the item to be cooked.
For best results, insert the probe as close as
possible to the center of the item and make
sure it is not in contact with bones or fat. Impro-
per placement of the probe could shut the oven
off too early and result in uncooked food. With
poultry, make sure the probe does not rest in a
cavity.
2 set function and temperature with the knobs.
3. Use the “<” and “>” buttons to select MEAT
PROBE
150
200
250
300
250
400
450
500
CLEAN
°F
MODE
/ Electric oven