F60CONXD Specifiche tecniche Feature List Feuille de Caractéristiques Hoja de Características Datenblatt
FROM THE DESK OF THE PRESIDENT Dear new owner of a Bertazzoni product, Our company brings to homeowners around the world beautiful, high-performance kitchen appliances, which make their dreams come true. We marry the finest Italian craftsmanship with technical precision using state-of-the-art manufacturing, which give our customers peace of mind. BERTAZZONI SpA Via Palazzina 8 42016 Guastalla RE ITALY WWW.BERTAZZONI.
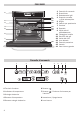
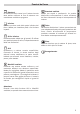
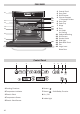
F60CONXD 11 12 13 14 1 9 10 2 11 12 3 4 15 16 17 18 19 13 14 15 5 6 10 11 12 13 14 15 16 7 8 16 Pannello di comando Guarnizione Resistenza del grill Supporto cromato + guide telescopiche Griglia Vassoio per pasticceria Cerniera Sportello Uscita aria di raffreddamento Fissaggio al mobile Schermo del grill Uscita dei fumi Luce laterale Pannello posteriore Ventola Vetro interno grande Pannello di comando 1 2 3 4 5 6 7 9 8 1 Funzioni di cottura 6 Sensore 2 Indicatore di temperatura 3 Orol
Standard Si utilizza per dolci e torte in cui il calore ricevuto deve essere uniforme al fine di ottenere una consistenza morbida e spugnosa. Inferiore Il calore proviene solo dalla parte inferiore del forno. Adatta per riscaldare piatti o far lievitare impasti. Grill e Inferiore Particolarmente adatta per gli arrosti. Si utilizza per qualsiasi pezzo di carne, indipendentemente dalle sue dimensioni. Grill Gratinatura e cottura arrosto superficiale.
Raccomandazioni per scongelare gli alimenti La funzione di scongelamento funziona con un sistema di aria calda su due livelli, il livello HI per la carne in generale e il livello LO per pesce, impasti vari e pane. Una volta selezionata la funzione di scongelamento, sul visore della temperatura è possibile selezionare il livello HI oppure LO, toccando il sensore e successivamente i sensori oppure . • La carne e il pesce non hanno bisogno di essere completamente scongelati per iniziare la cottura.
Comandi del forno 2 3 4 5 6 7 9 8 ITALIANO 1 Regolazione dell’orologio elettronico Attenzione L’orologio elettronico dispone di tecnologia Touch-Control. Per impostarlo basta toccare i simboli sul vetro con il dito. La sensibilità del Touch-Control si adatta continuamente alle condizioni ambientali. Quando si collega il forno all'alimentazione, verificare che la superficie del vetro della parte frontale contenente i comandi sia pulita e libera da qualsiasi ostacolo.
Illuminazione del forno La lampadina interna del forno si accende –Quando si apre lo sportello del forno. Dopo un tempo determinato in cui lo sportello del forno resta aperto, la luce si spegnerà per ridurre il consumo di elettricità. –Quando si seleziona una qualsiasi funzione di cottura. Trascorso un tempo determinato la luce si spegne. Se si desidera accendere la luce durante la cottura basterà toccare il sensore dell’illuminazione interna .
1 Toccare più volte il sensore dell’orologio fino a quando il simbolo si illuminerà. 2 Selezionare l’ora di fine cottura toccando i sensori o . 3 Saranno emessi due beep di seguito, sarà visualizzato il tempo di cottura rimanente e il simbolo lampeggerà lentamente per indicare che il forno si spegnerà automaticamente. 17 Selezionare una funzione e una temperatura di cottura. 18 Il forno resterà spento e il simbolo rimarrà illuminato mentre il simbolo lampeggerà lentamente.
F60CONXD 11 12 13 14 1 9 10 2 11 12 3 4 15 16 17 18 19 13 14 15 5 6 10 11 12 13 14 15 16 7 8 16 Control Panel Oven Seal Grill Element Chrome Support + Telescopic Guides Oven Grid Cake Tray Hinge Door Air Outlet for Cooling Cabinet Mounting Grill Screen Smoke Outlet Side light Back Wall Panel Fan Large Inner Glass Door Control Panel 1 2 3 4 11 Cooking Functions 16 Sensor 12 Temperature Indicator 17 Sensor 13 Electric Clock 18 On / Off 14 Temperature Sensor 19 Inside Light 15 Electric
Convencional This function is for use when baking cakes, where the heat should be even to give a spongy texture. Conventional with Fan Suitable for roasts and cakes. The fan spreads the heat evenly throughout the inside of the oven to reduce cooking time and temperature. Lower Element Heat only comes from beneath. Suitable for warming plates or letting dough rise. Turbo The fan spreads the heat coming from an element located at the back of the oven.
Recommendations for Defrosting Food The defrost function works by means of a 2-level system of hot air. HI is for meats in general and LO is for fish, cakes, pastries and bread. When selecting the defrost function, select HI or LO on the temperature display by pressing on the temperature sensor and then the or sensors. • Meat and fish do not need to be completely thawed before cooking. Condiments can be added once the surface is soft. • Food should always be cooked after defrosting.
1 2 3 4 5 6 7 9 8 Use of the electronic timer Caution The electronic clock features Touch-Control technology. To operate, simply touch the glass control symbols with your fingertip. The touch control sensitivity continuously adapts to changing conditions. Ensure that the glass front of the control panel is clean and free of any obstacles when turning on the oven.
Oven Lighting The inside light will go on: –When the oven door is open. If the door is not closed after a certain time, the light will turn off to reduce power consumption. –When any cooking function is selected. The light will turn off after a certain time. If you want to turn the light on during cooking, just touch the Oven Light sensor . If you keep your finger on this sensor for a few seconds, the light will stay on throughout cooking.
Programming the Cooking Stop Time 17 Select a cooking function and temperature. 1 Press on the clock sensor several times until the symbol lights up. 18 The oven will remain off, with the symbol lit and the symbol flashing slowly. The clock will show the current time and the inside light will remain off. The oven is now programmed. 3 Two consecutive beeps will then sound and the display will show the remaining cooking time.
F60CONXD 11 12 13 14 1 9 10 2 11 12 3 4 15 16 17 18 19 13 14 15 5 6 10 11 12 13 14 15 16 7 8 16 Panneau de commande Joint de four Résistance du grill Support chromé + Guides télescopique Grille Plateau à Patisserie Charnière Porte Sortie d’air de réfrigération Fixation au meuble Écran du grill Sortie des fumées Ampoules latérales Panneau du fond Turbine Vitre intérieure de grande taille Panneau frontal de commande 1 2 3 4 5 11 Fonctions de cuisson 16 Symbole 12 Indicateur de température
Fonctions du four Traditionnel On l’utilise pour faire des gâteaux ou des tartes pour lesquels la chaleur de cuisson doit être uniforme et pour obtenir une texture spongieuse. Traditionnel à turbine Idéal pour les rôtis et les gâteaux. Le ventilateur répartit la chaleur de façon uniforme à l’intérieur du four, réduisant le temps et la température de cuisson. Sole Chaleur seulement depuis la partie inférieure. Idéale pour chauffer des plats ou faire lever des pâtes à gâteaux et autres.
Recommandations pour la décongélation des aliments La décongélation se réalise grâce à un système d'air chaud à 2 niveaux, le niveau HI pour les viandes en général, et le niveau LO pour les poissons, les pâtisseries et le pain. Lorsque la fonction décongélation est sélectionnée, il est possible de choisir les niveaux HI ou LO sur l'afficheur de température, en appuyant sur le symbole et ensuite sur les symboles ou .
Fonctionnement du four 1 2 3 4 5 6 7 9 8 Utilisation de l’horloge électronique Attention Fonctionnement manuel Cette horloge électronique est équipée de la technologie Touch-Control. Pour l’utiliser, il suffit d’appuyer sur les symboles représentés sur la vitre. Une fois l'horloge réglée, votre four est prêt à fonctionner : La sensibilité du panneau tactile s’adapte constamment aux conditions ambiantes.
Éclairage du four La lumière à l’intérieur du four s’allumera –lorsque l'on ouvre la porte du four. Au bout d'un certain temps sans fermer la porte du four, la lumière s'éteindra pour réduire la consommation électrique. –Lorsque l'on sélectionne une fonction de cuisson. Au bout d'un moment, la lumière s'éteindra. Si vous souhaitez allumer la lumière pendant la cuisson, il suffit d'appuyer sur le symbole de lumière intérieure .
1 Appuyez à plusieurs reprises sur le symbole de l'horloge jusqu'à ce que le symbole s'allume. 2 Sélectionnez l'heure de fin de la cuisson, en appuyant sur les symboles ou . 3 Il y aura ensuite 2 bips consécutifs, indiquant le temps de cuisson restant, et le symbole clignotera lentement, indiquant que votre four s'éteindra automatiquement. 4 Sélectionnez une fonction et une température de cuisson.
Pour désactiver la fonction de sécurité enfants, il faut appuyer de manière prolongée sur le symbole et entendre un bip prolongé. 22 Attention En cas de coupure de courant, toute la programmation de l’horloge électronique sera effacée et l'indication 12:00 clignotera sur l’afficheur de l’horloge. Il vous faudra alors remettre l'horloge à l’heure et procéder à une nouvelle programmation.
F60CONXD 1 2 3 4 1 9 10 2 11 12 3 4 5 6 7 8 9 13 14 15 5 6 10 11 12 13 14 15 16 7 8 16 Frente de Mandos Junta de Horno Resistencia de Grill Soporte Cromado + Guías Telescópicas Parrilla Bandeja pastelera Bisagra Puerta Salida de Aire de Refrigeración Fijación al Mueble Pantalla de Grill Salida de Humos Lámpara lateral Panel Trasero Turbina Cristal Interior de Gran Tamaño Frontal de Mandos 2 3 4 5 6 7 9 8 ESPAÑOL 1 11 Funciones de cocinado 16 Sensor 12 Indicador de temperatura 17 Sen
Funciones del Horno Convencional Se usa en bizcochos y tartas en los que el calor recibido debe ser uniforme y para que consigan una textura esponjosa. Solera Calor sólo desde la parte inferior. Apropiado para calentar platos o levantar masas de repostería y afines. Grill y Solera Especial para asados. Puede usarse para cualquier pieza, independiente de su tamaño. Grill Gratinado y asado superficial. Permite el dorado de la capa exterior sin afectar al interior del alimento.
Recomendaciones para la Descongelación de Alimentos La descongelación se realiza mediante un sistema de aire caliente en 2 niveles, el nivel HI para carnes en general y el nivel LO para pescados, repostería y pan. Cuando seleccione la función descongelación, podrá seleccionar los niveles HI ó LO en el visualizador de temperatura, tocando en el sensor y luego en los sensores ó . • Las carnes y pescados no necesitan estar totalmente descongelados para cocinarlos.
Manejo del Horno 1 2 3 4 5 6 7 9 8 Manejo del reloj electrónico Atención Funcionamiento Manual Su reloj electrónico incorpora tecnología Touch-Control. Para manejarlo es suficiente con tocar los símbolos del cristal con su dedo. Tras poner el reloj en hora, su horno está listo para cocinar: La sensibilidad del touch-control se adapta continuamente a las condiciones ambientales.
La luz interior del horno se encenderá, –Al abrir la puerta del horno. Transcurrido un tiempo sin cerrar la puerta del horno, la luz se apagará para reducir el consumo eléctrico. –Cuando se selecciona cualquier función de cocinado. Transcurrido un tiempo la luz se apagará. Si desea encender la luz durante el cocinado basta con tocar el sensor de Luz Interior . Si se toca este sensor durante un tiempo prolongado, la luz se mantendrá encendida durante todo el cocinado.
Programación de la Hora de Finalización del Cocinado 17 Seleccione una función y una temperatura de cocinado. 1 Toque varias veces el sensor del reloj hasta que el símbolo se ilumine. 18 El horno permanecerá desconectado, quedándose iluminado el símbolo y con el símbolo parpadeando lentamente. En la pantalla del reloj verá la hora actual y la luz interior permanecerá apagada. Su horno está programado. 2 Seleccione la hora de finalización del cocinado, tocando los sensores ó .
F60CONXD 11 12 13 14 1 9 10 2 11 12 3 4 15 16 17 18 19 10 13 14 15 5 6 11 12 13 14 15 16 7 8 16 Bedienfeld Backofendichtung Grillwiderstand Verchromte Halterung + Teleskopführung Rost Backblech tief Scharnier Tür Kühlluftaustritt Befestigung am Einbauschrank Grillblech Abzug Seitenlampen Rückwand Ventilator Große Innenglasscheibe Bedienfeld 2 3 4 11 Kochfunktionen 16 Sensor 12 Temperaturanzeige 17 Sensor 13 Elektronikuhr 18 Ein-/Ausschalter 14 Temperatursensor 19 Innenlicht 5 6 7 9
Backofenfunktionen Normal Empfohlen für Kuchen und Torten, die gleichmäßige Hitze benötigen, um eine luftige Konsistenz zu erhalten. Normal mit Umluft Geeignet für Braten und Gebäck. Der Ventilator verteilt die Hitze gleichmäßig im Backofen und verkürzt die Gardauer und -temperatur. Unterhitze Hitze nur von der Unterseite. Geeignet zum Anwärmen von Tellern oder zum Aufgehenlassen von Teig oder ähnlichem.
Empfehlungen für das Auftauen von Tiefkühlkost Das Auftauen funktioniert mittels eines Warmluftsystems in 2 Stufen: Stufe HI für Fleisch im Allgemeinen und Stufe LO für Fisch, Gebäck und Brot. Wird die Auftaufunktion gewünscht, kann man zwischen Stufe HI oder LO auf der Temperaturanzeige wählen, indem man den Sensor und danach die Sensoren oder berührt. • Fleisch oder Fisch müssen vor der Garung nicht komplett aufgetaut werden. Es reicht aus, wenn die Oberfläche weich genug ist, um sie zu würzen.
Bedienung des Backofens 1 2 3 4 5 6 7 9 8 Bedienung der Elektronikuhr Achtung Ihre Elektronikuhr verfügt über eine TouchControl-Technologie. Zur Bedienung reicht es aus, die Glas-Symbole mit dem Finger zu berühren. Die Empfindlichkeit der Touch-Control passt sich fortwährend den Umgebungsbedingungen an. Beim Anschließen des Backofens an das Stromnetz achten Sie bitte darauf, dass die Glasoberfläche der Vorderseite der Bedienelemente sauber und frei von jeglichen Verunreinigungen ist.
Das Innenlicht leuchtet auf, wenn –die Backofentür geöffnet wird. Bleibt die Backofentür längere Zeit geöffnet, erlöscht das Licht automatisch, um Strom einzusparen. – eine Garfunktion eingestellt wird. Nach einiger Zeit schaltet sich das Licht aus. Möchten Sie das Licht während des Garvorgangs einschalten, berühren Sie einfach den Innenlichtsensor . Wird dieser Sensor länger berührt, bleibt das Licht während des gesamten Garvorgangs eingeschaltet.
Programmierung des Garzeit-Endes 1 Berühren Sie mehrmals den Uhrsensor bis das Symbol aufleuchtet. , 2 Wählen Sie das Garzeit-Ende, indem Sie die Sensoren oder berühren. 3 Danach hören Sie 2 aufeinander folgende Pieptöne; die Restgarzeit erscheint, und das Symbol blinkt langsam, um anzuzeigen, dass sich der Backofen automatisch abschalten wird. 4 Wählen Sie eine Gartemperatur.
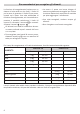
SCHEDA / SPECIFICATIONS / FICHE / FICHA / DATENBLATT Manufacturer Fabricant Fabricante Hersteller Modello Model Modèle Modelo Modell Classe di efficienza energetica (dove A è la classe di maggiore efficienza e G di minore efficienza). Energy efficiency type follows a scale between A (most efficient) and G (least efficient). Classe d’efficience énergétique, sur une échelle de A (le plus efficient) à G (le moins efficient).