W1070+/W1080ST+ Digital Projector Home Cinema Series User Manual
Table of contents Important safety instructions.......3 Overview..........................................6 Projector features .................................... 6 Shipping contents...................................... 8 Standard accessories..................................... 8 Projector exterior view .......................... 9 Controls and functions..........................10 Control panel ............................................... 10 Remote control............................................
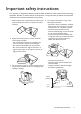
Important safety instructions Your projector is designed and tested to meet the latest standards for safety of information technology equipment. However, to ensure safe use of this product, it is important that you follow the instructions mentioned in this manual and marked on the product. 1. Please read this user manual before you operate your projector. Keep this manual in a safe place for future reference. 2. Always place the projector on a level, horizontal surface during operation. 4.
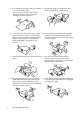
5. Do not block the vents holes while the projector 9. Do not look straight into the projector lens during operation. It may harm your sight. is on (even in standby mode). - Do not cover the projector with any item. - Do not place the projector on a blanket, bedding or any other soft surface. 6.
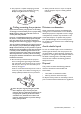
13. This projector is capable of displaying inverted images for ceiling mount installation. Use only BenQ's Ceiling Mount Kit for mounting. 15. When you think service or repair is required, take the projector only to a suitably qualified technician. Ceiling mounting the projector Moisture condensation Never operate the projector immediately after moving it from a cold location to a hot location.
Overview Projector features • • • • • • • • • • • 6 Full HD compatible The projector is compatible with Standard Definition TV (SDTV) 480i, 576i, Enhanced Definition television (EDTV) 480p, 576p and High Definition TV (HDTV) 720p, 1080i/p 60Hz formats, with the 1080p format providing a true 1:1 image reproduction.
• • • • Intuitive lens shift (W1070+) The intuitive control over lens shift lever provides flexibility in setting-up your projector. Short throw ratio (W1080ST+) The short throw ratio projection provides 1080p picture quality with shorter projection distance. SmartEco SmartEco™ technology saves lamp power consumption up to 70% depending on the content brightness level when SmartEco mode is selected. Wireless FHD Kit supported (optional accessory) Refer to the kit’s documentation to learn how to use it.
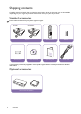
Shipping contents Carefully unpack and verify that you have the items below. Some of the items may not be available depending on your region of purchase. Please check with your place of purchase. Standard accessories Some of the accessories may vary from region to region. W1070+ W1080ST+ Projector Warranty card* User manual CD Remote control Batteries Quick start guide Power cable * The warranty card is only supplied in some specific regions. Please consult your dealer for detailed information.
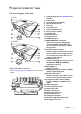
Projector exterior view Front and upper side view 1. Control panel (See Control panel for details.) 1 2. Lamp cover 2 3. Vent (heated air exhaust) 6 4. Quick-release button 7 5. Lens cap 6. Lens shift lever 8 7. Focus and Zoom ring 3 8. Vent (cool air intake) 9 9. Speaker grill 10 4 10. Front IR sensor 11. Projection lens 11 5 12. HDMI input port 13. MHL/HDMI dual mode port W1080ST+ Also can be used for charging the 1 connected MHL compatible smart 2 device as long as the power is fed to the projector.
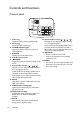
Controls and functions Control panel 1 2 9 10 3 4 5 11 12 7 13 14 12 6 7 8 1. Focus ring Adjusts the focus of the projected image. 2. Zoom ring Adjusts the size of the image. 3. POWER indicator light Lights up or flashes when the projector is under operation. 4. SOURCE Displays the source selection bar. 5. Top IR remote sensor 6. POWER Toggles the projector between standby mode and on. 7. Keystone/Arrow keys ( / , / ) Manually corrects distorted images resulting from an angled projection.
Remote control 6. MENU 1 2 11 13 4 14 8 9 10 Accesses the On-Screen Display (OSD) menu. Goes back to previous OSD menu, exits and saves menu settings. • • • Mute: Toggles projector audio between on and off. Volume Down: Decreases the projector volume. Volume Up: Increases the projector volume. 12 3 5 6 7 • • 15 16 7. , , 8.
Installing/replacing the remote control batteries 1. Press and slide off the battery cover, as illustrated. 2. Remove the old batteries (if applicable) and install two AAA batteries within. Make sure that the positive and negative ends are positioned correctly, as illustrated. 3. Slide the battery cover in until it clicks into place. • Avoid leaving the remote control and batteries in an excessive heat or humid environment like the kitchen, bathroom, sauna, sunroom or in a closed car.
Installation Choosing a location Before choosing an installation location for your projector, take the following factors into consideration: • Size and position of your screen • Electrical outlet location • Location and distance between the projector and the rest of your equipment You can install your projector in the following ways. 1. Front: 3. Front Ceiling: Select this location with the projector placed near the floor in front of the screen.
Obtaining a preferred projected image size The projected image size is determined by the distance from the projector lens to the screen, the zoom setting, and the video format. W1070+ is equipped with movable lens. See ‘Shifting the projection lens vertically (W1070+ only) for details. Projection dimensions Use the illustration and tables below to help you determine the projection distance.
Shifting the projection lens vertically (W1070+ only) The vertical lens shift control provides flexibility for installing your projector. It allows the projector to be positioned slightly above or below the top level of the projected images. The lens shift (offset) is expressed as a percentage of the projected image height. It is measured as an offset from the projected image's vertical center.
Connection When connecting a signal source to the projector, be sure to: 1. Turn all equipment off before making any connections. 2. Use the correct signal cables for each source. 3. Make sure the cables are firmly inserted. • In the connection illustrations shown below, some cables may not be included with the projector (see Shipping contents). They are commercially available from electronics stores. • The illustrations below are for reference only.
Connecting with video equipment You need only connect the projector to a video source device using just one of the connecting methods. Each video source provides different picture quality.
Connecting smart devices The projector can project the content directly from a MHL compatible smart device. Using an HDMI to Micro USB cable or an HDMI to Micro USB adaptor, you can connect your smart devices to the projector and then enjoy your content on the big screen. Some smart devices may not be compatible to the cable that you use. Please consult the manufacturer of your smart device for detailed information. Using an HDMI to Micro USB cable 1.
Connecting component-video devices The RCA type component video jacks are provided for connection to video output devices. You should also connect the separate audio cable to a suitable audio amplifier. AV equipment: DVD player, digital tuner, etc. From audio output terminals To audio input terminals Component video cable Connecting video devices Connect your video device to the projector with a composite video cable. You should also connect the separate audio cable to a suitable audio amplifier.
Connecting a computer Connect the projector to a computer with a VGA cable. Laptop or desktop computer From audio output terminal To audio input terminals VGA cable Many laptops do not turn on their external video ports when connected to a projector. Usually a key combination like Fn + F3 or CRT/LCD key turns the external display on/off. Locate a function key labeled CRT/LCD or a function key with a monitor symbol on the laptop. Press Fn and the labeled function key simultaneously.
Operation Starting up the projector 1. Plug the power cable into the projector and into a power outlet. Turn on the power outlet switch (where fitted). The POWER indicator light on the projector lights orange after power has been applied. Please use the supplied power cable to avoid possible dangers such as electric shock and fire. 2. Press on the projector or on the remote control to start the projector. As soon as the lamp lights up, a Power On Tone will be heard.
Step 3: Specify 2D Keystone. Step 4: Specify Auto Source. Now you’ve completed the initial setup. 4. If you are prompted to enter the password, use the arrow keys on the projector or remote control to enter a six-digit password. See Utilizing the password function for details. 5. Switch on the connected equipment. 6. The projector starts to search for available input signals. The current input signal being scanned displays on the screen.
Securing the projector Using a security cable lock The projector has to be installed in a safe place to prevent theft. Otherwise, purchase a lock, such as the Kensington lock, to secure the projector. You can locate a Kensington lock slot on the projector. See item 28 on page 9 for details. A Kensington security cable lock is usually a combination of key(s) and the lock. Refer to the lock's documentation to learn how to use it.
If you forget the password If you enable the password function, you’ll have to enter your password each time you turn on the projector. Once you enter an incorrect password, the error message displays, and the Input Password window follows. • Under the Advanced OSD menu • Under the Basic OSD menu Password Error Password Error Please try again. Please try again. You can retry by entering another six-digit password, or if you absolutely do not remember it, use the password recall procedure.
Changing the password To do this, first and foremost, you have to access the Advanced OSD menu (see 30 for details). 1. Go to System Setup : Advanced > Password to display the Password window. 2. Select Change Password and press OK to display the Input Current Password window. Input Current Password Back 3. Use the arrow keys on the projector or remote control to enter the old password. • If the password is correct, the Input New Password window displays.
Selecting an input source The projector can be connected to multiple equipment at the same time. However, it only displays one full screen at a time. When starting up, the projector automatically searches for the available signals. If you want the projector to always automatically search for the signals: • Under the Advanced OSD menu, go to the System Setup : Basic menu, and enable Auto Source.
Adjusting the projected image Adjusting the projection angle The projector is equipped with a quick-release adjuster foot and a rear adjuster foot. These adjusters change the image height and projection angle. To adjust the projector: 1. Press the quick-release button and lift the front of the projector. Once the image is positioned as desired, release the quick-release button to lock the foot in position. 2. Screw the rear adjuster foot to fine-tune the horizontal angle.
Correcting keystone Keystoning refers to the situation where the projected image is noticeably wider at either the top or bottom. It occurs when the projector is not perpendicular to the screen. You may correct this in ONE of these ways. • Using the remote control Press KEYSTONE to display the 2D Keystone window. • Using the projector Press / , / , / , or to display the 2D Keystone window.
Menu Functions About the OSD Menus To let you make various adjustments or settings on the projector and the projected image, the projector is equipped with 2 types of multilingual On-Screen Display (OSD) menus: • Basic OSD menu: provides primary menu functions. (See Using the Basic OSD menu) • Advanced OSD menu: provides full menu functions. (See Using the Advanced OSD menu) To access the OSD menu, press MENU on the projector or remote control.
If you intend to switch from the Basic OSD menu to the Advanced OSD menu, follow the instructions below: Use the arrow keys ( / / / ) on the projector or remote control to move through the menu items, and use OK to confirm the selected menu item. • When there is a video signal connected to the projector i. Go to the Settings > Menu Type menu. ii. Use / to select Advanced and press OK. iii. Press MENU again to access the Advanced OSD menu. • When there is NO video signal connected to the projector i.
Using the Basic OSD menu Depending on whether or not any video signal is connected to the projector, the Basic OSD menu offers different available functions. Check the following links to learn more. • Basic OSD menu - with input signals connected • Basic OSD menu - without input signals connected (limited menus are available) Basic OSD menu - with input signals connected The Basic OSD menu provides primary menu functions.
Adjusts the volume level of the projector's internal speaker or the volume being output from the audio output jack. Volume If the Mute function is activated, adjusting Volume will turn off the Mute function. The function is accessible through the remote control. Mute Selects On to temporarily turn off the projector's internal speaker or the volume being output from the audio output jack. To restore the audio, select Off. The function is accessible through the remote control.
• HDMI Format Selects an input source type for the HDMI signal. You can also manually select the source type. The different source types carry different standards for the brightness level. HDMI Format is only available when the HDMI signal is selected. • Reset Lamp Timer • Reset All Settings • Information Activates this function only after a new lamp is installed. When you select Reset, a "Reset Successfully" message displays to notify that the lamp time has been reset to "0".
Basic OSD menu - without input signals connected As there’s no input signal to your projector, only the submenus of Settings under Basic OSD menu with input signals connected are available. Menu options that are not available will become grayed out. To access the OSD menu, press MENU on the projector or remote control. / / • Use the arrow keys ( items. • Use OK to confirm the selected menu item.
Using the Advanced OSD menu The Advanced OSD menu offers complete menu functions. Main menu icon Main menu name Picture Picture Mode Select Standard User Mode Management 50 Brightness Submenu Contrast 50 Color 50 Tint 50 Status 7 Sharpness Color Temperature Normal Lamp Power Advanced... Reset Current Picture Mode Current input source Exit PC Press BACK to go back to the previous window or to exit.
Picture menu Submenu Picture Mode Functions and Descriptions Selects a preset picture mode to suit your operating environment and input signal picture type. The preset picture modes are described as below: • Bright: Maximizes the brightness of the projected image. This mode is suitable for environments where extra-high brightness is required, such as using the projector in well lit rooms.
Adjusts the degree of difference between dark and light in the picture. After adjusting the Brightness value, adjust Contrast to set the peak white level. The higher the value, the greater the contrast. Contrast 30 50 70 The function is accessible through the remote control. Color Tint Sharpness Adjusts the color saturation level -- the amount of each color in a video picture. Lower settings produce less saturated colors; setting to the minimum value makes the image black and white.
• Black Level Sets the picture grayscale to 0 IRE or 7.5 IRE. The grayscale video signal is measured in IRE units. In some areas which use NTSC TV standard, the grayscale is measured from 7.5 IRE (black) to 100 IRE (white); however, in other areas where PAL equipment or Japanese NTSC standards are used, the grayscale is measured from 0 IRE (black) to 100 IRE (white). We suggest you to check if the input source is with 0 IRE or with 7.5 IRE, and then make your selection accordingly.
• Color Management In most installation situations, color management is not necessary, such as in classroom, meeting room, or lounge room situations where lights remain on, or where building external windows allow daylight into the room. Only in permanent installations with controlled lighting levels, such as boardrooms, lecture theaters, or home theaters, should color management be considered. Color management provides fine color control adjustment to allow for more accurate color reproduction.
All of the adjustments you’ve made for the selected Picture Mode (including preset modes, User 1, and User 2) return to the factory preset values. Reset Current Picture Mode 1. Press OK. The confirmation message displays. 2. Use / to select Reset and press OK. The picture mode returns to the factory preset settings. 3. Repeat steps 1 and 2 if you want to reset other picture modes. Audio Setup menu Submenu Functions and Descriptions • Effect Mode Selects a sound effect mode to your preference.
Display menu Submenu Functions and Descriptions The native display resolution of this projector is in a 16:9 aspect ratio. However, you may use this function to display projected picture of different aspect ratio. In the following illustrations, the black portions are inactive areas and the white portions are active areas. • Auto 15:9 picture • Scales a picture proportionally to fit the projector's native resolution in its horizontal or vertical width.
• H. Size Adjusts the horizontal width of the picture. This function is only available when the Component or PC signal is selected. PC & Component YPbPr Tuning • Phase Adjusts the clock phase to reduce picture distortion. This function is only available when the Component or PC signal is selected. • Auto Adjusts the phase and frequency automatically. This function is only available when the PC signal is selected.
System Setup : Basic menu Submenu Functions and Descriptions Language Sets the language for the On-Screen Display (OSD) menus. Background Color Sets the background color when there is no signal to the projector. Splash Screen Projector Position Auto Off Direct Power On Allows you to select which logo screen displays during projector start-up. You can choose BenQ logo screen, Blue screen, or Black screen. The projector can be installed on a ceiling or behind a screen, or with one or more mirrors.
System Setup : Advanced menu Submenu Reset Lamp Timer Functions and Descriptions Activates this function only after a new lamp is installed. When you select Reset, a "Reset Successfully" message displays to notify that the lamp time has been reset to "0". • HDMI Format Selects an input source type for the HDMI signal. You can also manually select the source type. Different source types carry different standards for the brightness level. HDMI Format is only available when the HDMI signal is selected.
For security purposes and to prevent unauthorized use, you may set up password security for the projector. See Utilizing the password function for details. Password • Change Password You will be asked to enter the current password before changing to a new one. • Key Lock Power On Lock Limits use of the projector to only those who know the correct password.
Information menu Submenu Functions and Descriptions Source Displays the current signal source. Picture Mode Displays the current picture mode under the Picture menu. Resolution Displays the native resolution of the input source. Color System Displays input system format. Equivalent Lamp Hour Displays the number of hours the lamp has been used. 3D Format Displays the current 3D mode. Only available when 3D Mode is enabled. Firmware Version Displays the firmware version of your projector.
Advanced OSD menu structure The OSD menus vary according to the signal type selected. Main menu Picture Submenu Picture Mode Cinema/Bright/Standard/User 1/User 2/3D/ISF Night/ISF Day User Mode Management Load Settings From Rename User Mode Brightness 0–100 Contrast 0–100 Color 0–100 Tint 0–100 Sharpness 0–15 Color Temperature Normal/Cool/Lamp Native/Warm Lamp Power Normal/Economic/SmartEco Black Level Advanced... Sound Mode 0 IRE/7.5 IRE Gamma Selection 1.6/1.8/2.0/2.2/2.4/2.5/2.
Language Background Color System Setup : Basic Black/Blue/Purple Splash Screen BenQ/Black/Blue Projector Position Front/Front Ceiling/Rear/Rear Ceiling Auto Off Disable/5 min/10 min/15 min/20 min/25 min/ 30 min Direct Power On Menu Settings On/Off Menu Type Basic/Advanced Menu Display Time 5 sec/10 sec/15 sec/20 sec/25 sec/30 sec/ Always On Blank Reminder Message On/Off Source Rename Auto Source On/Off Reset Lamp Timer HDMI Settings Reset/Cancel HDMI Format Auto/PC Signal/Video Signal C
Maintenance Care of the projector Your projector needs little maintenance. The only thing you have to do on a regular basis is keep the lens clean. Never remove any parts of the projector except the lamp. Contact your dealer or local customer service center if the projector fails to operate as expected. Cleaning the lens Clean the lens whenever you notice dirt or dust on the surface.
Lamp information Getting to know the lamp hour When the projector is in operation, the duration (in hours) of lamp usage is automatically calculated by the built-in timer. To obtain the lamp hour information: 1. Press MENU and then use the arrow keys ( / / / Information. 2. The Equivalent Lamp Hour information displays. 3. Press BACK to exit. ) to go to Information or Settings > Extending lamp life The projection lamp is a consumable item.
Timing of replacing the lamp When the Lamp indicator lights up red or a message appears suggesting it is time to replace the lamp, please install a new lamp or consult your dealer. An old lamp may cause a malfunction in the projector and in some instances the lamp may explode. Go to http://www.BenQ.com for a replacement lamp. The Lamp indicator light and Temperature warning light will light up if the lamp becomes too hot. Turn the power off and let the projector cool for 45 minutes.
Replacing the lamp • To reduce the risk of electrical shock, always turn the projector off and disconnect the power cable before changing the lamp. • To reduce the risk of severe burns, allow the projector to cool for at least 45 minutes before replacing the lamp. • To reduce the risk of injuries to fingers and damage to internal components, use caution when removing lamp glass that has shattered into sharp pieces.
7. As shown in the illustration, lower the new lamp. 8. Tighten the screw that secures the lamp. 9. Ensure the handle is fully laid flat and locked in place. • Loose screw may cause a bad connection, which could result in malfunction. • Do not over tighten the screw. 2 1 10. Replace the lamp cover on the projector. 11. Tighten the screw that secures the lamp cover. • Loose screw may cause a bad connection, which could result in malfunction. • Do not over tighten the screw. 12.
Indicators There are three indicators which show the status of the projector. Check the following information about the indicator lights. If there is anything wrong, turn the projector off and contact your dealer.
Troubleshooting Problem The projector does not turn on. Cause Remedy There is no power from the power cable. Plug the power cable into the AC inlet on the rear of the projector, and plug the power cable into to the power outlet. If the power outlet has a switch, make sure that it is switched on. Attempting to turn the projector on again during the cooling process. Wait until the cooling down process has completed. The lamp cover is not securely attached. Correctly attach the lamp cover.
Specifications Projector specifications All specifications are subject to change without notice. Optical Control Resolution 1920 (H) x 1080 (V) Display system Single-chip DLPTM system Lens F/Number F = 2.59 to 2.87, f = 16.88 to 21.88 mm (W1070+) F = 2.6 to 2.78, f = 10.2 to 12.24 mm (W1080ST+) Lamp 240 W lamp RS-232 serial control 9 pin x 1 IR receiver x 2 12VDC (Max. 0.5 A) x 1 Weight 2.75 Kg (6.06 lbs) (W1070+) 2.85 Kg (6.
Dimensions 311.87 mm x 244.12 mm x 104 mm (W x D x H) 311.87 244.12 104 Unit: mm Ceiling mount installation Ceiling mount screws: M4 160 46.21 80 115 (Max. L = 25 mm; Min. L= 20 mm) 137 537.9 577.7 625.95 43.55 95.33 163.12 102.97 311.95 244.
Timing chart Supported timing for PC input Format Resolution Refresh rate (Hz) H. Frequency (KHz) Pixel Frequency (MHz) 720 x 400 720 x 400_70 70.087 31.469 28.3221 VGA_60* 59.940 31.469 25.175 VGA_72 72.809 37.861 31.500 VGA_75 75.000 37.500 31.500 VGA_85 85.008 43.269 36.000 SVGA_60* 60.317 37.879 40.000 SVGA_72 72.188 48.077 50.000 SVGA_75 75.000 46.875 49.500 SVGA_85 85.061 53.674 56.250 SVGA_120** (Reduce Blanking) 119.854 77.425 83.000 XGA_60* 60.004 48.
SXGA_60*** 60.020 63.981 108.000 SXGA_75 75.025 79.976 135.000 SXGA_85 85.024 91.146 157.500 1280 x 960_60*** 60.000 60.000 108 1280 x 960_85 85.002 85.938 148.500 1360 x 768 1360 x 768_60*** 60.015 47.712 85.500 1440 x 900 WXGA+_60*** 59.887 55.935 106.500 1400 x 1050 SXGA+_60*** 59.978 65.317 121.750 1600 x 1200 UXGA*** 60.000 75.000 162.000 1680 x 1050 1680 x 1050_60*** 59.954 65.290 146.250 640 x 480@67Hz MAC13 66.667 35.000 30.
Supported timing for HDMI (HDCP) input Resolution Refresh rate (Hz) H. Frequency (KHz) Pixel Frequency (MHz) VGA_60* 59.940 31.469 25.175 VGA_72 72.809 37.861 31.500 VGA_75 75.000 37.500 31.500 VGA_85 85.008 43.269 36.000 720 x 400_70 70.087 31.469 28.3221 SVGA_60* 60.317 37.879 40.000 SVGA_72 72.188 48.077 50.000 SVGA_75 75.000 46.875 49.500 SVGA_85 85.061 53.674 56.250 SVGA_120** (Reduce Blanking) 119.854 77.425 83.000 XGA_60* 60.004 48.363 65.
1280 x 960_60*** 60.000 60.000 108 1280 x 960_85 85.002 85.938 148.500 1360 x 768 1360 x 768_60*** 60.015 47.712 85.500 1440 x 900 WXGA+_60*** 59.887 55.935 106.500 1400 x 1050 SXGA+_60*** 59.978 65.317 121.750 1600 x 1200 UXGA*** 60.000 75.000 162.000 1680 x1050 1680 x 1050_60*** 59.954 65.290 146.250 640x480@67Hz MAC13 66.667 35.000 30.240 832x624@75Hz MAC16 74.546 49.722 57.280 1024x768@75Hz MAC19 75.020 60.241 80.000 1152x870@75Hz MAC21 75.06 68.
Supported timing for MHL input Timing Resolution V. Frequency (Hz) H. Frequency (KHz) Pixel Freq. (MHz) Remark 480i 720 (1440) x 480 59.94 15.73 27 MHL 480p 720 x 480 59.94 31.47 27 MHL 576i 720 (1440) x 576 50 15.63 27 MHL 576p 720 x 576 50 31.25 27 MHL 720/50p 1280 x 720 50 37.5 74.25 MHL 720/60p 1280 x 720 60 45.00 74.25 MHL 1080/50i 1920 x 1080 50 28.13 74.25 MHL 1080/60i 1920 x 1080 60 33.75 74.25 MHL 1080/24P 1920 x 1080 24 27 74.
Warranty and Copyright information Warranty BenQ warrants this product against any defects in material and workmanship, under normal usage and storage. Proof of purchase date will be required with any warranty claim. In the event this product is found to be defective within the warranty period, BenQ’s only obligation and your exclusive remedy shall be replacement of any defective parts (labor included).