
Installation manual
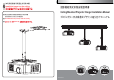

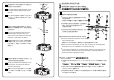

պᒳ൛(Part K)ઠ˱ࣈ႓(Part J)ᖇ־ػː
༄ЊཆЁ̛ޜڟӹᆇጠĄ
Fix Height adjust Inside pipe (Part J) onto
the frame-mounted projector with Screw
(Part K).
䊈䉳㩷(Part K) 䉕↪䈚䈩ౝ䊌䉟䊒㩷(Part J)
䉕䉦䊮䉼䊧䊋䊷ข䉍ઃ䈔ᷣ䉂䈱䊒䊨䉳䉢䉪䉺
䊷䈮࿕ቯ䈜䉎䇯
պڱ͟ቡጌӹᆇጠэኌ໋ݙĂϔҁ
ᒳृ(Part L)Ⴤᒳ౾(Part F)Ăઠ˱ࣈ႓־ס
ػʹࣈ႓˱Ą
The user can adjust the projector to the
desired height, and then fix the Inner
Sleeve in the Outer Sleeve with Carriage
Bolt (Part L) and Nyllon nut (Part F).
↪⠪䈲⥄り䈪䊒䊨䉳䉢䉪䉺䊷䉕ㆡᒰ䈭㜞䈘
䈮⺞ᢛ䈚䈢ᓟ䇮䊗䊦䊃㩷(Part L) 䈫䊅䉾䊃(Part
F) 䉕↪䈚䈩䇮ౝ䊌䉟䊒䉕ᄖ䊌䉟䊒ౝ䈮
࿕ቯ䈜䉎䇯
శݣϔઠᒳ൛(Part M)ᖇ־ػʹࣈ႓ʰĂպ
ʹࣈ႓Ⴤ˱ࣈ႓־סԁߏᗧסĄ
Finally, lock Button Screw (Part M) on the
Outer Sleeve, securing outer and inner
sleeves in place firmly.
ᦨᓟ䈮䊈䉳㩷(Part M) 䉕ᄖ䊌䉟䊒䈮࿕ቯ
䈚䈩䇮ᄖ䊌䉟䊒䈫ౝ䊌䉟䊒䉕䈚䈦䈎䉍࿕ቯ
䈘䈞䉎䇯
2-2
2-2
2-2
2-3
2-3
2-3
2-4
2-4
2-4
J
K
I
J
F
M
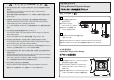
ھۡ֜ഥԒӤܻ࢜Ј߆ݖ
Install the hanger on the ceiling
ᄤๆ⌕ᑼ䊑䊤䉬䉾䊃䉕ᄤ䈮࿕ቯ䈜䉎
ᄤๆ⌕ᑼ䊑䊤䉬䉾䊃䉕ᄤ䈮࿕ቯ䈜䉎
ᖳ๛(Part H)წаޟ௶Ӗו
œ
Њཆϵ̈ۆٖढ٧๎፷൬ᒳ൛(Part H)
̰ڟϖӕĄ
ҁწаƖӤ࢜១ӇƖҁწаƖኆᙋწаƖᖳҔĄ
œ
Њཆढᐖϑሂჯ̈ۆٖڟႍᘸĂᎵጅኌ໋ڟ
ᒳ൛ĂΏχؚ͓ۣڟᒳ൛(Part H)Ă!!!!!!
ͫኌػ̫٫ᑓĄ
œ
Њཆϵ̣ቴڟ̈ۆٖФઊڟ઼ݙĂծ̸
ΥટʡࢷᎵጅኌ໋ڟᒳ൛Ą
Fix Inflate Screw (Part H) onto the ceiling
œ
Place the Inflate Screw (Part H) on the ceiling,
in the following order:
Washer Ɩ Iron Hanger Ɩ Washer Ɩ Spring Washer Ɩ Nut.
œ
Select screws that are suitable for each type of ceiling. The enclosed Inflate
Screw (Part H) are for installation on concrete walls only.
œ
In the case of installation on a wooden ceiling, make sure it is strong enough.
Do not install on decorated posts or plaster boards. Consult professional
personnel to select appropriate screws.
䉟䊮䊐䊧䊷䊃䊶䊈䉳
䉟䊮䊐䊧䊷䊃䊶䊈䉳㩷
(Part H) 䉕ᄤ᧼䈮ข䉍ઃ䈔䉎䇯
䉕ᄤ᧼䈮ข䉍ઃ䈔䉎䇯
œ
ᄤ᧼䈮ข䉍ઃ䈔䉎ᤨ䈲䉟䊮䊐䊧䊷䊃䊶䊈䉳㩷(Part H) 䊪䉾䉲䊞䊷䈱ឃ㗅ᐨ䈮ᵈᗧ
䈜䉎䇯
ᐔ䊪䉾䉲䊞䊷
ᐔ䊪䉾䉲䊞䊷㩷
Ɩࡉࠤ࠶࠻ㇱຠ
ࡉࠤ࠶࠻ㇱຠ㩷
Ɩᐔ䊪䉾䉲䊞
ᐔ䊪䉾䉲䊞㩷
Ɩ䉴䊒䊥䊮䉫䊶䊪䉾䉲䊞䊷
䉴䊒䊥䊮䉫䊶䊪䉾䉲䊞䊷㩷
Ɩ䊅䉾䊃䇯
䊅䉾䊃䇯
œ
ข䉍ઃ䈔ᤨ䈮ᄤ᧼䈱⒳㘃䉕⏕䈚ㆡᒰ䈭䊈䉳䉕ㆬ䉖䈪䈒䈣䈘䈇䇯ઃዻ䈱䊈䉳㩷㩷㩷㩷㩷㩷
(Part H)㩷䈲䉶䊜䊮䊃ოኾ↪䈪䈜䇯
œ
ᧁᄤ᧼䈮ข䉍ઃ䈔䉎႐ว䈲චಽ䈭ᒝᐲ䈏ᔅⷐ䈪䈜䇯䉁䈢ኾ㐷ᬺຬ䈏ㆡᒰ䈭
䊈䉳䉕ㆬ䈹䈖䈫䈏ᔅⷐ䈪䈜䇯
1
H
G
3