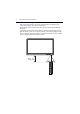
4 Parts of the display and their functions Remote control usage tips • Point and aim the top front of the remote control directly at the display’s remote control sensor window when you press the buttons. • Do not let the remote control become wet or place it in humid environments (like bathrooms). • If the display’s remote control sensor window is exposed to direct sunlight or strong light, the remote control may not operate properly.
Connection 15 Connection Connecting the VGA input 1. Connect the VGA IN jack on the display to the VGA output jack on a computer using a D-Sub (15-pin) cable. 2. Connect the computer’s audio output jack to the AUDIO IN jack on the display with a suitable audio cable. 3. To view images from this input, press the INPUT button on the remote control to switch to respective input source.
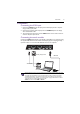
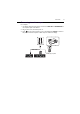
16 Connection Connecting the digital inputs 1. Connect the HDMI output jack of a computer or A/V device (such as a VCR or DVD player) to the HDMI input jack on the display using an HDMI cable. 2. To view images from this input, press the INPUT button on the remote control to switch to respective input source. HDMI cable DVD player The applicable cable is not supplied and should be purchased separately.
Connection 17 Connecting the AV inputs 1. Connect the AV IN jack on the display to the output jack on an A/V device (such as a VCR) using an appropriate video cable. 2. Connect the VCR’s audio output jacks to the AV IN jacks on the display using a suitable audio cable. 3. To view images from this input, press the INPUT button on the remote control to switch to respective input source.
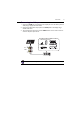
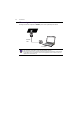
18 Connection Connecting the coaxial output To use coaxial out for acoustic applications: 1. Use coaxial cable to connect via COAX OUT to your audio equipment. 2. Plug in power cord, and switch power on. Coaxial cable drive LAN Audio equipment The applicable cable is not supplied and should be purchased separately.
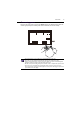
Connection 19 Connecting the video output For computer: 1. Use D-Sub cable and audio cable to connect from VGA OUT and EARPHONE to the respective jacks of the devices. 2. Plug in power cord, and switch power on. 3. Press on the remote control to turn on the display. Press INPUT to switch to PC port. Set internal computer as VGA output or multi-screen display.
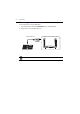
20 Connection Connecting to serial port Directly connect the computer to RS232 ports on the input/output terminals. RS-232C cable Computer • The applicable cable is not supplied and should be purchased separately. • This connection is applicable to straight-through RS-232C cable only.
Connection 21 Connecting power Plug one end of the power cord into the Power jack on the display and the other end into an appropriate power outlet (if the outlet is switched, turn on the switch). . • The supplied power cord is suitable for use with 100-240V AC power only. • The power cord and outlet illustrated may differ from the ones used in your region. • Only use an appropriate power cord for your region.
22 Product information Product information Specifications Item Backlight Panel size LCD panel 1920 x 1080 Brightness (cd/m2) (typical) 350 nits Contrast (typical) 1400:1 8-bit(16.7M) IR Touch Resolution 32767 x 32767 Accuracy Operating System Tempered glass 10 points touch (varies from operating systems and applications) +/- 2mm USB type B x 1 Windows XP/Vista/7/8, Mac OS X 10.6~10.10, Linux, Chrome OS 4.0.1847.
Product information Supply Power 190W Consumption Standby ≤ 0.5W Operating Temperature 0 - 40oC Operating Humidity Environment Storage Temperature Storage Humidity Display Orientation Weight (kg) Mechanical Dimensions (W x H x D) (mm) Bezel Dimension - T/B/ L/R (mm) Feature 100 - 240V AC, 50/60 Hz Consumption Max.
24 Product information Dimensions Unit: mm
Product information Supported input signal resolution Resolution 640 x 480 @ 60Hz 640 x 480 @ 67Hz 640 x 480 @ 72Hz 640 x 480 @ 75Hz 720 x 400 @ 70Hz 800 x 600 @ 60Hz 800 x 600 @ 75Hz 832 x 624 @ 75Hz 1024 x 768 @ 60Hz 1024 x 768 @ 75Hz 1152 x 870 @ 75Hz 1280 x 720 @ 60Hz 1280 x 768 @ 60Hz 1280 x 800 @ 60Hz RB 1280 x 800 @ 60Hz 1280 x 960 @ 60Hz 1280 x 1024 @ 60Hz 1360 x 768 @ 60Hz 1366 x 768 @ 60Hz 1400 x 1050 @ 60Hz 1600 x 1200 @ 60Hz 1680 x 1050 @ 60Hz RB 1600 x 1050 @ 60Hz 1920 x 1080 @ 50Hz 1920 x 108
26 Product information 720p (25Hz) 720p (30Hz) 720p (50Hz) 720p (60Hz) 1080i (50Hz) 1080i (60Hz) 1080p (24Hz) 1080p (25Hz) 1080p (30Hz) 1080p (24Psf) 1080p (25Psf) 1080p (50Hz) 1080p (60Hz) • : supported • Vacant: not supported
Troubleshooting Troubleshooting Problem No picture No sound The computer input image looks strange The control panel buttons do not work Solution Check the following: • Is the display turned on? Check the power indicator of the display. • Is the signal source device turned on? Turn on the device and try again. • Are there any loose cable connections? Make sure that all cables are connected firmly.
28 Troubleshooting The remote control does • Have you locked the remote control function? Unlock the not work function and try again. • Check for incorrect battery orientation. • Check for dead batteries. • Check your distance and angle from the display. • Check whether remote control is properly being pointed at the display’s remote control sensor window. • Check for any obstacle between the remote control and the remote control sensor window.
Troubleshooting No picture and no sound • Check whether the machine is started state. • Check whether signal wire is well plugged, whether INPUT is corresponding to it. • If in internal computer mode, check whether internal computer is started. With horizontal or • Check whether signal wire is well connected. vertical stripes or image • Check whether other electronic equipment or power dithering tools are placed around the machine.
30 Appendix: Using Multi-Display Administrator Appendix: Using Multi-Display Administrator The Multi-Display Administrator is a software program that enables remote and centralized management of a single or multiple BenQ digital signage displays on a host computer. You can create and edit display groups, view status of displays as well as change display settings. You can also tile multiple displays and create a video wall easily through a step-by-step guided wizard.
Appendix: Using Multi-Display Administrator 31 Initial Setup The following operations must be performed before you can use the Multi-Display Administrator to manage your display(s). Installing Multi-Display Administrator Ensure that the computer meets the minimum system requirements set forth on page 30. 1. Locate the setup.exe file and double-click it to begin installation. 2. Follow the on-screen instructions to complete the installation.