32 Appendix: Using Multi-Display Administrator Launching Multi-Display Administrator To launch Multi-Display Administrator, click Windows Start button and select Programs > BenQ > MDA > MDA. You can also double-click the MDA icon Windows Desktop to launch the program. on A dialog prompting you to enter ID and password will appear. Enter the default password 0000 and click OK. You can change the ID and password in the Security menu.
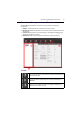
Appendix: Using Multi-Display Administrator 33 Overview of components and functions The Multi-Display Administrator home screen mainly consists of the following components: 1. Toolbar: provides functions for connection and security settings. 2. Monitor list panel: lists displays that are connected to the computer and found on the network. 3. Control panel: provides controls and settings for the display (and display groups) selected on the Monitor list panel. 4.
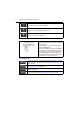
4 Appendix: Using Multi-Display Administrator Refreshes the information and setting values on the Control panel (Information, Control, AV, and Schedule). Allows you to change the user ID and password that are required for logging in to the Multi-Display Administrator. Changes the program’s user interface language, shows software version and opens the online Help.
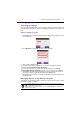
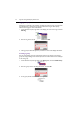
Appendix: Using Multi-Display Administrator 35 Managing displays Searching for displays After you finish connecting display(s) to the computer, what you need to do next is to let the Multi-Display Administrator search for the displays and add them to the Monitor list panel. Ethernet (LAN) connection 1. Click Search on the Toolbar. A dialog will appear asking you to specify the Communication Protocol. 2. Select Network, and click OK. The dialog below will follow. 3.
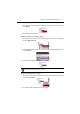
36 Appendix: Using Multi-Display Administrator Tagging a display If displays are connected to the computer via Ethernet connection, they are named after their IP addresses on the Monitor list panel by default. You can give these displays different names (tags) for easier identification. 1. On the Monitor list panel, right-click on the display you want to add a tag, and select Add Tag. 2. Enter the tag name in the dialog that follows, and click OK. 3.
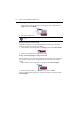
Appendix: Using Multi-Display Administrator 37 Deleting a group 1. On the Monitor list panel, right-click on the display group you want to delete, and select Delete. 2. The selected group will be deleted. Adding displays to an existing group 1. On the Monitor list panel, right-click on a display you want to add to a display group and select Add to Group. 2. In the dialog that appears, select the group to which the display will be added, and then click Select. 3.
38 Appendix: Using Multi-Display Administrator Deleting a display from the Monitor list panel 1. On the Monitor list panel, right-click on the display you want to delete under the Single node and select Delete. 2. The selected display will be deleted. If a display is deleted under the Single node, it will also be deleted from the group to which it belongs.
Appendix: Using Multi-Display Administrator 39 Setting up display configurations You can use the settings and options on the Control panel to remotely set up various settings for a selected display or display group on the Monitor list panel. Some controls and settings on the Control panel may not be available depending on your display model. A warning message will appear in the Notification area on the lower left corner of the program window if an unsupported control or setting is selected.
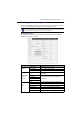
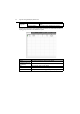
40 Appendix: Using Multi-Display Administrator Diagnosis Power Operation Hours The diagnosis result for the display’s power status. The display’s total elapsed power on time. The following information of each display will be provided on the Information tab when a display group is selected on the Monitor list panel. Item Status IP Address (Ethernet connection) Tag Power Input Description The network connection status of each display. The IP address of each display.
Appendix: Using Multi-Display Administrator Control tab The Control tab consists of controls for basic display operations. Item Power Select Video Source Volume Volume Mute Remote/Key Lock Language Aspect Image Retention All Reset Description Turns on the power of the display or puts the display to standby mode. Selects a video input source. Adjusts audio volume. Mutes or unmutes audio output. Turns on or off the remote control lock and key lock functions. Changes the language of the OSD menu.
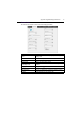
42 Appendix: Using Multi-Display Administrator AV tab The AV tab contains controls for picture quality and sound settings. Item Picture Mode Backlight Contrast Brightness Chroma Sharpness Color Temp. (White Balance) Auto Adjustment Balance Sound Mode Treble Bass Description Selects a preset picture mode. Adjusts the backlight intensity of the screen. Adjusts the image contrast. Adjusts the image brightness. Adjusts the color intensity of the image. Adjusts the image sharpness.
Appendix: Using Multi-Display Administrator 43 Schedule tab The Schedule tab provides controls by which you can set the display(s) to turn on or off (enter standby mode) automatically. Item Clock Description Allows you to set up current time manually. You can also click Set by PC Time to set the display to use the current time on the computer. Allows you to specify on and off time schedules. 1. Set a repeat mode by checking a Repeat checkbox. (Every Day, Mon., Tue. ..., etc.) 2.
44 Appendix: Using Multi-Display Administrator Additional operations Changing login ID and password You can change the ID and password that are used to log in to the Multi-Display Administrator. The ID and password can be changed, however, you cannot create multiple ID and password combinations. 1. Click Security on the Toolbar. The following dialog will appear. 2. Enter current ID and password in the ID and Password fields, and then click Confirm.
Appendix: Using Multi-Display Administrator Troubleshooting If you encounter problems while using the Multi-Display Administrator, please refer to the following troubleshooting tips to try to solve the problems by yourself. If the problem persists, please contact BenQ Customer Support for help. Problem Solution Check the following: Cannot connect to the display(s) • Check the cable connection.
Safety warnings and precautions English THIS EQUIPMENT MUST BE GROUNDED The lightning flash with arrowhead symbol, within an equilateral triangle, is intended to alert the user to the presence of uninsulated "dangerous voltage" within the product's enclosure that may be of sufficient magnitude to constitute a risk of electric shock to persons.
安全警告和预防措施 在等边三角形内的带箭头的闪电符号旨在警告用 户在产品外壳内有非绝缘的 “ 危险电压 ” 存在, 该类危险电压足以给人带来触电的风险。 简体中文 此设备必须接地 为确保安全操作,三脚插头只能插入使用常规 家庭布线而有效接地的标准三脚电源插座。设 备所使用的延长线必须有三股并应正确接地。 连接错误的延长线是死机的主要原因。 尽管设备运行顺利,但并不表示电源插座已正 确接地或安装完全安全。为了您的安全,如果 您对于电源插座的有效接地有任何疑问,请咨 询合格电工。 在等边三角形内的惊叹号旨在警告用户查看随机 所附的重要操作和维护 (维修)指示文字。 • 电源线的电源插头应该保持随时可使用。交流插座 (电源插座)应安装在设备附近且方便 使用。要完全将设备与交流电源断开,请从交流插座上拔下电源插头。 • 勿将显示器置于不平、倾斜或不稳的表面 (如推车)上,因为这可能导致其跌落并损伤机 身或其他物品。 • 勿将显示器置于水源附近,如浴场或泳池,或置于可能让水飞溅或喷洒到显示器上的地 方,如打开的窗户前面,此处雨水可能溅入。 • 勿将显示器安装在没有适当通风和空气流动的密闭空间,如密封的柜子
安全警告與注意事項 等邊三角形圖示當中的閃電箭頭符號,意 在警告使用者產品機殼內部會產生非絕緣 的 「危險電壓」,且強度足以導致人員觸 電的風險。 等邊三角形圖示當中的驚嘆號,意在警告 使用者該裝置附有重要的操作與維護 (維 修)文字說明。 繁體中文 本產品必須接地 為確保操作安全,您必須僅將 3 針腳插 頭插入至標準 3 針腳電源插座,以透過 標準家庭電路將產品有效接地。 產品必 須使用三芯延長線並正確連接電源,以 將產品電源接地。 電源延長線連接錯誤 是造成致命危險的一大主因。 產品正常運作並不表示電源插座已接 地,或是安裝過程一切安全無虞。 為了 安全起見,若您對於是否有效將電源插 座接地有任何疑慮,請洽詢合格的電工 技師。 • 電源供應器主插頭應隨時保持容易操作的狀態。AC 電源插座 (主插座)應安裝於設備附 • • • • • • 近,以便使用。 若要從 AC 主插座完全拔下此設備的電源線,請從 AC 電源插座拔下電源 線插頭。 請勿將此顯示器置於不平坦、傾斜或不穩定的表面 (例如手推車),因為這可能導致傾 倒,或是造成自己與他人受傷。 請勿將此顯示器置於靠近水域之處 (例如 SPA 或水池
Avertissements et précautions de sécurité Français CET ÉQUIPEMENT DOIT ÊTRE MIS À LA TERRE L’éclair fléché dans un triangle équilatéral, est destiné à alerter l’utilisateur de la présence de « tension dangereuse » non isolée dans le boîtier du produit pouvant être d’une ampleur suffisante pour constituer un risque d’électrocution pour les personnes.
Advertencias y medidas de seguridad Español ESTE EQUIPO DEBE DISPONER DE TOMA A TIERRA El símbolo de relámpago con punta de flecha, dentro de un triángulo equilátero, pretende alertar al usuario de la presencia de "tensión peligrosa" no aislada en el habitáculo del producto, pudiendo ser de una magnitud tal que constituya un riesgo de descarga eléctrica para las personas.
Avisos de segurança e advertências Português ESTE EQUIPAMENTO DEVE SER LIGADO À TERRA O relâmpago com a seta dentro de um triângulo equilátero destina-se a alertar o utilizador para a presença de “tensão perigosa” dentro do invólucro do produto, tensão essa que pode ter amplitude suficiente para constituir um risco de choque eléctrico para as pessoas.