
Operation Manual
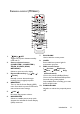
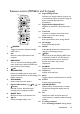
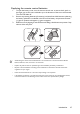
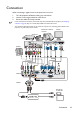
Table Of Contents
- Table of contents
- Important safety instructions
- Introduction
- Positioning your projector
- Connection
- Operation
- Starting up the projector
- Adjusting the projected image
- Using the menus
- Securing the projector
- Switching input signal
- Magnifying and searching for details
- Selecting the aspect ratio
- Optimizing the image
- Setting the presentation timer
- Remote paging operations
- Freezing the image
- Hiding the image
- Locking control keys
- Operating in a high altitude environment
- Adjusting the sound
- Using the test pattern
- Using the teaching templates
- Presenting from a USB Reader
- Shutting down the projector
- Direct power off
- Menu operation
- Maintenance
- Troubleshooting
- Specifications
- Warranty and Copyright information
Introduction 11
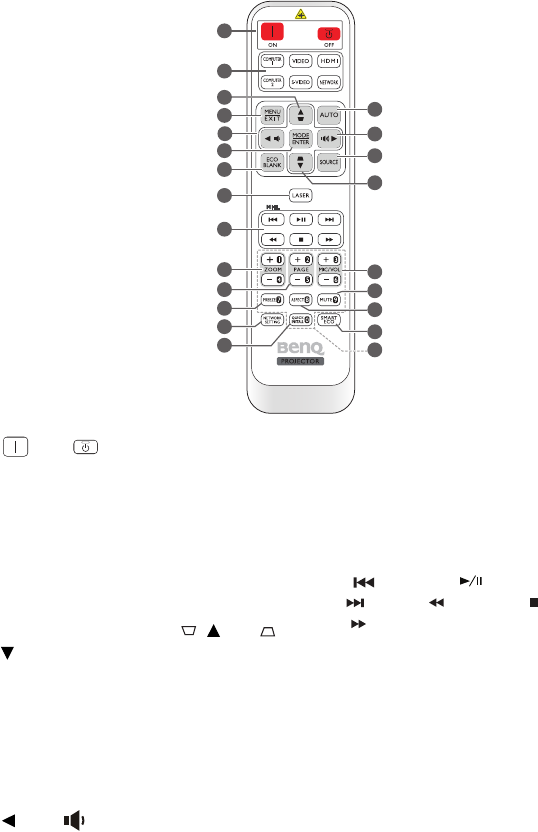
Remote control (MX666+)
1. ON/ OFF
Toggles the projector between standby
mode and on.
2. Source selection buttons
(COMPUTER 1, COMPUTER 2,
VIDEO, S-VIDEO, HDMI,
NETWORK
)
Selects an input source for display.
3. Keystone/Arrow keys ( / Up, /
Down)
Manually corrects distorted images
resulting from an angled projection.
4. MENU/EXIT
Turns on the On-Screen Display (OSD)
menu. Goes back to previous OSD menu,
exits and saves menu settings.
5. Left/
Decreases the projector volume.
6. MODE/ENTER
Selects an available picture setup mode.
Activates the selected On-Screen Display
(OSD) menu item.
7. ECO BLANK
Used to hide the screen picture.
8. LASER
Emits visible laser pointer light for
presentation purposes.
9. MHL control buttons
(Previous, Play/Pause,
Next, Rewind, Stop,
Fast-forward)
Goes to the previous file/Plays/Pauses/
Goes to the next file/Rewinds/Stops/Fast-
forwards during media playback.
Only available when controlling your smart
device in MHL mode.
10. ZOOM+/ZOOM-
Magnifies or reduces the projected picture
size.
4
3
7
8
9
11
10
12
13
14
15
16
17
18
21
22
19
20
3
5
6
1
2