
User manual


Table Of Contents
- Table of contents
- Important safety instructions
- Introduction
- Positioning your projector
- Connection
- Operation
- Starting up the projector
- Using the menus
- Utilizing the password function
- Switching input signal
- Adjusting the projected image
- Magnifying and searching for details
- Selecting the aspect ratio
- Optimizing the image
- Setting the presentation timer
- Hiding the image
- Locking control keys
- Freezing the image
- Utilizing FAQ function
- Operating in a high altitude environment
- Adjusting the sound
- Personalizing the projector menu display
- Shutting down the projector
- Menu operation
- Maintenance
- Troubleshooting
- Specifications
- Warranty and Copyright information
- Regulation statements
Connection18
Connecting a monitor
If you want to view your presentation close-up on a monitor as well as on the screen, you
can connect the D-SUB OUT signal output socket on the projector to an external monitor
with a VGA cable following the instructions below:
To connect the projector to a monitor:
1. Connect the projector to a computer as described in "Connecting a computer" on page
17.
2. Take a suitable VGA cable (only one supplied) and connect one end of the cable to the
D-Sub input socket of the video monitor.
Or if your monitor is equipped with a DVI input socket, take a VGA to DVI-A cable
and connect the DVI end of the cable to the DVI input socket of the video monitor.
3. Connect the other end of the cable to the D-SUB OUT socket on the projector.
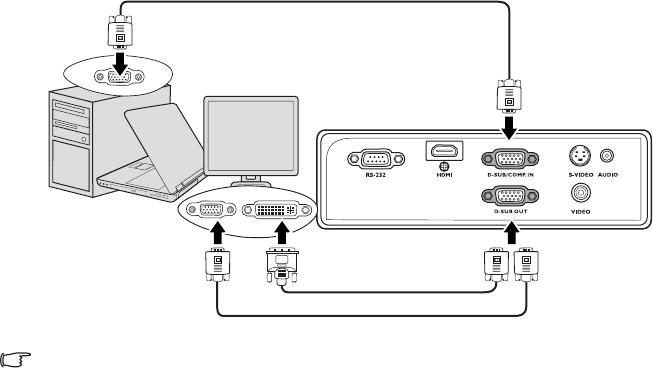
The final connection path should be like that shown in the following diagram:
• The D-Sub output only works when an appropriate D-Sub input is made to the projector.
• If you wish to use this connection method when the projector is in standby mode, make sure the
Standby D-Sub Output function is turned on in the SYSTEM SETUP: Advanced menu. See
"Standby D-Sub Output" on page 46 for details.
Notebook or
desktop computer
VGA cable
VGA cable
VGA to DVI cable