
Operation Manual
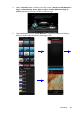
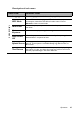
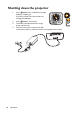
Table Of Contents
- Table of contents
- Important safety instructions
- Introduction
- Positioning your projector
- Connection
- Connecting the power
- Connecting a computer
- Connecting Video source devices
- Connecting an HDMI source device
- Connecting a Component Video source device
- Connecting a Composite Video source device
- Connecting an iPhone/iPod device
- Connecting an external speaker
- Connecting a wireless dongle
- Connecting to an external memory device
- Playing sound through the projector
- Operation
- Starting up the projector
- Switching input signal
- Adjusting the projected image
- Hiding the image
- Securing the projector
- Selecting the aspect ratio
- Optimizing the image
- Operating in a high altitude environment
- Adjusting the sound
- Firmware upgrade
- Personalizing the projector menu display
- Playing files with iPhone/iPod
- Using iPhone/iPod pop-up menus
- Displaying images with PC and Video source devices
- Using PC/ Video pop-up menus
- Displaying files with internal memory, USB Drive and SD card
- Using USB Streaming
- Using Wireless Streaming
- Settings menu
- Shutting down the projector
- Maintenance
- Troubleshooting
- Specifications
- Warranty and Copyright information

Operation
82
Settings menu
This menu is to set the projector’s operating environment.
Using the menu
1. To open the OSD menu, press / to select Settings and press OK to enter.
2. When the OSD is displayed, press / to select any item in the main menu.
3. After selecting the desired main menu item, press OK or to enter the feature
settings submenu.
4. Press / to select the desired item and press OK to open the pop-up menu.
5. Select the settings using / / / and press OK to confirm. Once the setting is
selected, the OSD menu returns to the selected item.
6. Press or to return to the main menu.
You may press to go back to home screen directly.
7. Press again to go back to home screen.