
Operation Manual
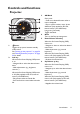
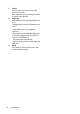

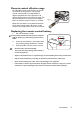

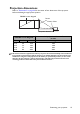
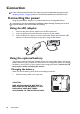
Table Of Contents
- Table of contents
- Important safety instructions
- Introduction
- Positioning your projector
- Connection
- Connecting the power
- Connecting a computer
- Connecting Video source devices
- Connecting an HDMI source device
- Connecting a Component Video source device
- Connecting a Composite Video source device
- Connecting an iPhone/iPod device
- Connecting an external speaker
- Connecting a wireless dongle
- Connecting to an external memory device
- Playing sound through the projector
- Operation
- Starting up the projector
- Switching input signal
- Adjusting the projected image
- Hiding the image
- Securing the projector
- Selecting the aspect ratio
- Optimizing the image
- Operating in a high altitude environment
- Adjusting the sound
- Firmware upgrade
- Personalizing the projector menu display
- Playing files with iPhone/iPod
- Using iPhone/iPod pop-up menus
- Displaying images with PC and Video source devices
- Using PC/ Video pop-up menus
- Displaying files with internal memory, USB Drive and SD card
- Using USB Streaming
- Using Wireless Streaming
- Settings menu
- Shutting down the projector
- Maintenance
- Troubleshooting
- Specifications
- Warranty and Copyright information
Introduction
12
7. Home
Directly returns to home screen from
lower level of OSD.
Exits application/pop-up message and back
to home screen directly.
8. Right key
When the On-Screen Display (OSD) menu
is on:
- Navigate right to select the desired menu
items.
- Make adjustments. (e.g. brightness,
contrast...)
When the On-Screen Display (OSD) menu
is off: (Only applied to SD card, internal
memory and USB Drive)
- Play next video and audio file.
- Press and hold to fast forward video and
audio file.
9. Back
Goes back to previous OSD menu, exits
and saves menu settings.