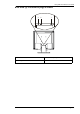
BenQ FP767 LCD Color Monitor 17.0" (43.
BenQ LCD Color Monitor User's Guide Copyright Disclaimer Safety Instructions Copyright © 2002 by BENQ Corporation. All rights reserved. No part of this publication may be reproduced, transmitted, transcribed, stored in a retrieval system or translated into any language or computer language, in any form or by any means, electronic, mechanical, magnetic, optical, chemical, manual or otherwise, without the prior written permission of BENQ Corporation.
BenQ LCD Color Monitor User's Guide ==== ======Table ========of == ===Contents Unpacking .......................................................................................................................................... 3 Views of the Monitor ..................................................................................................................... 4 Front View ................................................................................................................................
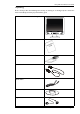
BenQ LCD Color Monitor User's Guide Unpacking Please check you have the following items. If they are missing or are damaged, please contact the dealer immediately at which you purchased the good.
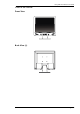
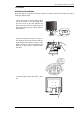
BenQ LCD Color Monitor User's Guide Views of the Monitor Front View Back View (1) English 4
BenQ LCD Color Monitor User's Guide Back View (2): Locations of plugs & sockets 3 1. D-sub connector 2 1 2. Power AC input jack 3.
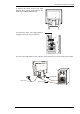
BenQ LCD Color Monitor User's Guide Installation Hardware Installation Make sure that the computer and monitor’s power are both turned off. Please follow the steps to install your LCD monitor. 1. Place the arrow on the base and the front side of the monitor in corresponding direction. The arrow on the base indicates the front of the base. Place the monitor into the base until it locks into place. There will be a clicking sound. 2. Place the monitor face down on a soft surface.
BenQ LCD Color Monitor User's Guide 4. Connect the power cord to your LCD monitor. Then connect audio cable to the Audio Input of BenQ LCD Monitor. 5. Connect the other end of signal cable to the signal connector of your computer. 6. Connect the audio cable to your computer. Connect the power cord to an AC power socket.
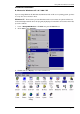
BenQ LCD Color Monitor User's Guide Software Installation A. Microsoft® Windows® 95 / 98 / 2000 / XP If you are using Windows 95, Windows 98, Windows 2000 or XP as an operating system, you have to set up the correct monitor driver. Windows 95 The first time you start Windows with a new monitor, the system will detect it and automatically install the driver for plug and play displays. To install the current driver from CD, proceed as follows: 1. 2. Insert “BenQ LCD Monitor” CD-ROM into your CD-ROM Driver.
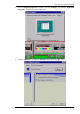
BenQ LCD Color Monitor User's Guide 4. From the “Display Properties” window, select the “Settings” tab. Click the “Advanced Properties" button in the bottom right corner. 5. Select the “Monitor” tab. Click the “Change” button in the top right corner.
BenQ LCD Color Monitor User's Guide 6. Now click the “Have Disk” button in the bottom right corner. When the next window appears, select the “Browse” button. 7. 8. Insert the supplied CD into your computer. Select the CD-drive from the drop-down menu. In the field above the drive selection, change to the "Drivers” folder. The current driver files are located there. Press “OK” and the window closes.
BenQ LCD Color Monitor User's Guide 9. By pressing “OK” again in the next window you will be given a list of compatible devices. Select “FP767” from the list and press “OK” again. 10. You are now back at “Advanced Display Properties”. Close this window by clicking “OK “ and confirm the following messages with “Yes”. Click “OK” and “Yes” again. The installation is now completed. You can close “Display Properties”.
BenQ LCD Color Monitor User's Guide Windows 98 To manually install or update the driver, perform the following steps: 1. 1. Open the control panel and double-click "Display" icon. . 2. From the "Display Properties" window, select the "Settings" tab. Click the "Advanced..." button in the bottom right corner. .
BenQ LCD Color Monitor User's Guide 3. Select the "Monitor" tab. Click the "Change" button in the top right corner. 4. The "Update Device Driver Wizard" opens. Confirm by clicking "Next".
BenQ LCD Color Monitor User's Guide 5. Select "Display a list of all drivers in a specific location, so you can select the driver you want." and press "Next". 6. Now click the “Have Disk” button in the bottom right corner. Another window appears, select the “Browse” button.
BenQ LCD Color Monitor User's Guide 7. Insert the supplied CD into your computer. Select the CD-drive from the drop-down menu. . 8. By pressing “OK” again in the next window you will be given a list of compatible devices. Select “FP767” from the list and press “Next” again. 9. An “Insert Disk” dialogue box appears. Click “OK”, and then click “Skip File.
BenQ LCD Color Monitor User's Guide 10. Close “Update Device Driver Wizard” by clicking “Finish” to complete the installation.
BenQ LCD Color Monitor User's Guide Windows 2000 The first time you start Windows with a new monitor, the system will detect it and automatically start the “Add New Hardware Wizard”. Carry out the instructions beginning at step 4. 1. 2. Insert “BenQ LCD Monitor” CD-ROM into your CD-ROM Driver. Click “Start” then “Settings”. 3. Open the Control Panel and double click on the “Display” icon.
BenQ LCD Color Monitor User's Guide 4. From the “Display Properties” window, select the “Settings” tab. Click the “Advanced...” button in the bottom right corner. 5. Select the “Monitor” tab, then click “Properties” .
BenQ LCD Color Monitor User's Guide 6. Select the “Driver” tab, then click “Update Driver.” 7. The “Upgrade Device Driver Wizard” will pop up. Then Click “Next”.
BenQ LCD Color Monitor User's Guide 8. Select “Display a list of the known drivers for this device so that I can choose a specific driver” then click “Next”. 9. In the next window, click “Have Disk”, then “Install From Disk” window will pop up, click “Browse", the “Located File” will pop up.
BenQ LCD Color Monitor User's Guide 10. Scroll down and select your CD ROM Driver, then click “Next.” .
BenQ LCD Color Monitor User's Guide 11. In the list of CD-ROM, select “Drivers” folder then click “Open” twice, then click “OK”, Select the your LCD Mode (FP767) from the list in the next window then click “Next” twice. 12. The new drivers are now installed to your computer.
BenQ LCD Color Monitor User's Guide Windows ME To manually install or update the driver, perform the following steps: 1. 2. 3. Click “Start”, “Settings”, “Control Panel” and then double-click “Display”. In the Display Properties window, click the “Settings” tab and click “Advanced...”. Click the “Monitor” tab and then click “Change”. 4. “Update Device Driver Wizard” dialogue box appears. Choose “Specify the location of the driver (Advanced)” and then click “Next”.
BenQ LCD Color Monitor User's Guide 5. Choose “Display a list of all the drivers in a specific location, so you can select the driver you want” then click “Next”. 6. Choose “Monitors” from the list, then click “Next”.
BenQ LCD Color Monitor User's Guide 7. Choose “Display a list of all the drivers in a specific location, so you can select the driver you want.”. 8. Click “Have disk” and then click “Browse...”. 9. Insert “BenQ LCD Monitor’s CD” into your CD-ROM and type d:\ (change the driver letter to match your CD-ROM driver if it is not drive D). Enter “Drivers” folder to select the model from the list left. Click “OK”.
BenQ LCD Color Monitor User's Guide 10. Click “OK” on the “Install From Disk” window. The dialogue box “Update Device Driver Wizard” appears. Choose the model from the list, then click “Next”.
BenQ LCD Color Monitor User's Guide 11. Click “Next”. 12. Click “Finish” to complete the installation.
BenQ LCD Color Monitor User's Guide Windows XP. 1. Right click mouse on the desktop and choose “Properties”. Select “Settings” tab and click the “Advanced” button. A small window will pop up. Select the “Monitor” tab in the new window and then click “Properties”. 2.
BenQ LCD Color Monitor User's Guide 3. The “Hardware Update Wizard” will pop up. Then click “Next”. 4. Select “Don’t search. I will choose the driver to install” and then click “Next”.
BenQ LCD Color Monitor User's Guide 5. In the next window, click “Have Disk…”, and then “Install From Disk” window will pop up. Click “Browse”. The “Locate File” window will pop up.
BenQ LCD Color Monitor User's Guide 6. Select your driver and then click “Next”. 7. The new drivers are now installed to your computer. Click “Finish” to exit installation.
BenQ LCD Color Monitor User's Guide B. Choosing the best resolution Due to the technology of an LC display, it always provides a fixed resolution. For the FP767 this is a resolution of 1280x1024. This is called the "Native Resolution", which also represents the maximal resolution. Lower resolutions are displayed on a full screen through an interpolation circuit. Flaws do occur with the interpolated resolution compared to the native resolution.
BenQ LCD Color Monitor User's Guide 4. In the subsequent windows, press "OK" and "Yes." 5. You can now close "Display Properties.
BenQ LCD Color Monitor User's Guide C. Refresh Rate Selection There is no need to choose the highest possible refresh rate on a LC display. It is not technically possible for an LC display to flicker. Even at a refresh rate of 60 Hz you will get an absolutely flickerfree image. More important is that you make sure that you use one of the factory modes. In contrast to a modern CRT monitor, which is a multiscan monitor, the LC display is a multi-frequency monitor.
BenQ LCD Color Monitor User's Guide 3. Select the "Adapter” tab. The refresh rate selection field is located in the center at the bottom of the window. 4. 5. Choose a refresh rate from the table with the factory modes, which can be found in the user’s guide, and select this in the settings field. In the subsequent windows press "Change", "OK" and "Yes". 6. You can now close "Display Properties".
BenQ LCD Color Monitor User's Guide D. Picture Optimization The easiest way to obtain an optimal display is to use the ikey function. Press the “ikey” on the control panel and the monitor will adjust automatically. If you are still not satisfied with the result, you can still adjust the image manually. 1. 2. 3. 4. Run the test program auto.exe from CD-ROM, this is the best way to observe possible changes. You can also use any other image, such as the desktop of your operating system.
BenQ LCD Color Monitor User's Guide Adjusting the Monitor A Look at the Control Panel Exit Enter There are 6 keys for user’s control including “iKey”, “Exit”, “Enter”, “<” and “>” key and a power swith.The following descriptions are the introduction of these keys & switch. 1. “Power”: Turn the power on or off. 2. “iKey” : Adjust vertical position, phase, horizontal position and pixel clock automatically. 3. “Exit” key: Back to main menus, save menu or exist OSD menu without saving. 4.
BenQ LCD Color Monitor User's Guide Main Menu Mode Control Functions Available in Main Menu Brightness 1. 2. 3. 4. Press Enter key to enter brightness adjustment submenu. Press Left/Right key to reduce/increase the value of brightness. Press Exit key to leave the submenu. The scale of adjustment is 0-100. Contrast 1. 2. 3. 4. Press Enter key to enter contrast adjustment submenu. Press Left/Right key to reduce/increase the value of contrast. Press Exit key to leave the submenu.
BenQ LCD Color Monitor User's Guide Vertical Position This function can adjust the vertical position of display on screen. 1. 2. 3. 4. Press Enter key to enter vertical position adjustment submenu. Press Left/Right key to reduce/increase the value vertical position. Press Exit key to leave the submenu. The scale of adjustment is 0-100. Phase 1. 2. 3. 4. Press Enter key to enter phase adjustment submenu. Press Left/Right key to reduce/increase the value of phase. Press Exit key to leave the submenu.
BenQ LCD Color Monitor User's Guide Color This function lets user to choice color temperature from C1 to C3, or to set up user mode. C1: 9300K, C2: 6500K, C3: 5800K 1. 2. 3. 4. Press Enter key to enter color select submenu. Press Left/Right key to select within C1 to C3 and user define. Select user define and press Enter key to enter user define submenu. Select one setting within C1 to C3 and press exit to set the color temperature. This function can adjust the setting of each color. 1. 2. 3. 4. 5.
BenQ LCD Color Monitor User's Guide Recall This function lets user to recover the ex-factory settings. 1. 2. 3. 4. Press Enter key to enter recall submenu. Press Left/Right key to select Yes/No. Press Enter to confirm the selection. Press Exit key to cancel the selection and leave the submenu. OSD Time This function lets user to set the OSD menu lasting time. 1. 2. 3. 4. Press Enter key to enter OSD time adjustment submenu. Press Left/Right key to reduce/increase the lasting time.
BenQ LCD Color Monitor User's Guide OSD Position This function lets user to adjust the horizontal and vertical position of OSD. 1. 2. 3. 4. 5. Press Enter key to enter OSD position adjustment submenu. Press Left/Right key and Enter key to select H.P. (horizontal position) or V.P. (vertical position). Press Left/Right key to adjust the position. Press Exit key to leave the submenu. The scale of adjustment is 0-100. Information This function shows display information. 1. 2.
BenQ LCD Color Monitor User's Guide Troubleshooting Frequently Asked Questions (FAQ) ✓ The image is blurred: ☞ Read the chapter, "Installation/Adjustment" and select the correct resolution, refresh rate and make adjustments based on these instructions. ☞ Do you use a VGA extension cable? Remove the extension cable for the test. Is the image now in focus? If not, optimize the image working on the description in the chapter, "Installation/Adjustment.
BenQ LCD Color Monitor User's Guide ☞ Is the prompt on the display not illuminated at all? Check the power supply mains socket, the external power supply and the mains switch. ✓ The image is distorted, flashes or flickers: ☞ Read the chapter, "Installation/Adjustment"and then select the correct resolution, refresh rate and make adjustments based on these instructions.
BenQ LCD Color Monitor User's Guide Supported operating modes Incoming display mode(Input timing) Multi-scan operation Resolution Horizontal Frequency (KHz) Vertical Frequency (Hz) Dot Clock Frequency (MHz) Remark Actual display resolution 640x350 31.47(P) 70.08(N) 25.17 DOS 1280X943 *720x400 31.47(N) 70.08(P) 28.32 DOS 640x480 31.47(N) 60.00(N) 25.18 DOS 640x480 35.00(N) 67.00(N) 30.24 Macintosh 640x480 37.86(N) 72.80(N) 31.5 VESA 640x480 37.50(N) 75.00(N) 31.
BenQ LCD Color Monitor User's Guide Specifications Model FP767 767Display type 17.0" ,active, TFT Viewable diagonal 43.2 cm Native (maximum) resolution 1,280X1,024 Colors 16.7 million Contrast / Brightness 500:1 (Max. 600:1) / 260 cd/m² (Max. 290 cd/m²) Response time 16 ms Viewing angle (left/right, up/down) 70/70, 70/70 (CR=10) 80/80, 80/80 (CR=5) Line frequency 31.47 - 83 kHzMulti- frequency monitor Image frequency 56.25 - 75.