
Operation Manual


Working with computer and AV system 23
English
Startup Image
Sets the welcome image when the camera is powering on.
To select a startup image:
1. Press > > > Startup.
2. Press or and then select one of the following options:
• Off: No welcome image when you turn on the camera.
• Default: uses the original startup image.
• My photos: uses or to move to the image you want to use as the startup image.
3. Press .
Working with computer and AV system
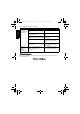
Bundled software
The camera offers the following programs on a CD.
To install these programs, see the information supplied with the CD.
Connecting the camera to a computer
You can connect the camera to a PC or notebook to transfer,
view, print, or edit files.
To connect the camera to a computer:
1. Connect the end of the smaller plug of the 2-in-1 USB and
AV cable to the camera.
2. Connect the other end of the 2-in-1 USB and AV cable to an
available USB port on your computer.
3. Turn on the camera.
4. A Removable Disk icon appears in My Computer. Click this icon to access the files in your
camera.
ArcSoft
PhotoImpression 5
Combines photo editing with creative enhancement and sharing tools
that maximize your digital media experience.
ArcSoft
VideoImpression 2
Creates multimedia presentations by combining photos and video
clips with audio, text and scene transitions.
• When connecting the camera to a computer, it is necessary to install a battery into the
camera.
• When connecting the camera to a computer, please use the original accessory of the
USB cable to avoid possible system conflicts and damage to the camera.
E1020_UM - EN.book Page 23 Tuesday, November 18, 2008 6:32 PM