
Operation Manual


Operating the camera 9
English
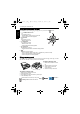
Movie Record mode settings
Flash mode
The flash offers an additional light source (usually used in a low-light environment). You
can capture an image using one of the following flash modes.
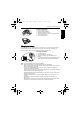
To select a flash mode:
1. Go to the Capture mode.
2. Keep pressing to toggle among different flash modes and select a desired option.
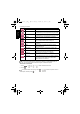
Icon Description
Video Format: VGA (640 x 480), QVGA (320 x 240)
White balance: Auto, Daylight, Tungsten, Fluorescent, and Cloudy. See
"White Balance" on page 15 for more details.
Effect: Vivid, Normal, B&W, Sepia. See "Effect" on page 16 for more
details.
• See "Setting Sharpness, Saturation and Contrast" on page 17 for information on
saturation and contrast.
• Sharpness is not available in the Movie Record mode.
• Flash is automatically turned off in the Movie Record mode.
• The Movie Record mode records both sound and video. The recording time is
continuous, but recording will stop once the memory card space is full.
• The zoom function is still available while a video is recording. See "Specifications" on
page 27 for details.
Icon Mode Description
Auto flash The flash fires automatically based on the photographic
conditions.
Force off The flash does not fire. Select this mode when flash
photography is prohibited, or when the distance to the
subject is beyond the effective range of the flash.
Force on The flash always fires regardless of the surrounding
lighting conditions. Select this mode when capturing
images with high contrast (backlighting) and deep
shadows.
Auto anti red-eye Reduces the red-eye phenomenon when capturing
natural-looking images of people and animals in low-light
conditions. Be sure to ask the subject to look at the
camera lens or get as close to the camera as possible.
The flash fires automatically based on the photographic
conditions.
E1020_UM - EN.book Page 9 Tuesday, November 18, 2008 6:32 PM