DC C700 Digital Camera User Manual Welcome Downloaded from ManualsCamera.
Copyright Copyright 2007 by BenQ Corporation. All rights reserved. No part of this publication may be reproduced, transmitted, transcribed, stored in a retrieval system or translated into any language or computer language, in any form or by any means, electronic, mechanical, magnetic, optical, chemical, manual or otherwise, without the prior written permission of this company.
1. Touring Your Camera.............................................................. 1 1.1 Checking the package contents .............................................. 1 1.2 Camera components ........................................................... 1 1.2.1 Front view ............................................................. 1.2.2 Rear view .............................................................. 1 2 1.2.3 LED indicators........................................................ 2 2.
English 14 17 3.4 Setup mode...................................................................... 18 3.4.1 Date/Time ........................................................... 18 3.4.2 Format ............................................................... 18 3.4.3 Beeper................................................................ 18 3.4.4 Language ............................................................ 18 3.4.5 Auto Off ............................................................. 18 3.4.
Touring Your Camera 1.1 English 1 Checking the package contents Carefully unpack your kit box and ensure that you have the following items. 1. 2. 3. 4. 5. 6. 7. 8. 9. User Manual Digital camera USB cable Lithium-ion rechargeable battery Hand strap Software CD-ROM Pouch AC power adapter Battery charger If any of the items are missing or appear to be damaged, contact your dealer. Save the packaging in case you need to ship your camera for service. 1.2 Camera components 1.2.1 Front view 2 3 1. 2. 3.
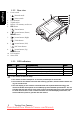
1.2.2 Rear view English 1. Focus switch [ 2. 3. 4. 5. [ ] Macro mode USB terminal Tripod socket Battery / SD memory card cover OK button [ 6. 7. 8. 11 ] Normal mode 9 8 10 7 6 5 K O ] Zoom button [ ] Arrow button (Down) MODE button [ ] Arrow button (Right) [ ] Flash button [ ] Arrow button (Left) [ ] Self-timer button 4 1 2 3 9. [ ] Arrow button (Up) MENU button 10. LCD monitor 11. Status LED 1.2.
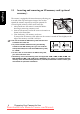
Preparing Your Camera for Use 2.1 English 2 Installing the battery We highly recommend that you use only the specified rechargeable lithium-ion battery for your camera. Make sure that the power of the camera is off before inserting or removing the battery. To insert the battery: 1. Slide the battery / SD memory card cover. 2. Insert the battery in the correct orientation shown.
2.3 English Inserting and removing an SD memory card (optional accessory) The camera is equipped with internal memory, allowing you to record video clips and capture images. You can also expand the memory capacity by using an optional SD (Secure Digital) memory card to store more files. 1. Always make sure the camera is turned off before inserting or removing a memory card. 2. Insert an SD memory card in the correct orientation as shown in the illustration. 3. Close the battery / SD memory card cover.
Using the Camera 3.1 English 3 Capture mode 3.1.1 Getting started with capturing images 1. Slide the lens cover to turn on the camera. The camera sounds one beep when it is initiated. 2. Compose your image in the LCD monitor. 3. Press the shutter button. • To turn off the camera, slide the lens cover back. • The LCD monitor darkens in strong sunlight or bright light. ON OFF This is not a malfunction.
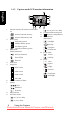
3.1.2 Capture mode LCD monitor information English A 0.3 01/07/2007 08:03 1. Internal memory/SD memory card indicator [ INT ] Status of internal memory [ ] Status of SD memory card Battery level [ ] Full battery power [ ] Medium battery power [ ] Low battery power [ ] Virtually no battery power Flash mode [Blank]Automatic 2. 3. [ [ ] Red-eye reduction ] Forced flash [ ] Flash off Focus area Image Size 4. 5. [ ] 3072 x 2304 [ ] 2560 x 1920 [ ] 1600 x 1200 [ 10+2s ]10+2 sec. delay 10.
3.1.3 Choosing the screen language 2. Press the [ English Follow the steps below to set the OSD (On-Screen Display) language. 1. Press the MENU button. ] button to select [Setup] menu. 3. Press the [ ] / [ ] button to select [Language], and then press the OK button. 4. Select a language that you prefer by using the [ [ ] button. 5. Press the OK button after all fields are set. ]/ • The language setting will be retained even if the camera is turned off. 3.1.
• To disable Macro photography, slide the focus switch back to the Normal mode English [ ]. • When using the Macro mode, the icon [ ] will be displayed on the LCD monitor. • In the Macro mode, the flash mode is automatically set to Flash off [ ]. • After a macro shot is taken, DO NOT FORGET to reset the lens to the Normal mode. 3.1.7 Using the flash The flash is designed to function automatically when lighting conditions warrant the use of flash.
The self-timer can be used in situations such as group shots. When using this option, you should either mount the camera on a tripod (recommended) or rest it on a flat surface. The self-timer duration can be set as 2 , 10 seconds or 10+2 seconds. After the self-timer is set, the shutter automatically releases after 2 , 10 seconds or 10+2 seconds. 1. Secure the camera to a tripod or place it on a stable surface. 2. Slide the lens cover to turn on the camera. 3.
English 5. To exit from the menu mode, use the [ OK button. • You may also press the [ ]/[ ] button to select [Exit] and press the ] button to quit directly. 3.1.10.1.1 Size This sets the size of the image that will be photographed. [3072 x 2304]: 3072 x 2304 pixels [2560 x 1920]: 2560 x 1920 pixels [1600 x 1200]: 1600 x 1200 pixels [640 x 480]: 640 x 480 pixels 3.1.10.1.2 Quality This sets the quality (compression rate) at which the image is taken.
Spot lighted subjects, particularly against dark backgrounds Imaging of printed text (white characters on black paper) Scenes with low reflectivity, such as shots of green or dark foliage 3.1.10.1.5 White Balance When the brightness of the light changes, our eyes adapt the difference so that the white object remains white. For digital still cameras, they can also see the white object as white by averaging the light around the subject.
3.1.10.2.2 Preview English Set to display a photographed image on the LCD monitor immediately after you have taken the shot. [ON]: Display quick view [OFF]: Do not display quick view 3.1.10.2.3 Date Print If you set the imprint function, your image will be displayed with the date information on it. [ON]: Date will be shown on the captured image. [OFF]: Date will not be shown on the captured image. 3.1.10.2.4 Exit Select this option if you wish to exit from the menu mode. 3.
3.2.3.1 English 3.2.3 Video mode menu settings Video Output menu This menu is for the basic settings to be used when recording video clips. 3.2.3.1.1 EV For details, refer to 3.1.10.1.4 “EV” on page 10. 3.2.3.1.2 White Balance For details, refer to 3.1.10.1.5 “White Balance” on page 11. 3.2.3.1.3 Exit Select this option if you wish to exit from the menu mode. 3.3 Playback mode Playback mode [ ] allows you to view, magnify your images or play video clips back.
3.3.3 Playback mode - the basics English 3.3.3.1 Viewing images To play back still images one at a time: 1. Press twice the MODE button to enter Playback mode [ ]. The last recorded image appears on the LCD monitor. 2. View and select your captured images by using the [ [ ] button. • • To view the previous image, press the [ To view the next image, press the [ ]/ ] button. 2 of 10 ] button. • To exit Playback mode [ ], press the MODE button.
Thumbnail display This function allows you to view nine thumbnail images on the LCD monitor simultaneously so that you can quickly scan for a particular image. 1. Press twice the MODE button to enter Playback mode [ ]. 2. Press the MENU button. 3 1 2 3. Use the [ ] / [ ] button to select [Thumbnails]. 4. Press the OK button and nine thumbnail images appear on the LCD monitor. (Assuming there are nine or more recorded images in the memory.) 5.
3.3.3.5 Protecting files English This feature allows you to prevent captured images from being accidentally erased. 1. Press twice the MODE button to enter Playback mode [ ]. Then press the MENU button to enter [Playback] menu. 2. Select [Protect] by using the [ ] / [ ] button, and press the OK button. 3. You can select to protect single image or all images at a time by using the [ ] / [ ] button, and press the OK button. • [Single]: Protect one image at a time • [All]: Protect all images once 4.
3.3.4.1 Playback menu By using the [Playback] menu you can create an on-camera slideshow or configure DPOF settings. You may also delete or protect one or all stored images. 1. Press twice the MODE button to enter Playback mode [ ]. Then press the MENU button to enter [Playback] menu. Scroll through the options by using the [ ]/ [ ] button. 2. To enter the sub-menu, press the OK button. After settings are set, press the OK button to confirm. 3.3.4.1.1 Delete For details, refer to 3.3.3.
3.4 Setup mode English You can select according to your preference for the camera settings in [Setup] of [Capture] / [Video] / [Playback] menu. Navigate the options you wish to configure by using the [ [ ]/ ] button. 3.4.1 Date/Time This sets the date and the time. For details, refer to 3.1.4 “Setting the date and time” on page 7. 3.4.2 Format This utility formats the internal memory (or memory card) and erases all stored images and data. 3.4.
PC Dependent Features 4.1 English 4 Bundled software The camera is supplied with the following software. To install the software, refer to the information supplied with respective CDs. Ulead Photo Express Ulead® Photo Express™ 5.0 SE is a complete photo project software for digital images. Acquire photos effortlessly from digital cameras or scanners. Edit and enhance images using easy-to-use editing tools and cool photographic filters and effects.
4.2.1 Step 1: Connecting the camera to your computer English 1. Turn on the camera. 2. Connect one end of the USB cable to an available USB port on your computer. 3. Connect the other end of the USB cable to the USB terminal on the camera. 4. The [USB] mode screen is displayed. Use the [ ]/ [ ] button to select [Disk Drive], then press the OK button. 5. Look for a new “Removable Disk” icon appearing in the “My Computer” window.
English 2. When the welcome screen appears, click “Install USB Driver”. Follow the on-screen instructions to complete the installation. 3. After the driver installation is completed, restart your computer. 4.3.2 Step 2: Connecting the camera to your computer 1. Turn on the camera. 2. Connect one end of the USB cable to an available USB port on your computer. 3. Connect the other end of the USB cable to the USB terminal on the camera. 4. The [USB] mode screen is displayed. Printer 5.
English printer will read the embedded information on the memory card and print your images as specified. To Set DPOF: 1. Press twice the MODE button to enter Playback mode [ ]. Then press the MENU button to enter the [Playback] menu. 2. Select [DPOF] by using the [ then press the OK button. ]/[ ] button, and 3. Select [Single] or [All] with the [ ] / [ ] button, and then press the OK button. The DPOF sub-menu options: [Single]: Sets DPOF for each individual image. [All]: Sets DPOF for all images once.
1. Use the [ ] / [ ] button to select [PictBridge], then press the OK button. 2. To select the image you want to print, choose [Images] from the PictBridge menu and press the OK button. * If you want to print one image, choose [Single] and press the OK button. Then choose the image by using English Settings and printing image Printer the [ ] / [ ] button and press the OK button to confirm. * If you want to print all images, choose [All] and press the OK button to confirm.
English 5 Troubleshooting Refer to the symptoms and solutions listed below before shipping your camera for service. If the problem persists, contact your local reseller or service center. Symptom Cause The camera cannot be There is no battery or the battery is powered up. not inserted correctly. The battery power is draining quickly. Solution Insert the battery correctly. The battery has no power. Recharge the battery or use the AC power adapter. The AC power adapter is not connected correctly.
Cause Solution I cannot download images. The free space on the hard disk of your computer is insufficient. Ensure that the hard disk has enough space for running Windows and that the drive for loading image files has free space equal to or greater than the memory card in the camera. There is no power being supplied to Turn on the power. Use the AC the camera. power adapter or recharge the battery if necessary. The camera does not shoot even when pressing the shutter button.
English 6 Specifications and Service Information Item Description Image Sensor 1/2.5”, 7 Mega Pixels CCD Image Resolution 3072 x 2304 (7M), 2560 x 1920 (5M), 1600 x 1200 (2M), 640 x 480 (VGA) Lens Fixed Focus: Focus Length: F=7.1 mm (Equivalent to 42 mm) Aperture: F3.2 Zoom Digital: 4X LCD 2.4” TFT LCD, 115K Pixels Dimensions / Weight 89.5 x 55 x 21 mm (25 mm with lens cover) / Approx.