
Digital Projector Commuter Series User's Manual Model CP120c

Using the projector 25
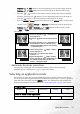
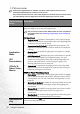
Keystone /3Left button to correct keystoning at the top of the image. Press the
Keystone /4Right button to correct keystoning at the bottom of the image.
• Press the / buttons on the remote control to display the status bar labelled
Keystone, then press the button to correct keystoning at the top of the image or
press the button to correct keystoning at the bottom of the image.
• Press the MENU/6Down button on the projector or the MENU button on the remote
control. Go to
Picture --> Keystone and adjust the values by pressing the
Keystone /3Left or Keystone /4Right buttons on the projector, or the
3Left or 4Right buttons on the remote control.
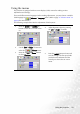
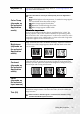
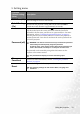
For example,
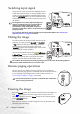
Automatic keystone correction
Your projector is equipped with Autokeystone function that corrects keystoning
automatically. See "Autokeystone (On)" on page 30 for details.
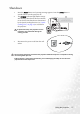
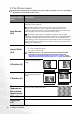
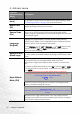
Selecting an application mode
The projector is preset with several predefined application modes so that you can choose
one to suit your operating environment and input source picture type. To select a operation
mode that suits your need, press the MODE button. The application modes available for
different types of signals are shown below. See "Application Mode" on page 30 for details.
0
Keystone
-6
Keystone
0
Keystone
+6
Keystone
1. Press the Keystone /3Left button on
the projector or
2. Press the button on the remote control
or
3. Press the Keystone /3Left button on
the projector, or the3Left button on the
remote control when you are in the Picture
--> Keystone menu.
1. Press the Keystone /Right 4 button
on the projector or
2. Press the button on the remote
control or
3. Press the Keystone /Right
4button
on the projector, or the 4 Right button on
the remote control when you are in the
Picture --> Keystone menu.
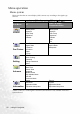
PC Signal Input
Brightest Presentation
(default)
sRGB/Photo Gaming Video
YPbPr / S-Video / Video Signal Input
Movie (default) Cinema Photo Gaming