Joybee 110 (DA-110) Digital Audio Player User Manual Welcome
Copyright Copyright 2003 by BENQ Corporation. All rights reserved. No part of this publication may be reproduced, transmitted, transcribed, stored in a retrieval system or translated into any language or computer language, in any form or by any means, electronic, mechanical, magnetic, optical, chemical, manual or otherwise, without the prior written permission of this company.
Table of Contents 1 Copyright 2 Disclaimer 2 Table of Contents i Your Joybee 110 Digital Audio Player 1 Introduction 1 Package Contents 1 System Requirements 1 Touring the Joybee 110 Digital Audio Player 2 Buttons/Ports/Parts 2 The LCD Display 4 Getting the Joybee 110 Digital Audio Player Ready 5 Connecting Earphone 5 Charging the Battery 5 Installing Joybee 110 Digital Audio Player Software 6 Installing the USB Driver 7 Installing in Windows ME/Windows 2000/Windows XP 7 Installing in Windows 98 7 Using t
Format flash memory 10 Setting Joybee 110 Auto-Off time 10 Setting display backlight duration 10 Setting display contrast 10 Setting language 10 SW Upgrade 10 Buttons Lock 10 Using the Joybee 110 Digital Audio Player as a USB Flash Drive 11 Using QMusic 12 The Main Screen 12 Adding songs to the Joybee 110 Digital Audio Player using QMusic 14 Notes, FAQ and Troubleshooting Tips 21 Notes 21 FAQ and Troubleshooting Tips 22 ii Table of Contents
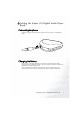
Your Joybee 110 Digital Audio Player Introduction Congratulations on your purchase of the Joybee 110 Digital Audio Player! The Joybee 110 Digital Audio Player not only provides multiple functions for high quality music playback and voice recording but consumes lower power to extend your good time. It supports MP3 and WMA music formats, multi-language display and 7 pre-set EQ modes.
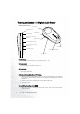
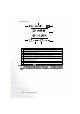
Touring the Joybee 110 Digital Audio Player Buttons/Ports/Parts (1) LCD Dipslay (2) Earphone Jack (3) Necklet Hole (8) Volume Up (4) Scroll Up/ Next/ Fast Forward (9) Volume Down (5) Play/ Pause/ Stop/ Power (6) Scroll Down/ Previous/ Fasr Rewind (12)USB port (7) Menu/ Function (11) In-Built Microphone (10) A-B/ Hold (1) LCD display Displays the status of the player. (e.g. song title, play time..., etc.) (2) Earphone jack For connecting your earphone to Joybee 110.
When the player is in standby mode, press this button to start playing. In a menu, press this button to enter or confirm your selection. When player power is on or in standby mode, hold down this button for 2 seconds to turn it off. When playing or recording, press this button to pause. The icon will appear on the display. When paused, press this button to resume playing or recording. The icon will disappear. While playing or recording, long press this button to stop and put the player into standby mode.
The LCD Display (2) (3) (1) (4) (5) (8) (6) (7) No. (1) (2) (3) (4) (5) Description Indicates that the player is in playback mode. Indicates that the player is in MUSIC/VOICE/RECORD/ SETTING mode. Shows the status of battery power. Shows the artist and the audio file being played. Appearance of this icon indicates that the player is in repeat mode. Appearance of this icon indicates type of repeat mode. (ALL repeat/ AB section (6) repeat/single audio tract repeat) (7) Shows current playspeed.
Getting the Joybee 110 Digital Audio Player Ready Connecting Earphone As illustrated, plug the earphone into the earphone jack on the Joybee 110 Digital Audio Player. Charging the Battery Connect Joybee 110 Digital Audio Player to PC USB port with the USB cable. When charging completes, “Charging Completes” will show on display. It’ll take about three hours the first time you charge your Joybee 110. A fully charged battery is capable of providing up to 10 hours of playback time.
When the battery is completely drained after your first time use, extend the charging time for 2 more hours than usual. Installing Joybee 110 Digital Audio Player Software Insert the Joybee 110 Digital Audio Player CD-ROM into your CD-ROM drive. A few seconds later, a software installation menu will appear on your computer screen. Click on an item to select it and start installing the selected software. If the autorun function of your CD-ROM drive is disabled, look for the file "Setup.
Click this item to install Windows Media Player 9. Click this Install Windows Media item if you do not have such program in your computer, or Player 9 what you have is an older version. QMusic does not support TVF format at this version. Please TVF plug-in for Microsoft install this TVF plug-in program, then play your TVF file with Media Player Microsoft Media Player 9. Click this item to install the Acrobat Reader software for Install Acrobat Reader viewing the on-line manual files.
Using the Joybee 110 Digital Audio Player Turning the Player On and Off In power off status, long press the button to turn on the player. In playback and recording modes, long press the enter standby mode. In standby status, press and hold the button to stop playing or recording and button for about 2 seconds to turn off the player. Playing Music 1. Press the button to turn on the player and the main menu will appear on the display automatically. 2.
Ran. Rep: Random repeat. Joybee 110 will repeatedly play random audio files. Random: Random play. Joybee 110 will play audio files randomly. All: Repeat all. Joybee 110 Digital Audio Player plays all audio files repeatedly. The icon will appear on the display in this mode. One: Repeat current one. Joybee 110 will play current audio repeatedly. The icon will appear on the display in this mode. Normal: No repeat. The Joybee 110 Digital Audio Player will just play all audio files once in this mode.
Recording setups Quality: Here you have four choices to decide the recording quality: High, Mid, Low, and TVF (TVF, mono audio format. Taking up less memory space to extend recording time.). VOR: If you set VOR on, Joybee 110 Digital Audio Player only starts recording when there’s sound signal detected by in-built microphone. Or Joybee 110 Digital Audio Player will start recording whenever you start recording. Exit: Scroll here and press to go back to Setting menu.
Long press functions. /A-B to disable the button functions, and long press again to release button Using the Joybee 110 Digital Audio Player as a USB Flash Drive In combination with the USB cable, you can use the Joybee 110 Digital Audio Player as a handy USB flash drive. 1. Connect the Joybee 110 Digital Audio Player using the USB cable. The player will be recognized automatically and there will be a new removable disk icon in the My Computer window. 2.
Using QMusic QMusic is a software program that helps you to easily organize your music collection. You can use it to play music CDs and MP3 files, convert CD music into .mp3 format, create playlists for playing music, burn music CDs and compile your own music album. When used with the Joybee 110 Digital Audio Player, you can easily convert CD music into .mp3 format and transfer it to the player. You can also let QMusic update the music files in the player automatically.
Music Playing Buttons Feature Buttons You can use these buttons to play music. The detailed information of playlist will appear here, including total number of songs and total playback time. When playing music, you can use these buttons to change play mode. Right Panel Shows songs in the selected playlist/media on the left panel. Status Bar Search Window System Buttons Display You search for a song by entering its name and pressing the magnifier icon. Used to control the QMusic window.
Adding songs to the Joybee 110 Digital Audio Player using QMusic After QMusic is opened, connect the Joybee 110 Digital Audio Player to your computer using the USB cable. The icon it. will appear on the left panel of QMusic and default folders MP3 and MicIn will appear below Adding CD music to the Joybee 110 Digital Audio Player 1. Insert a music CD into the CD-ROM drive of your computer.
2. Check the checkboxes next to the songs you want to transfer to the player. When finished, click the button. QMusic will convert selected songs into MP3 format. 3. When QMusic has done with the conversion process, it will place all converted files in a New Album playlist on the left panel. Click on it and you will see a list of converted files on the right panel.
4. Click and drag the selected songs on the right panel to the MP3 directory under the icon. Before dragging the selected songs to the Joybee 110 Digital Audio Player, make sure that there is enough memory space. Adding new songs to the Joybee 110 Digital Audio Player from your computer 1. Click the My Joybee playlist on the left panel.
2. Click the button and then browse for and select the .mp3, .wav or .wma song files you want to transfer to the Joybee 110 Digital Audio Player. Click Open and the selected song files will be added to the My Joybee playlist. 3. Click the icon on the left panel. 4. Click the button. The songs you just added will be transferred by QMusic to the player.
player. If you want to keep these songs, please back them up in your computer before continuing. Before dragging the selected songs to the Joybee 110 Digital Audio Player, make sure that there is enough memory space. Let QMusic automatically update the songs upon getting connected to the Joybee 110 Digital Audio Player 1. Click on My Joybee under Music Library on the left panel.
2. Click the button and then browse for and select the .mp3, .wav or .wma song files you want to transfer to the Joybee 110 Digital Audio Player. Click Open and the selected song files will be added to the My Joybee playlist. 3. Click the button.
4. Click the Joybee tab on the dialogue box that appears. 5. On the Joybee tab, click to select Automatically launch QMusic when Joybee inserted and Automatically transfer MP3 files to Joybee when inserted, then click the button. 6. Disconnect the Joybee 110 Digital Audio Player and then reconnect it to the computer. QMusic will automatically update the songs in the player with the songs in the My Joybee playlist.
Notes, FAQ and Troubleshooting Tips Notes Do not put too many files under each directory or in the root directory to prevent the system from slowing down. If a large number of files must be put in the player, organize the files into different directories. Do not store data in the player to its full memory capacity. Allow at least 0.5 MB for the system to manage memory to prevent the system from slowing down or improper data storage status.
FAQ and Troubleshooting Tips Why can’t I play certain songs in WMA format using my Joybee 110 Digital Audio Player? Some WMA songs currently available from the Internet are copyright protected. This kind of protection method prevents unauthorized person from playing protected song files. These songs can only be played using a Window Media Player program that has been authorized.
Why do different songs have different sound volumes? Because the parameter of the volume level when recording each song may not be the same, the volume level of different songs are different. The file size is smaller than the free memory available in my player, but I still cannot transfer it to my player The Joybee 110 Digital Audio Player allocates memory in cluster of 16KB or 32KB.