
Quick Start Guide


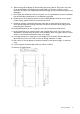


Table Of Contents
- Copyright
- Disclaimer
- Display installation guide
- Video wall installation guide
- Special signage installation guide
- Mounting installation
- Digital Signage Bar-Type Series
- Troubleshooting
- Preventing afterimage burn-in
- Appendix 1: Installation Checklists
- Appendix 2: Basic Troubleshooting Checklists for IFP & IL series
- Appendix 3: Basic Troubleshooting Checklists for Video Wall
- Appendix 4: Basic Troubleshooting Checklists for X-Sign

54 Mounting installation
U-Mount
To o l s n e e d e d
Pre-action: secure bracket to a wall
1. Please identify the type of the target wall: Concrete or wood.
2. Please drill holes of diameter 10mm and depth 55mm in concrete walls with power drill at
locations you have marked earlier. Please select screws according to the type of the wall.
The expansion screws (B) that come with your product are designed for cement walls only.
Screws for wood wall installation shall feature adequate strength and be validated by
qualified technicians.
3. Hammer the expansion screws (M8xL60) (B) in the holes drilled earlier and tighten their
nuts.
Power drill Drill head Hammer
Phillips screwdriver Pencil
• DO NOT secure the bracket to any decorative post or plasterboard for wood walls.
• Before drill the hole, use Pipe TOP and BOT to mark hole location on center line by pencil.