
Instructions


32
12/ 2019
BENNING MM 10 –PV/ MM 10 –1
to switch back to normal operating mode.
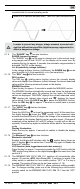
without HFR (without low-pass lter) with HFR (with low-pass lter)
In order to prevent any danger, always measure a present volt-
age first without low-pass filter (high-frequency suppression) to
detect a dangerous voltage.
5.1.9 The “RANGE” key
5
has two functions:
RANGE (measuring range):
The “RANGE” key
5
can be used to change over to the manual meas-
uring ranges and to hide “AUTO” on the display at the same time. By
pressing the key for approx. 2 seconds, the automatic range selection is
activated (“AUTO” on the display).
Lo/ Hi (sensitivity voltage indicator):
In the voltage indicator function (VoltSense), the RANGE key
5
can be
used to switch to Hi (high sensitivity) or Lo (low sensitivity).
5.1.10 The “REL” key
6
has two functions:
REL function:
The REL key
6
(relative-value function) stores the currently display
value and displays the dierence (oset) between the stored measured
value and the following measured values on the display.
MIN/MAX function:
Press the key for approx. 2 seconds to enable the MIN/MAX function.
The MIN/MAX function automatically records and stores the highest and
the lowest measured value. By pressing the key again, the following
values are displayed: “MAX/MIN” displays the current measured value,
“
MAX
” displays the highest value stored and “
MIN
” displays the lowest
value stored. Press the HOLD key
7
to pause the MIN/MAX function.
Press the REL key
6
for approx. 2 seconds to switch back to normal
operating mode.
5.1.11 The “HOLD” key
7
has two functions:
HOLD function:
Press the HOLD key
7
to store the measuring result. At the same time,
the digital display
1
shows the “
HOLD
” symbol. If the measured value
exceeds the stored value by 50 digits, the change of the measured value
is indicated by the display ashing and an acoustic signal. (Changes of
measured values between AC and DC voltage / current will not be rec-
ognized). Press the key again to switch the device back to the measuring
mode.
Display illumination:
Press the key for approx. 2 seconds to enable or disable the display
illumination.
5.1.12 The Bluetooth
®
key
8
has two functions:
Bluetooth
®
interface:
Enables the Bluetooth® interface with the „ “ symbol being shown on
the LC display
1
at the same time. Press the key again to disable the
Bluetooth
®
interface.
LOG function (data logger/measured value memory):
Press the key for approx. 2 seconds to enable the LOG function with the
“
LOG
” symbol being shown on the digital display
1
at the same time. See
section 5.2
5.1.13 The BENNING MM 10-PV/ MM 10-1 switches o automatically after
approx. 20 minutes (APO, Auto-Power-O). It switches on again if the
rotary switch is switched on from switch position “OFF” or if a key is
pressed. The switch-o time can be set (see section 5.1.14).
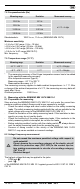
5.1.14 The BENNING MM 10-PV/ MM 10-1 oers individual setting possibili-
ties. To change a setting, press one of the following keys and simulta-
neously switch on the BENNING MM 10-PV/ MM 10-1 from the “OFF”
position.