
Owner's Manual


6
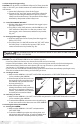
7.0 Trigger:
The Trigger of your AIRBOW is a 2 stage unit. The purpose of a 2 stage trigger is to provide feedback to the
shooter when pulling the trigger up to the point just before the trigger breaks and the AIRBOW res. This
provides for a very controlled release of the trigger. The trigger is factory set for safe and reliable use. No
maintenance should be required. The trigger is designed to have approximate pull weights of 2 lbs on the 1st
stage and break at 3 lbs on the 2nd stage.
1. While pointed at a SAFE DIRECTION, pull the trigger slowly until a solid resistance is felt. This is the
1st stage of the trigger and is sometimes referred to as “take-up”’. This is also the point at which the
2nd stage begins. Any additional pull of the trigger beyond this point WILL re the AIRBOW.
2. While holding the trigger against the 2nd stage, adjust your aim on the target and, when ready to
re, pull the trigger the nal portion through the 2nd stage. This WILL re the AIRBOW.
NOTE: While holding the trigger against the 2nd stage, if the shooter decides NOT to re the AIRBOW, the
trigger can be released and the trigger will reset to the original position.
8.0 Optics Package:
Your AIRBOW comes equipped with a CENTERPOINT 6x40 mm scope, 2pc extra-high Picatinny rings and a 20
MOA Picatinny base rail.
The 20 MOA Picatinny base rail has a built-in 20 MOA cant. When mounted to the Picatinny rail of the AIRBOW,
it will provide an additional 20 MOA of upward elevation adjustment
DIRECT VIEWING OF THE SUN CAN CAUSE PERMANENT EYE DAMAGE. DO NOT ATTEMPT TO VIEW THE
SUN THROUGH THIS RIFLESCOPE OR ANY OTHER OPTICAL INSTRUMENT.
ALWAYS FOLLOW ALL RULES OF FIREARM AND GUN SAFETY WHEN USING THIS SCOPE.
8.1 Eyepiece Focusing:
Without using your scope, look at a distant object for several seconds. Then look through the scope at a plain
white background or the blue sky and quickly look away. Turn the fast-focus eyepiece clockwise or counter
clockwise to adjust to your eyes. The reticle should be sharp and clear before your eye can refocus. After you
have made your adjustment, with a quick glance, re-check your image.
8.2 Mounting your sight package:
ALWAYS ENSURE YOUR AIRBOW IS “ON SAFE”, UNLOADED AND UNCOCKED BEFORE FITTING THE SCOPE.
ALWAYS PRACTICE SAFE HANDLING OF FIREARMS AND GUNS AT ALL TIMES.
1. Lay the 20 MOA base rail on a at surface with raised bridge in the front
2. Remove the top portion of the scope rings, by removing the 4 hex screws from each one.
3. Attach ring bases to your 20 MOA base rail; tighten ring mounting screws using the hex wrench.
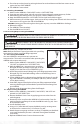
4. Set the scope onto the ring bases with
the objective bell towards the front of the
raised sight bridge (Fig. 7).
5. Replace the ring top to each mount and
loosely install the screws so the scope can
still move freely.
6. Attach the 20 MOA base rail (with scope
and rings mounted) to your AIRBOW, with
the objective bell of the scope towards the
front of the AIRBOW.
7. Put the AIRBOW to your shoulder, in your
natural shooting position, and adjust the scope’s eye relief by moving the scope back and forth in
the rings, until you achieve a full eld of view.
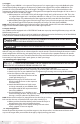
NOTE: Make sure the scope is far enough forward so that the top cocking
bolt can clear the rear, ocular bell of the scope when raised (Fig. 8).
8. When you have found the ideal eye relief, rotate the scope so
the reticle crosshairs are level with the horizon.
9. Tighten the ring top screws evenly; making sure each side is
evenly gapped. Do not over tighten.
8.3 Adjusting Parallax:
Rotate the parallax adjustment ring until the target is in the sharpest focus and the center of the crosshair
stays on the target while you examine the image by slightly moving your head.
Fig. 7
Fig. 8