
Owner's Manual


5
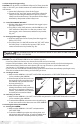
3. Close the top cocking lever by pushing the lever forward and down until the lever comes to rest
against the top of the AIRBOW.
4. The AIRBOW is now cocked.
5.2 Uncocking the AIRBOW:
1.
Make sure the AIRBOW is "UNLOADED" and in a SAFE DIRECTION.
2. Grasp the top cocking lever and pull upward and rearward until it cannot move any further.
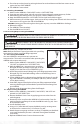
3. While holding the cocking lever in this position, take the AIRBOW “OFF SAFE”.
4. Keep the AIRBOW pointed in a SAFE DIRECTION and pull and hold the trigger.
5. While continuing to hold the trigger, slowly move the top cocking lever forward and down until the
lever comes to rest against the side of the AIRBOW.
CAUTION: Letting go of the cocking lever during this step may cause the AIRBOW to discharge.
6. Release the trigger.
7. The AIRBOW is now Uncocked.
8. Put the AIRBOW on “ON SAFE”.
6.0 Pressurizing/Depressurizing the AIRBOW:
EXPLOSION DANGER. USE ONLY COMPRESSED AIR IN THIS AIRBOW. USE OF OTHER GASSES, INCLUDING
OXYGEN, CAN CAUSE A FIRE OR EXPLOSION MAY RESULT IN SERIOUS INJURY OR DEATH.
DO NOT DISCONNECT THE FILL HOSE BEFORE FIRST BLEEDING THE AIR. FAILURE TO FOLLOW THESE
INSTRUCTIONS MAY CAUSE THE HOSE TO WHIP FROM PRESSURE BUILT UP IN THE FILL HOSE AND MAY RESULT IN SERIOUS
INJURY OR DEATH.
NOTE: Use clean, dry, compressed air ONLY.
NOTE: Refer to the owner’s manual provided with your lling
equipment for proper use of the lling equipment
6.1 Pressurizing the AIRBOW:
Your new AIRBOW is unique because it operates on
compressed air. This owner’s manual describes operating the
AIRBOW with compressed air only.
1. Make sure the AIRBOW is “UNLOADED”, “UNCOCKED”,
“ON SAFE” and pointed in a SAFE DIRECTION.
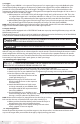
2. With the AIRBOW in a secure position, attach the
ll nipple (located separately in package) to the ll
nipple port on the front of your AIRBOW (Fig. 5A).
3. Attach the quick disconnect tting from your lling equipment to the
ll nipple (Fig. 5B). Note: Before lling, make sure both ttings have a
secure connection.
4. Fill the AIRBOW slowly to eliminate heat buildup and chance for overll-
ing. If the AIRBOW is overlled, past 3000 psi (207 bar), refer to Section
6.2 for depressurizing.
5. Once lled, depressurize the hose from your lling equipment before
removing the ll nipple (still attached to quick disconnect tting) from
your AIRBOW.
6. Remove quick disconnect tting from the ll nipple.
6.2 Depressurizing the AIRBOW:
1.
Make sure the AIRBOW is “UNLOADED”, “UNCOCKED”, “ON SAFE” and
pointed in a SAFE DIRECTION.
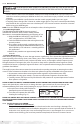
2. Remove the Bleed Screw Cover by applying pressure to the front tab
with a ngertip.
3. Rotate the Cover away from the AIRBOW. Lift and move the Cover for-
ward to allow the retaining tab to exit the AIRBOW stock (Fig. 6A). Stow
for replacement later.
4. Locate the bleed screw.
5. Using a 3/32” Allen Wrench, loosen the bleed screw by rotating count-
er-clockwise for a maximum of 1 ½ full turns (Fig. 6B).
6. Watch the pressure gauge and listen as the air is expelled past the bleed
screw until the desired pressure is achieved. Then tighten the bleed
screw rmly.
7. Replace the Bleed Screw Cover in the reverse order.
Fig. 5A
Fig. 5B
Fig. 6B
Fig. 6A