
User's Manual


98
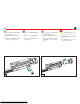
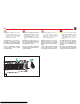
3) Infilare la spina-fissaggio-guardia
(fig. 56).
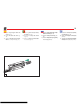
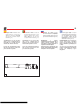
4) Inserire il serbatoio nell'affusto,
mantenendo allineato il pulsante
di montaggio/smontaggio con la
relativa sede sull'affusto stesso
(fig. 57) fino a portare il pulsante
nella corretta posizione (fig. 58).
AVVERTENZA: l’operazione descritta
al punto “4” non è eseguibile ove il
modulo tubo serbatoio sia inamovibi-
le (vedi avvertenza al punto “15”).
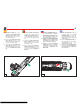
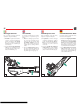
5) Inserire la molla-rinculo-otturato-
re nella sua sede (fig. 59).
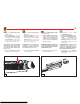
3) Insert the trigger guard pin (fig.
56).
4) Insert the magazine tube into the
gun carriage, keeping the assem-
bly/disassembly button aligned
with its lodging on the gun carria-
ge (fig. 57), until the button is
brought into the correct position
(fig. 58).
WARNING: the operation described
at point “4” cannot be carried out
where the magazine tube module is
fixed (see warning at point “15”).
5) Insert the inertia spring into its
lodging (fig. 59).
3) Enfiler la cheville de fixage de la
garde (fig. 56).
4) Introduire le magasin dans l’affût,
en maintenant le poussoir de mon-
tage/démontage aligné sur son
logement situé sur l’affût (fig. 57)
jusqu’à ce que le poussoir atteigne
sa position correcte (fig. 58).
REMARQUE: l’opération décrite au
point “4” ne peut pas être effectuée
quand le module tube magasin est ina-
movible (voir remarque au point
“15”).
5) Introduire le ressort de recul obtu-
rateur dans son emplacement (fig.
59).
3) Den Abzugsbügelbefestigungsstift
einsetzen (Abb. 56).
4) Das Magazin in das Waffengestell
einsetzen, dabei den Knopf Monta-
ge/Zerlegung in Übereinstimmung
mit dem jeweiligen Sitz auf dem
Waffengestell selbst halten (Abb.
57) bis der Knopf in korrekter Posi-
tion ist (Abb. 58).
HINWEIS: Der unter Punkt “4” be-
schriebene Vorgang kann in den Fällen,
wo das Magazinrohr nicht entfernbar
ist, nicht ausgeführt werden (man sehe
den Hinweis unter Punkt “15”).
5) Die Pufferfeder in ihren Sitz einfü-
gen (Abb. 59).
56 57