
Use and Care Manual


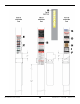
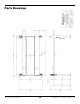
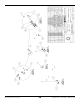
Table Of Contents
- HD-9 Manual
- Table of Contents
- Introduction
- Shipping Information
- Safety Considerations
- Components
- Specifications
- Frequently Asked Questions
- Installation Checklist
- Installation
- Being Safe
- Using Tools
- Planning for Electrical Work
- Selecting a Location
- Checking Clearances
- Deciding the Lift Orientation
- Creating Chalk Line Guides
- Unloading and Unpacking
- Moving the Posts into Position
- Installing the Crosstubes
- About Safety Locks
- Installing the Ladders and Top Cap
- Raising the Crosstubes
- Securing the Ladders
- Removing the Sheaves
- Installing the Runways
- Installing the First End of the Flex Tube
- Routing the Lifting Cables
- Working with Compression Fittings and Tubing
- Installing the Air Lines
- Installing the Return Line
- Hydraulic Fluid Contamination
- About Thread Sealants
- Installing the Hydraulic Hose
- Installing the Power Unit
- Filling the Hydraulic Fluid Reservoir
- Installing the Second End of the Flex Tube
- Installing the Pushbutton Air Valve
- Connecting the Return Line
- Connecting the Hydraulic Hose
- Contacting the Electrician
- Connecting the Power Source
- Installing a Power Disconnect Switch
- Installing a Thermal Disconnect Switch
- About Effective Embedment
- Anchoring the Posts
- Final Leveling
- Installing Accessories
- Lubricating the Lift
- Bleeding the Hydraulic Cylinder
- Test the Lift
- Final Checklist
- Outdoor usage
- Operation
- Maintenance
- Troubleshooting
- Wiring Diagrams
- Labels
- Parts Drawings
- Automotive Lift Institute (ALI) Store

HD-9 Series Four-Post Lifts 71 P/N 5900123 — Rev. M1 — March 2020
To lower a Vehicle:
1. Double check that no one except the Lift operator is within 10 feet of the Lift.
2. Press the Up button to disengage the Runways from the Safety Locks.
After a second or two, release the Up button.
3. Press and hold the Pushbutton Air Valve
and
the Lowering Handle at the same time.
4. Lower the Runways all the way to the ground, then release the Pushbutton Air Valve and the
Lowering Handle.
5. Remove the Tire Chocks, then carefully drive the Vehicle off the Runways.
Maintenance
⚠ DANGER Before performing any maintenance on your Lift, make sure it is
completely
disconnected from power. If your organization has Lockout/Tagout policies, make
sure to implement those procedures after connecting to the power source.
To maintain your Lift:
• Daily: Keep the Lift clean. Wipe up any spills, clean any dirt.
• Daily: Make a visual inspection of all moving parts and check for damage or excessive wear.
Replace any damaged or worn parts before using the Lift.
⚠ DANGER Do not use the Lift if the Cables are damaged or extremely worn. If a Vehicle is
raised when you notice the damage or extreme wear, very carefully lower the
Vehicle to the ground. When the Lift is on the ground, take it out of service,
disconnect it from power, and make arrangements to fix the damage or wear.
• Daily: Make sure all Safety Locks are in good operating condition. Do not use your Lift if the
Safety Locks are damaged or excessively worn.
• Monthly: Check all labels on the Lift. Replace them if they are illegible or missing.
• Monthly: Grease all lubrication points on the Lift.
• Monthly: Check Hydraulic Fluid levels. Refill if low.
• Monthly: Lubricate the wire rope (Cables). Use a wire-rope lubricant such as 90-WT gear oil or
ALMASOL® Wire Rope Lubricant.
• Monthly: Check cable connections, bolts, and pins for proper mounting and torque.
• Every two months: Check all Anchor Bolts to make sure they are properly torqued. If they are
loose, tighten them.
• As needed. Take the Lift out of service and then replace the Lifting Cables if there are signs of
damage or extreme wear.
⚠ WARNING Do not operate your Lift if you find maintenance issues; instead, take the Lift out of
service, then contact your dealer, visit bendpak.com/support, email
support@bendpak.com, or call (800) 253-2363.