
Use and Care Manual
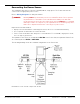
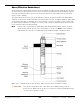


Table Of Contents
- HD-9 Manual
- Table of Contents
- Introduction
- Shipping Information
- Safety Considerations
- Components
- Specifications
- Frequently Asked Questions
- Installation Checklist
- Installation
- Being Safe
- Using Tools
- Planning for Electrical Work
- Selecting a Location
- Checking Clearances
- Deciding the Lift Orientation
- Creating Chalk Line Guides
- Unloading and Unpacking
- Moving the Posts into Position
- Installing the Crosstubes
- About Safety Locks
- Installing the Ladders and Top Cap
- Raising the Crosstubes
- Securing the Ladders
- Removing the Sheaves
- Installing the Runways
- Installing the First End of the Flex Tube
- Routing the Lifting Cables
- Working with Compression Fittings and Tubing
- Installing the Air Lines
- Installing the Return Line
- Hydraulic Fluid Contamination
- About Thread Sealants
- Installing the Hydraulic Hose
- Installing the Power Unit
- Filling the Hydraulic Fluid Reservoir
- Installing the Second End of the Flex Tube
- Installing the Pushbutton Air Valve
- Connecting the Return Line
- Connecting the Hydraulic Hose
- Contacting the Electrician
- Connecting the Power Source
- Installing a Power Disconnect Switch
- Installing a Thermal Disconnect Switch
- About Effective Embedment
- Anchoring the Posts
- Final Leveling
- Installing Accessories
- Lubricating the Lift
- Bleeding the Hydraulic Cylinder
- Test the Lift
- Final Checklist
- Outdoor usage
- Operation
- Maintenance
- Troubleshooting
- Wiring Diagrams
- Labels
- Parts Drawings
- Automotive Lift Institute (ALI) Store

HD-9 Series Four-Post Lifts 58 P/N 5900123 — Rev. M1 — March 2020
Anchoring the Posts
Install one Anchor Bolt in each corner of each Base Plate, 4 per Post, 16 Anchor Bolts total.
Concrete specifications are:
• Depth: 4.25 inches
• PSI: 3,000 PSI, minimum
• Cured: 28 days, minimum
Anchor Bolt specifications are:
• Length: 4.75 inches
• Diameter: .75 inch
• Anchor torque: 85-95 pound feet (do not Torque less than 80 or more than 105)
⚠ WARNING Your Concrete and Anchor Bolts
must
meet these specifications. Only install your
Lift on a Concrete surface. If you install a Lift on asphalt or any other surface, or
your Concrete or Anchor Bolts do not meet these specifications, it could lead to
product damage, Vehicle damage, personal injury, or even death.
BendPak Lifts are supplied with installation instructions and concrete fasteners meeting the criteria as
prescribed by the American National Standard “Automotive Lifts – Safety Requirements for
Construction, Testing, and Validation” ANSI/ALI ALCTV.
⚠ WARNING Use only the Anchor Bolts that came with your Lift. If you use components from a
different source, you void your warranty and compromise the safety of everyone
who installs or operates the Lift.
Lift buyers are responsible for conforming to all regional, structural, and seismic anchoring
requirements specified by any other agencies and/or codes, such as the Uniform Building Code and/or
International Building Code.
To anchor the Posts:
1. Locate the hardware you will need: four Anchor Bolts, four Nuts, and four washers
per Post
.
2. Using the Base Plates as guides, drill the holes —one hole in each corner of the Base Plate, so
four holes total per Base Plate.
Important: Do
not
drill all the way through the concrete; if you punch completely through the
slab, you compromise the holding strength of the Anchor Bolt once put into place.
Go in straight, in the center of the hole; do not let the drill wobble.
Use a carbide bit (conforming to ANSI B212.15).