
Use and Care Manual

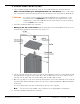

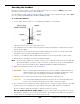
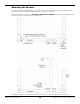

Table Of Contents
- HD-9 Manual
- Table of Contents
- Introduction
- Shipping Information
- Safety Considerations
- Components
- Specifications
- Frequently Asked Questions
- Installation Checklist
- Installation
- Being Safe
- Using Tools
- Planning for Electrical Work
- Selecting a Location
- Checking Clearances
- Deciding the Lift Orientation
- Creating Chalk Line Guides
- Unloading and Unpacking
- Moving the Posts into Position
- Installing the Crosstubes
- About Safety Locks
- Installing the Ladders and Top Cap
- Raising the Crosstubes
- Securing the Ladders
- Removing the Sheaves
- Installing the Runways
- Installing the First End of the Flex Tube
- Routing the Lifting Cables
- Working with Compression Fittings and Tubing
- Installing the Air Lines
- Installing the Return Line
- Hydraulic Fluid Contamination
- About Thread Sealants
- Installing the Hydraulic Hose
- Installing the Power Unit
- Filling the Hydraulic Fluid Reservoir
- Installing the Second End of the Flex Tube
- Installing the Pushbutton Air Valve
- Connecting the Return Line
- Connecting the Hydraulic Hose
- Contacting the Electrician
- Connecting the Power Source
- Installing a Power Disconnect Switch
- Installing a Thermal Disconnect Switch
- About Effective Embedment
- Anchoring the Posts
- Final Leveling
- Installing Accessories
- Lubricating the Lift
- Bleeding the Hydraulic Cylinder
- Test the Lift
- Final Checklist
- Outdoor usage
- Operation
- Maintenance
- Troubleshooting
- Wiring Diagrams
- Labels
- Parts Drawings
- Automotive Lift Institute (ALI) Store

HD-9 Series Four-Post Lifts 27 P/N 5900123 — Rev. M1 — March 2020
Securing the Ladders
Because it is much easier to secure the Ladders at the bottom of each Post
after
the Crosstubes
have been raised, that procedure is described here.
The following procedure assumes that the Ladders are in place and secured at the top. If this is
not
the case, return to Installing the Ladders and Top Cap.
To secure the Ladders:
1. Locate a Bolt, Washer, Spacer, second Washer, and Nut for each Ladder.
Side view of the Post. Not all components shown.
2. Put a Washer next to the Bolt head, then insert the Bolt just through the elongated hole near the
bottom of the Ladder.
3. Put the Spacer into position between the Ladder and the back of the Post, then push the Bolt
through the Spacer and then through the back of the Post.
4. Take the second Washer and the Nut and install them on the end of the Bolt; secure the Nut.
5. Repeat Steps 1 through 5 for the three remaining Ladders.
Note: Do not securely tighten the Top Nut at the top of the Top Cap at this point. The Top Nut and
the Stop Nut will be used later to make sure the Lift is level. They can be securely tightened
after you do the final leveling; refer to Final Leveling for additional information.
6. Make sure the Primary Safety Locks are engaged.
⚠ WARNING Do not continue with the installation until you have visually confirmed that all four
Primary Safety Locks are engaged. If they are not engaged, the Runways could
move or fall, possibly causing injury (even death) or product damage.
7. Stand up each Post. Have at least two people work together to stand up a Post.
⚠ CAUTION Use caution when walking around the Posts; they are not anchored down at this
point, so it is possible to knock them over, which could cause injury.
8. Use a Transit Level to estimate the Shim requirements: use a target to find the difference in height
between the Posts. The difference is the estimated amount of Shim thickness you will need.
Do not use Shims and/or Anchor Bolts to shim more than 1/2 an inch.
Do not anchor the Posts at this point
. You may or may not be anchoring the Posts at all,
depending on whether or not you are going to use the optional Caster Kit. But even if you plan to
anchor the Posts eventually, do not anchor the Post now.