
Use and Care Manual
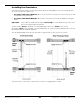
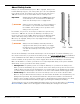

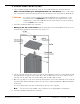

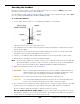
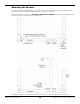

Table Of Contents
- HD-9 Manual
- Table of Contents
- Introduction
- Shipping Information
- Safety Considerations
- Components
- Specifications
- Frequently Asked Questions
- Installation Checklist
- Installation
- Being Safe
- Using Tools
- Planning for Electrical Work
- Selecting a Location
- Checking Clearances
- Deciding the Lift Orientation
- Creating Chalk Line Guides
- Unloading and Unpacking
- Moving the Posts into Position
- Installing the Crosstubes
- About Safety Locks
- Installing the Ladders and Top Cap
- Raising the Crosstubes
- Securing the Ladders
- Removing the Sheaves
- Installing the Runways
- Installing the First End of the Flex Tube
- Routing the Lifting Cables
- Working with Compression Fittings and Tubing
- Installing the Air Lines
- Installing the Return Line
- Hydraulic Fluid Contamination
- About Thread Sealants
- Installing the Hydraulic Hose
- Installing the Power Unit
- Filling the Hydraulic Fluid Reservoir
- Installing the Second End of the Flex Tube
- Installing the Pushbutton Air Valve
- Connecting the Return Line
- Connecting the Hydraulic Hose
- Contacting the Electrician
- Connecting the Power Source
- Installing a Power Disconnect Switch
- Installing a Thermal Disconnect Switch
- About Effective Embedment
- Anchoring the Posts
- Final Leveling
- Installing Accessories
- Lubricating the Lift
- Bleeding the Hydraulic Cylinder
- Test the Lift
- Final Checklist
- Outdoor usage
- Operation
- Maintenance
- Troubleshooting
- Wiring Diagrams
- Labels
- Parts Drawings
- Automotive Lift Institute (ALI) Store

HD-9 Series Four-Post Lifts 23 P/N 5900123 — Rev. M1 — March 2020
About Safety Locks
Safety Locks hold the Runways in place. Once engaged, Safety Locks
hold the Runways in place, even if the pow
er goes out or the Hydraulic
Hos
es break or leak. The Safety Locks are spaced every four inches /
100 mm
. Each Post has its own Ladder and set of Safety Locks.
Important
: Simply raising the Runways does
not
engage them
on the Safety Locks. You must back the Runways
down onto the Safety Locks to engage them.
⚠
WARNING Safety Locks are dependent on correct installation of
the ‘Ladders’. Pay careful attention when installing
the Ladders, thus ensuring correct operation of the
Safety Locks on your Lift.
The L
adders, one per Post, are steel pieces with holes spaced every
four
inches / 100 mm. As you raise the Runways, the Safety Locks
move into the holes in the Ladder. When you move the Runways back
down a little after passing a Safety Lock, the Safety Lock engages.
On
ce they are engaged, Safety Locks stay engaged until you are ready
to lower
the Runways.
⚠
WARNING Always leave the Runways either fully lowered or
engaged on their Safety Locks. When you engage
the Safety Locks at a desired height, check to make
sure that all four Safety Locks (one per Post) are
engaged.
So how do the Runways come down if the Safety Locks are engaged? To lower the Runways, you
raise them a few inches (to get them off the Safety Locks), then
press and hold down
the pushbutton
on the Pushbutton Air Valve. While you hold down the pushbutton, the Safety Locks are moved away
from the Ladders; in this position, they cannot engage, which allows the Runways to be lowered.
Out of an abundance of caution, your Lift has a second, independent Safety Lock system called the
Slack Safety. In total, your Lift has two Safety systems:
• Safety Locks: The primary system to hold up the Runways on your Lift are the Safety Locks.
When you move the Runways up, you can hear clicks as the Safety Locks go into the holes in the
Ladders. When you want to keep the Runways at a certain height, you go slightly past the height
you want, then back the Safety Locks down in to the holes in the Ladders, which engages them.
• Slack Safety: The Slack Safeties are next to the Safety Locks on the ends of the Crosstube
Gussets. They are different from the Safety Locks in that when the Cables are taut (which they are
during normal operation), they hold the Slack Safeties away from the Ladder so that the Slack
Safeties cannot engage. However, if a Cable were to break (which very rarely happens), the Slack
Safety for the broken Cable immediately engages, preventing the Runways from falling.
The Slack Safety Locks get engaged during installation when you raise the Crosstubes (see Raising
the Crosstubes). Make sure to disengage them immediately after raising the Crosstubes.